Coconut Mocha Coffee Recipe: Indulge in a Tropical Delight

Coffee lovers are always on the lookout for new flavors. Coconut mocha coffee is a delicious twist on your usual cup.

This recipe combines the rich taste of chocolate with the tropical hint of coconut, creating a drink that’s both sweet and refreshing. Imagine starting your day with a coffee that feels like a mini-vacation. This coconut mocha coffee recipe is perfect for anyone who wants to add a bit of excitement to their morning routine.

Whether you are a seasoned barista or a coffee newbie, this simple recipe is easy to follow. It’s a great way to impress guests or treat yourself to something special. Ready to elevate your coffee game? Let’s dive into the world of coconut mocha coffee!

Coconut Mocha Coffee Recipe: Indulge in a Tropical Delight

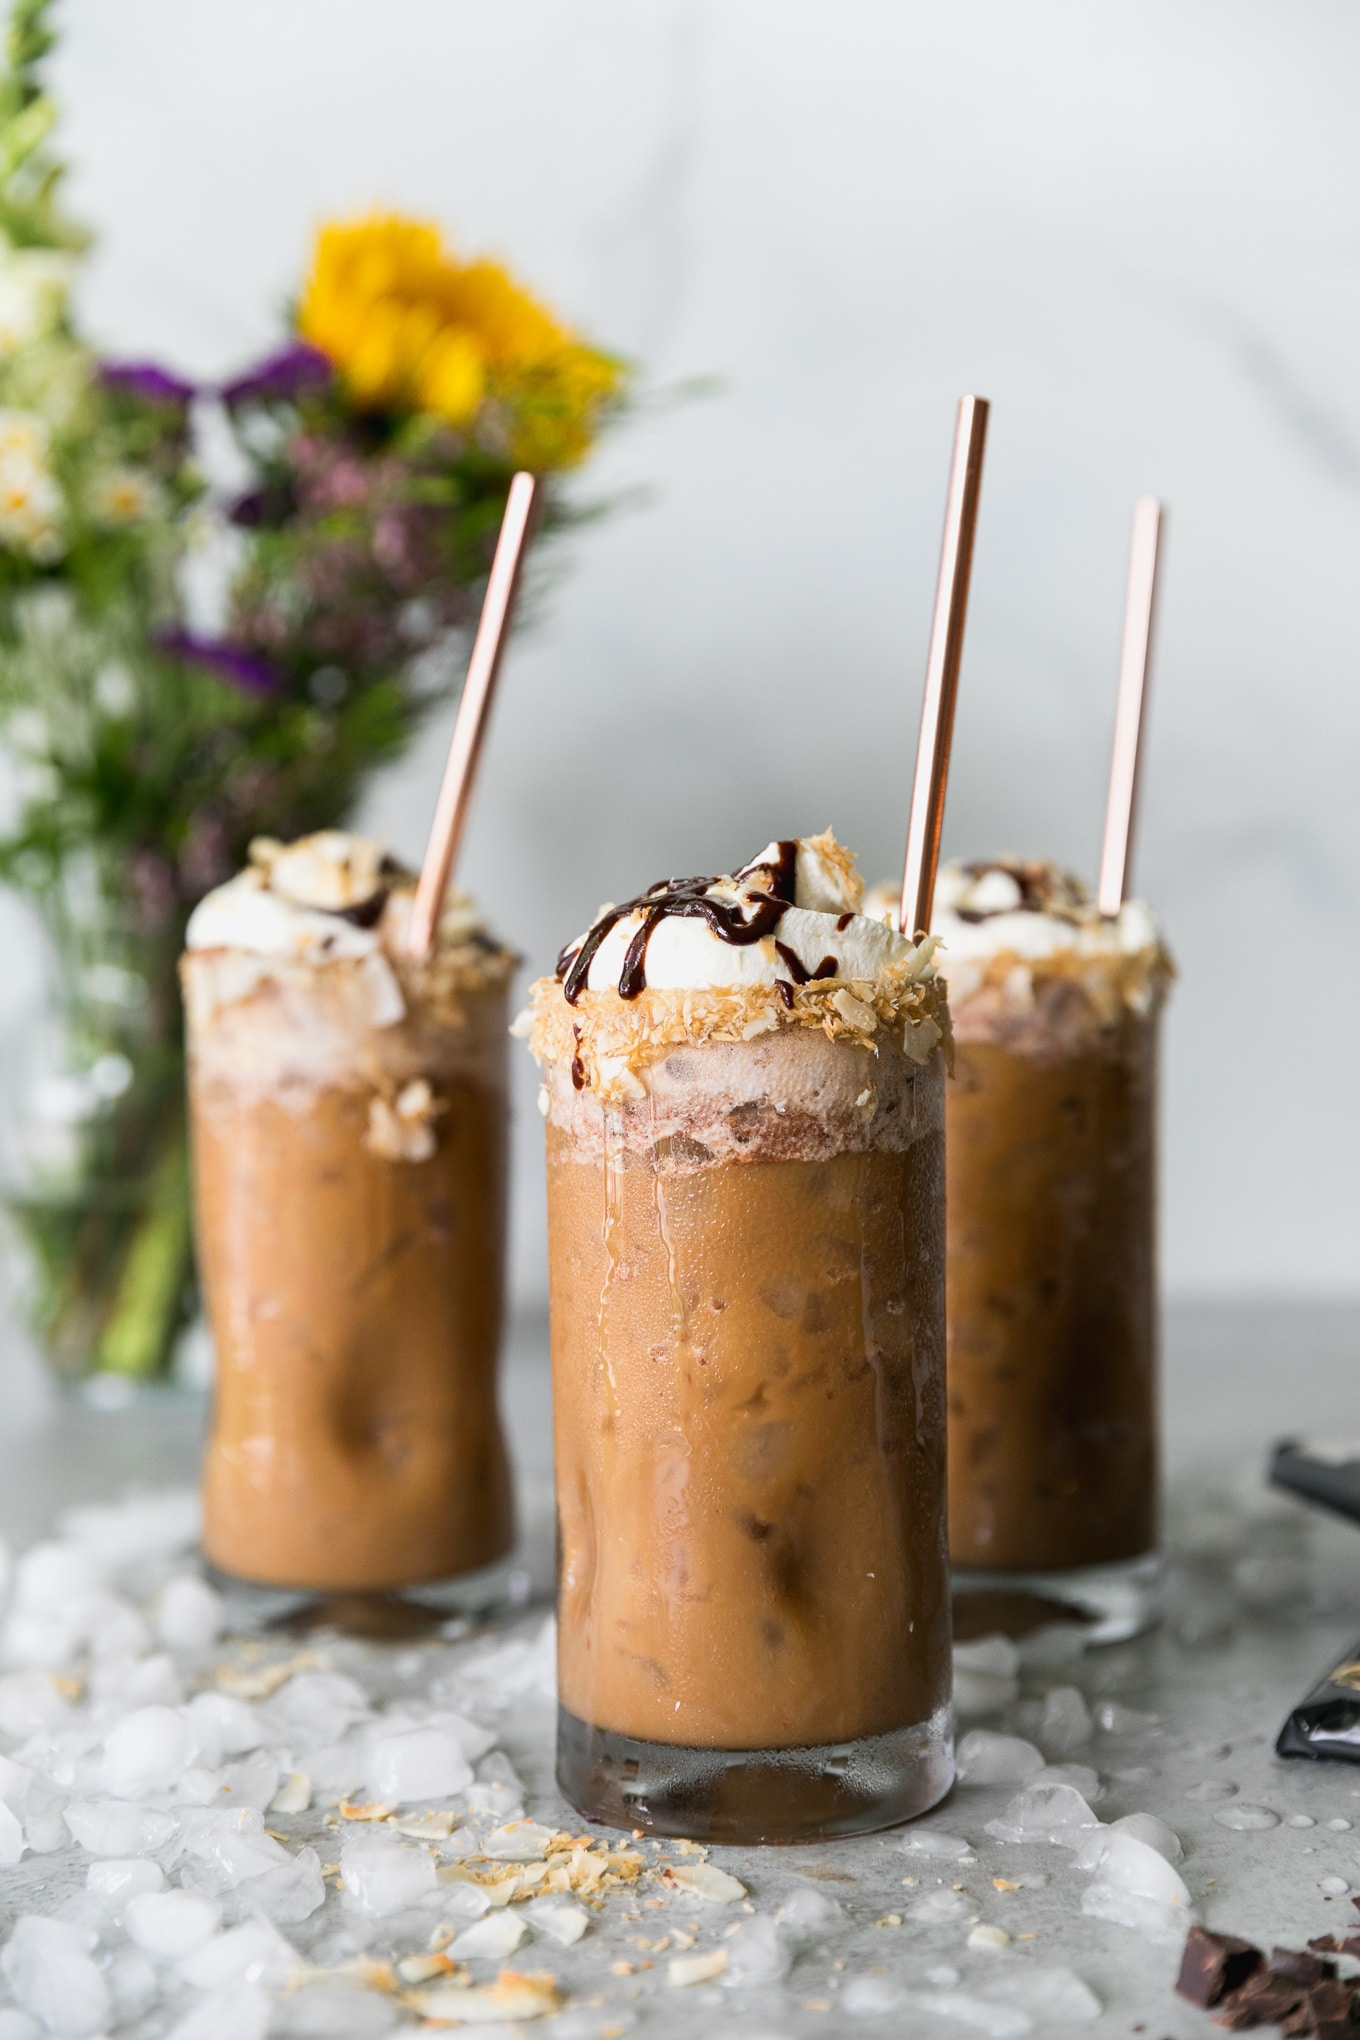
Credit: www.spicesinmydna.com

Introduction To Coconut Mocha Coffee

Coconut Mocha Coffee is a delightful blend of tropical coconut and rich chocolate flavors. This unique combination creates a luxurious and refreshing coffee experience. Perfect for those who love both coconut and mocha.

What Is Coconut Mocha Coffee?

Coconut Mocha Coffee is a delicious drink that combines the flavors of coconut and chocolate with coffee. The result is a creamy, sweet, and slightly nutty beverage. It is perfect for a morning treat or an afternoon pick-me-up.

This coffee can be made with various ingredients, including:

  • Coconut milk or coconut cream
  • Chocolate syrup or cocoa powder
  • Freshly brewed coffee or espresso
  • Sweeteners like sugar or honey (optional)
  • Whipped cream for topping (optional)

Origins And Popularity

The origins of Coconut Mocha Coffee are not well-documented. However, the combination of coconut and coffee has been popular in tropical regions for many years. Both ingredients are readily available in these areas, making it a natural pairing.

In recent years, this drink has gained popularity worldwide. People love the unique taste and the tropical twist it brings to their coffee routine. It’s also a popular choice at many coffee shops and cafes.

Here is a quick table to summarize the key points:

Aspect Details
Primary Ingredients Coconut milk, chocolate, coffee
Optional Ingredients Sweeteners, whipped cream
Popularity Global, especially in tropical regions

Enjoy the refreshing taste of Coconut Mocha Coffee and bring a bit of the tropics to your day.

Ingredients Needed

Creating a delightful Coconut Mocha Coffee at home requires a few essential ingredients. These ingredients ensure a rich, flavorful, and creamy coffee experience. Below, you will find a detailed list of both basic and optional ingredients.

Basic Ingredients

  • Freshly Brewed Coffee: Use your favorite coffee beans for the best flavor.
  • Coconut Milk: Adds a creamy and tropical touch.
  • Chocolate Syrup: Provides a sweet and rich chocolate flavor.
  • Sugar: Adjust to taste for sweetness.
  • Ice: If you prefer an iced version.

Optional Additions

  • Whipped Cream: Adds a luxurious texture.
  • Coconut Flakes: For an extra coconutty crunch.
  • Vanilla Extract: Enhances the overall flavor profile.
  • Cinnamon: A pinch adds warmth and spice.
  • Espresso Shot: Boosts the coffee’s strength.

These ingredients together create a delightful balance of flavors. Customize your Coconut Mocha Coffee to your liking with these simple additions. Enjoy the rich, tropical taste right at home.

Choosing The Right Coffee

Creating the perfect Coconut Mocha Coffee starts with choosing the right coffee. The quality of your coffee beans and the brewing method you use play crucial roles in the final taste. Let’s explore these aspects in detail.

Best Coffee Beans

Selecting the best coffee beans is essential. Opt for high-quality, freshly roasted beans to get the best flavor. Here are a few tips:

  • Arabica beans: Known for their smooth and rich flavor.
  • Robusta beans: These have a stronger, more bitter taste.
  • Medium roast: Balances flavor and acidity well.
  • Dark roast: Adds a robust, smoky flavor.

Brewing Methods

The brewing method you choose can affect the taste of your Coconut Mocha Coffee. Here are a few popular methods:

Method Description
French Press Produces a rich, full-bodied coffee.
Pour Over Offers a clean, crisp taste.
Espresso Machine Creates a strong, concentrated coffee.

Choose the method that best suits your taste preferences. Each method has its unique characteristics.

Selecting The Coconut Milk

Selecting the right coconut milk can elevate your Coconut Mocha Coffee. The texture, flavor, and creaminess of your coffee will depend on it. Understanding the different types of coconut milk and their benefits can help you make the best choice.

Types Of Coconut Milk

Coconut milk comes in various forms. The most common types are canned coconut milk, coconut milk beverages, and coconut cream. Canned coconut milk is thick and rich. It’s perfect for adding a creamy texture to your coffee. Coconut milk beverages are lighter and usually found in cartons. They work well for a smoother, lighter coffee experience. Coconut cream is thicker than regular coconut milk. It adds an extra creamy and luxurious feel to your coffee.

Benefits Of Coconut Milk

Coconut milk offers many health benefits. It’s a good source of healthy fats. These fats can help you stay full longer. Coconut milk also contains vitamins and minerals. These include vitamin C, E, B1, B3, B5, and B6. Its antioxidants can support your immune system. Additionally, coconut milk is lactose-free. It’s a great option for those who are lactose intolerant. Choosing coconut milk can make your Coconut Mocha Coffee both delicious and nutritious.

Preparing The Mocha Base

Preparing the perfect mocha base is essential for a delicious coconut mocha coffee. The right balance of flavors creates a rich and satisfying drink. This section will guide you through making the chocolate syrup and choosing alternative sweeteners.

Making The Chocolate Syrup

Start with high-quality cocoa powder. Mix it with sugar and water in a saucepan. Stir the mixture over low heat until smooth. Avoid boiling to maintain the chocolate’s integrity. Once thickened, remove from heat. Let it cool before using. This syrup forms the heart of your mocha base.

Alternative Sweeteners

Traditional sugar isn’t the only option. Honey adds a floral sweetness. Agave syrup offers a mild taste. Stevia is a great choice for a low-calorie option. Each sweetener brings a unique flavor. Experiment to find your favorite. Adjust the amount to taste. Enjoy your custom mocha base.

Coconut Mocha Coffee Recipe: Indulge in a Tropical Delight

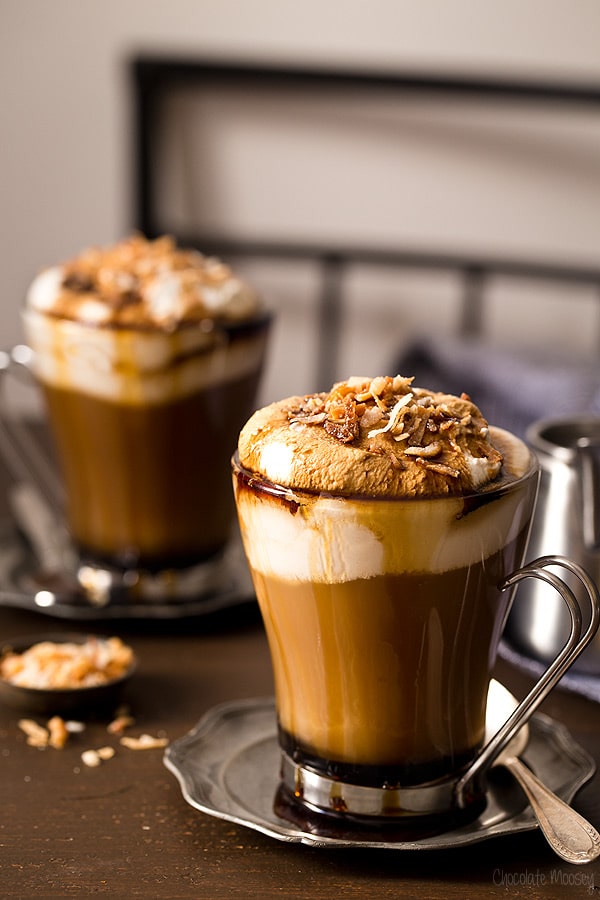
Credit: www.chocolatemoosey.com

Combining Ingredients

Combining ingredients to create the perfect Coconut Mocha Coffee is an art. The right blend of coffee, coconut milk, and chocolate syrup makes this drink irresistible. Let’s explore how to mix these ingredients for a delightful cup.

Mixing Coffee And Coconut Milk

Start with a cup of freshly brewed coffee. The coffee should be hot and strong. Pour it into a large mug or a bowl. Next, add coconut milk. Use about half a cup for a rich and creamy texture. Stir the mixture well to combine the coffee and coconut milk.

If you prefer a smoother drink, use an electric frother. Froth the mixture until it becomes light and airy. This step enhances the texture of your coffee. The unique flavor of coconut milk pairs perfectly with the bold taste of coffee.

Adding Chocolate Syrup

Now, it’s time to add the chocolate syrup. Use two tablespoons of chocolate syrup for a sweet and decadent touch. Pour the syrup into the coffee and coconut milk mixture. Stir thoroughly to ensure the syrup dissolves completely.

For an extra touch, drizzle some chocolate syrup on top. This not only adds flavor but also makes the drink look appealing. You can adjust the amount of syrup based on your preference for sweetness.

Here is a simple table to summarize the ingredients and their quantities:

Ingredient Quantity
Coffee 1 cup
Coconut Milk 1/2 cup
Chocolate Syrup 2 tablespoons

Enjoy your homemade Coconut Mocha Coffee by following these simple steps. Each ingredient plays a crucial role in creating a delightful and balanced flavor. Experiment with the quantities to find your perfect blend.

Serving Suggestions

Serving your Coconut Mocha Coffee perfectly can elevate the entire experience. This section provides some amazing serving suggestions to enhance both presentation and taste. Let’s dive into some creative ideas to make your Coconut Mocha Coffee a treat for all senses.

Garnishing Ideas

Garnishing your Coconut Mocha Coffee adds a delightful touch. Here are some simple yet elegant ideas:

  • Whipped cream: A classic choice for a creamy finish.
  • Shredded coconut: Sprinkle some on top for added flavor and texture.
  • Chocolate shavings: Use a grater to add some rich chocolate goodness.
  • Cinnamon stick: Place one in the cup for a warm, spicy aroma.
  • Cocoa powder: Lightly dust the top for a beautiful presentation.

Perfect Pairings

Pairing your Coconut Mocha Coffee with the right foods can make your coffee time even more enjoyable. Here are some perfect pairings:

Food Description
Chocolate croissant Rich and buttery, complements the mocha flavor.
Almond biscotti Crunchy and nutty, pairs well with the coconut.
Banana bread Moist and sweet, enhances the coffee’s creaminess.
Fruit salad Fresh and light, balances the coffee’s rich taste.
Vanilla ice cream Cold and creamy, a delightful contrast to hot coffee.
Coconut Mocha Coffee Recipe: Indulge in a Tropical Delight

Credit: thekitchenprepblog.com

Health Benefits

Coconut Mocha Coffee is not just a delightful drink. It offers several health benefits as well. By combining coffee, coconut milk, and cocoa, you create a delicious beverage that can boost your health in many ways. Below, we will explore the nutritional information and potential health benefits of this tasty coffee recipe.

Nutritional Information

Understanding the nutritional content of your Coconut Mocha Coffee can help you make informed decisions about your diet. Here’s a simple breakdown:

Ingredient Calories Protein Fats Carbohydrates
1 cup Coffee 2 0g 0g 0g
1/2 cup Coconut Milk 230 2.3g 24g 6g
1 tbsp Cocoa Powder 12 1g 0.7g 3g
1 tsp Sugar 16 0g 0g 4g

Potential Health Benefits

Coconut Mocha Coffee combines ingredients that each offer unique health benefits. Let’s break them down:

  • Boosts Energy: The caffeine in coffee helps increase alertness and energy levels.
  • Rich in Antioxidants: Cocoa powder contains flavonoids, which are powerful antioxidants.
  • Supports Heart Health: Coconut milk contains lauric acid that promotes good cholesterol levels.
  • Improves Digestion: Coconut milk can help improve digestion and soothe the gut.
  • Enhances Mood: Cocoa powder can boost serotonin levels, improving mood.

In summary, a cup of Coconut Mocha Coffee can provide a delightful blend of flavors and health benefits. Enjoy it as a part of your daily routine for a tasty and beneficial treat.

Variations And Customizations

Coconut Mocha Coffee is a delightful treat. You can try different variations to suit your taste. Customizing your coffee can make each cup unique and enjoyable. Let’s explore some exciting variations.

Iced Coconut Mocha

For a refreshing twist, try Iced Coconut Mocha. Start by brewing a strong cup of coffee. Let it cool to room temperature. Mix in coconut milk and chocolate syrup. Pour the mix over ice cubes in a tall glass. Stir well. Add whipped cream on top if desired.

This cold version is perfect for hot days. The blend of coconut and chocolate flavors is refreshing. You can also add a shot of espresso for extra kick. Experiment with the ratios to find your perfect balance.

Spiced Coconut Mocha

Spice up your coffee with a Spiced Coconut Mocha. Brew your coffee as usual. Add coconut milk and chocolate syrup. Next, sprinkle in some cinnamon and nutmeg. Stir the mixture well.

Top with whipped cream and a dash of cinnamon. The spices add warmth and depth to the drink. This variation is great for cozy mornings or chilly evenings. Adjust the spice levels to your liking.

Frequently Asked Questions

What Are The Ingredients For Coconut Mocha Coffee?

To make Coconut Mocha Coffee, you’ll need coconut milk, brewed coffee, cocoa powder, sugar, and vanilla extract.

How Do You Prepare Coconut Mocha Coffee?

Mix brewed coffee, coconut milk, cocoa powder, sugar, and vanilla extract. Stir well and serve hot.

Can I Use A Dairy-free Alternative?

Yes, you can use almond milk or soy milk as a dairy-free alternative for this recipe.

Is Coconut Mocha Coffee Healthy?

Coconut Mocha Coffee can be healthy if you use unsweetened coconut milk and limit the sugar added.

Conclusion

Enjoy the delightful blend of coconut and mocha in your coffee. This recipe is easy to make and perfect for any time. Share it with friends or savor it alone. The rich flavors will bring joy to your mornings. Try it today, and experience the tropical twist.

Your taste buds will thank you. Happy sipping!

Easy Pecan Candy Recipes: Quick and Delicious Treats

Craving a sweet treat that’s easy to make? Pecan candy recipes are perfect for you.

These delightful sweets combine rich flavors with simple ingredients. Pecan candy is a favorite dessert for many, offering a satisfying crunch and sweetness in every bite. Whether you’re a seasoned cook or a beginner in the kitchen, these recipes are simple to follow and sure to impress.

Imagine the joy of biting into a piece of homemade pecan candy, with its perfect balance of nutty and sugary goodness. From classic pralines to chocolate-covered pecans, there’s a recipe here for everyone. Ready to get started? Let’s dive into the world of easy pecan candy recipes and discover your new favorite treat.

Easy Pecan Candy Recipes: Quick and Delicious Treats

Credit: iheartrecipes.com

Introduction To Pecan Candy

Pecan candy is a delightful treat. It is perfect for any occasion. These candies boast a rich, nutty flavor. The sweetness complements the crunch of pecans. Whether for a holiday or a simple snack, pecan candy is a favorite. Here, we explore the world of pecan candy recipes.

Why Pecan Candy?

Pecan candy is a crowd-pleaser. The unique flavor of pecans shines in these treats. They provide a balance of sweetness and nuttiness. This makes them a hit with everyone. Pecan candy is also versatile. It can be made in different ways. You can add chocolate, caramel, or spices. This allows for endless variations.

Benefits Of Homemade Treats

Making pecan candy at home has many benefits. Firstly, you control the ingredients. This means no preservatives or artificial flavors. You can use fresh, high-quality nuts. Secondly, homemade treats often taste better. They have a fresh, homemade flavor. Lastly, making candy can be a fun activity. It is a perfect project for families or friends.

Classic Pecan Pralines

The Classic Pecan Pralines are a beloved Southern treat. These delightful candies combine the rich flavors of caramel and pecans. They are perfect for any occasion and easy to make at home. Below, you’ll find everything you need to create these sweet treats.

Ingredients Needed

  • 2 cups of granulated sugar
  • 1 cup of packed brown sugar
  • 1/2 cup of evaporated milk
  • 1/2 cup of heavy cream
  • 4 tablespoons of unsalted butter
  • 2 cups of pecan halves
  • 1 teaspoon of vanilla extract
  • 1/4 teaspoon of salt

Step-by-step Instructions

  1. Prepare a baking sheet with parchment paper. Set aside.
  2. In a large saucepan, combine both sugars, evaporated milk, and cream.
  3. Cook over medium heat, stirring constantly until the sugars dissolve.
  4. Add the butter and continue to cook until the mixture reaches 238°F on a candy thermometer.
  5. Remove the saucepan from heat. Stir in the vanilla extract and salt.
  6. Add the pecan halves and stir until the mixture thickens slightly.
  7. Quickly drop spoonfuls of the mixture onto the prepared baking sheet.
  8. Allow the pralines to cool completely before serving.

Enjoy your homemade Classic Pecan Pralines with family and friends. These candies are sure to be a hit!

Simple Pecan Turtles

Craving something sweet and nutty? Simple Pecan Turtles are the perfect treat. Combining pecans, caramel, and chocolate, this candy is easy to make. It is ideal for any occasion. Let’s dive into the process of creating this delightful snack.

Gathering Ingredients

First, gather all the necessary ingredients. You need:

  • 1 cup of pecan halves
  • 1 cup of soft caramels
  • 1 cup of semi-sweet chocolate chips
  • 1 tablespoon of vegetable oil

Ensure you have these items ready before starting. This helps make the process smooth and enjoyable.

Preparation Process

Start by preheating your oven to 350°F (175°C). Place the pecans on a baking sheet. Toast them in the oven for about 5 minutes. This enhances their flavor.

Next, melt the caramels in a saucepan over low heat. Stir continuously until smooth. Remove from heat. Let it cool for a minute.

Arrange the toasted pecans in clusters on a parchment-lined baking sheet. Spoon the melted caramel over each cluster. Allow the caramel to set for a few minutes.

Melt the chocolate chips with vegetable oil in a microwave-safe bowl. Heat in 30-second intervals, stirring each time. Continue until the chocolate is smooth.

Drizzle the melted chocolate over the caramel-pecan clusters. Let them cool until the chocolate hardens. Simple Pecan Turtles are ready to enjoy!

Quick Pecan Brittle

Quick Pecan Brittle is a delightful treat that you can whip up fast. It’s crunchy, sweet, and perfect for satisfying your sweet tooth. This easy recipe brings a classic candy to your kitchen with minimal effort.

Essential Ingredients

To make Quick Pecan Brittle, you need a few simple ingredients. Here’s what you’ll need:

  • 1 cup of sugar
  • 1/2 cup of light corn syrup
  • 1 cup of pecan halves
  • 1/4 cup of water
  • 1/4 teaspoon of salt
  • 1 tablespoon of butter
  • 1 teaspoon of vanilla extract
  • 1 teaspoon of baking soda

Cooking Directions

First, prepare a baking sheet by greasing it well. This prevents sticking.

Next, combine the sugar, corn syrup, water, and salt in a saucepan. Cook over medium heat. Stir constantly until the mixture boils.

Once boiling, add the pecan halves. Continue cooking without stirring. Watch until the mixture reaches a golden brown color.

Remove from heat. Quickly stir in the butter, vanilla extract, and baking soda. The mixture will foam.

Pour the hot mixture onto the prepared baking sheet. Spread it out thinly with a spatula.

Let it cool completely. Once cool, break the brittle into pieces.

Homemade Pecan Divinity

Homemade Pecan Divinity is a classic Southern candy. It has a fluffy, meringue-like texture with crunchy pecans throughout. This sweet treat is perfect for holidays or special occasions. It’s also a great way to impress your guests with a delightful homemade dessert.

Required Ingredients

To make Pecan Divinity, you will need the following ingredients:

  • 2 ½ cups of granulated sugar
  • ½ cup of light corn syrup
  • ½ cup of water
  • 2 egg whites
  • 1 teaspoon of vanilla extract
  • 1 cup of chopped pecans
  • A pinch of salt

How To Make It

Follow these simple steps to make Pecan Divinity:

  1. In a heavy saucepan, combine the sugar, corn syrup, water, and salt.
  2. Cook over medium heat, stirring until the sugar dissolves.
  3. Once dissolved, stop stirring and let it boil until it reaches 260°F on a candy thermometer.
  4. While the syrup is boiling, beat the egg whites in a large bowl until stiff peaks form.
  5. Once the syrup reaches 260°F, slowly pour it into the egg whites while beating constantly.
  6. Continue to beat the mixture until it holds its shape and becomes less glossy.
  7. Fold in the vanilla extract and chopped pecans.
  8. Drop spoonfuls of the mixture onto wax paper and let them cool completely.

Enjoy your delicious homemade Pecan Divinity with friends and family!

Chocolate-covered Pecans

Chocolate-covered pecans are a delightful treat. They combine the richness of chocolate with the crunch of pecans. Perfect for any occasion, these sweet bites are easy to make. Whether for a party or a quick snack, they are sure to impress.

Ingredients List

  • 1 cup of pecan halves
  • 1 cup of dark chocolate chips
  • 1 tablespoon of coconut oil
  • Pinch of sea salt (optional)

Easy Preparation Steps

  1. Prepare a baking sheet. Line it with parchment paper.
  2. Melt the chocolate. Use a microwave or double boiler.
  3. Add coconut oil. Stir until smooth.
  4. Dip the pecans. Coat each pecan in melted chocolate.
  5. Place on baking sheet. Arrange in a single layer.
  6. Sprinkle sea salt. This step is optional but adds flavor.
  7. Refrigerate. Chill for 30 minutes until chocolate sets.

Your chocolate-covered pecans are ready to enjoy. Store them in an airtight container. They stay fresh for up to a week.

Caramel Pecan Clusters

Caramel Pecan Clusters are a delightful treat. They combine rich caramel, crunchy pecans, and smooth chocolate. This sweet and salty snack is perfect for any occasion. It’s easy to make and sure to impress your friends and family.

What You Need

To make Caramel Pecan Clusters, gather these ingredients:

  • 2 cups of pecan halves
  • 1 cup of caramel candies
  • 2 tablespoons of heavy cream
  • 1 cup of semisweet chocolate chips
  • 1 tablespoon of vegetable oil

Making The Clusters

First, preheat your oven to 350°F (175°C). Spread the pecan halves on a baking sheet. Toast them in the oven for 8-10 minutes. Let them cool.

Next, melt the caramel candies in a microwave-safe bowl. Add the heavy cream. Microwave in 30-second intervals. Stir until smooth.

Arrange the toasted pecans in small clusters on a parchment-lined baking sheet. Spoon melted caramel over each cluster.

In another bowl, melt the chocolate chips with vegetable oil. Microwave in 30-second intervals. Stir until smooth.

Finally, spoon the melted chocolate over the caramel pecan clusters. Let them set at room temperature or refrigerate them for quicker results.

Storing And Sharing

Making pecan candy at home is fun and rewarding. But knowing how to store and share your sweet creations is essential. This ensures your candy stays fresh and delicious. Let’s dive into the best practices for storing and creative ideas for sharing your homemade pecan candy.

Best Storage Practices

Proper storage keeps your pecan candy fresh and tasty. Here are some best practices:

  • Airtight Containers: Use airtight containers to keep moisture out. This prevents your candy from becoming sticky or hard.
  • Cool, Dry Place: Store your candy in a cool, dry place. Avoid direct sunlight and heat sources.
  • Wax Paper Layers: Place wax paper between layers of candy. This prevents them from sticking together.
  • Refrigeration: If you live in a warm climate, consider refrigerating the candy. Ensure it’s in an airtight container to avoid moisture absorption.
  • Freezing: For long-term storage, freeze your pecan candy. Wrap each piece in wax paper and place in a freezer-safe bag. Thaw at room temperature before enjoying.

Gift Ideas

Homemade pecan candy makes a wonderful gift. Here are some creative ideas:

  1. Decorative Jars: Use small mason jars. Fill them with pecan candy and tie with a ribbon. Add a handwritten label for a personal touch.
  2. Gift Boxes: Purchase decorative gift boxes. Line them with tissue paper and arrange the candy neatly inside.
  3. Holiday Themes: For holidays, use themed bags or boxes. Add a festive touch with seasonal decorations.
  4. Personalized Tins: Buy metal tins and personalize them with stickers or paint. These make reusable and charming gift containers.
  5. Gift Baskets: Create a gift basket with assorted treats. Include your homemade pecan candy along with other goodies like chocolates and cookies.

These ideas will make your gifts memorable and show how much you care. Enjoy making, storing, and sharing your delicious homemade pecan candy!

Tips For Perfect Pecan Candy

Creating the perfect pecan candy can be an enjoyable culinary adventure. With the right techniques, you can produce mouth-watering treats that everyone will love. Below are some tips to ensure your pecan candy turns out perfectly every time.

Common Mistakes To Avoid

Even simple recipes can go wrong. Here are some mistakes to avoid:

  • Overcooking the syrup: This can make the candy too hard.
  • Using low-quality pecans: Fresh, high-quality pecans are key.
  • Skipping the cooling step: Let the candy cool completely to set properly.

Expert Tips

Take your pecan candy to the next level with these expert tips:

  1. Use a candy thermometer: This ensures the syrup reaches the right temperature.
  2. Roast the pecans: Roasting enhances their natural flavor.
  3. Butter the pan: Buttering prevents the candy from sticking.
  4. Stir constantly: Constant stirring prevents burning and ensures even cooking.
  5. Use parchment paper: This makes removing the candy easier.

By following these tips, your pecan candy will be perfect every time.

Easy Pecan Candy Recipes: Quick and Delicious Treats

Credit: www.momlovesbaking.com

Easy Pecan Candy Recipes: Quick and Delicious Treats

Credit: rosebakes.com

Frequently Asked Questions

What Are Pecan Candies?

Pecan candies are sweet treats made using pecans as the main ingredient. They often include sugar, butter, and other flavorings.

How To Make Simple Pecan Candies?

To make simple pecan candies, combine pecans, sugar, and butter in a pan. Cook until caramelized.

Are Pecan Candies Healthy?

Pecan candies are delicious but high in sugar and fat. Enjoy them in moderation for a balanced diet.

Can Pecan Candies Be Stored?

Yes, pecan candies can be stored in an airtight container. Keep them in a cool, dry place for freshness.

Conclusion

Creating pecan candy at home is simple and fun. These recipes require basic ingredients. Perfect for holidays or everyday treats. Your family and friends will love them. Enjoy the sweet, nutty flavors. Impress everyone with your homemade pecan candies. Try these easy recipes today.

Happy cooking!

Southern Chicken Chili Recipe: Irresistibly Flavorful and Easy

There’s something special about Southern comfort food. It warms the heart and soul.

Southern Chicken Chili is a prime example of this. Packed with tender chicken, beans, and a mix of spices, this dish brings a taste of the South to your kitchen. Whether you’re new to cooking or a seasoned chef, this recipe is easy to follow.

It combines classic Southern flavors with the hearty goodness of chili. Perfect for a family dinner or a cozy night in, Southern Chicken Chili is sure to become a favorite. Dive into this recipe and enjoy a bowl of warmth and flavor that’s second to none. Ready to cook? Let’s get started on this Southern classic!

Southern Chicken Chili Recipe: Irresistibly Flavorful and Easy

Credit: www.asouthernsoul.com

Introduction To Southern Chicken Chili

Southern Chicken Chili combines tender chicken, hearty beans, and flavorful spices. This recipe offers a comforting, delicious meal perfect for any season. Enjoy the rich Southern flavors in every bite.

Craving a warm, hearty meal? Southern Chicken Chili is the answer. This dish combines the rich flavors of the South with tender chicken. It’s a perfect comfort food for any season.

The Essence Of Southern Flavors

Southern cuisine is known for its bold and savory flavors. This chili captures that essence. Ingredients like smoked paprika, garlic, and onions bring depth. They create a robust taste that warms the soul.

Why Choose Chicken Chili

Chicken is a lean protein. It makes this chili lighter than traditional beef versions. This means it’s healthier yet still delicious. Plus, chicken absorbs the spices well. This ensures every bite is flavorful and satisfying. “`
Southern Chicken Chili Recipe: Irresistibly Flavorful and Easy

Credit: www.southernliving.com

Ingredients List

Creating a delicious Southern Chicken Chili starts with gathering the right ingredients. The ingredients list is crucial for achieving that rich, hearty flavor. This section will guide you through the essential and optional ingredients. Let’s dive into what you need to make this mouth-watering dish.

Essential Ingredients

For a perfect Southern Chicken Chili, you must have these key ingredients:

  • 1 pound of chicken breast, diced
  • 1 can of diced tomatoes (14.5 oz)
  • 1 can of black beans (15 oz), drained and rinsed
  • 1 can of corn kernels (15 oz), drained
  • 1 small onion, chopped
  • 2 cloves of garlic, minced
  • 1 tablespoon of chili powder
  • 1 teaspoon of cumin
  • 1 teaspoon of paprika
  • 2 cups of chicken broth
  • Salt and pepper to taste
  • 1 tablespoon of olive oil

Optional Add-ins For Extra Flavor

Enhance your Southern Chicken Chili with these optional ingredients:

  • 1 can of kidney beans (15 oz), drained and rinsed
  • 1 bell pepper, chopped
  • 1 jalapeño, finely chopped for some heat
  • 1 teaspoon of smoked paprika for a smoky flavor
  • 1/2 cup of sour cream for creaminess
  • 1/2 cup of shredded cheddar cheese for topping
  • Fresh cilantro, chopped, for garnish
  • 1 lime, cut into wedges for a citrus kick

These ingredients will help you create a flavorful and satisfying Southern Chicken Chili. Feel free to customize it to suit your taste.

Preparation Steps

Before cooking your delicious Southern Chicken Chili, it is crucial to prepare all ingredients properly. Follow these steps for a perfect and savory dish.

Prepping The Chicken

First, take your chicken breasts and rinse them with cold water. Pat them dry with a paper towel. Trim any excess fat using a sharp knife. Cut the chicken into 1-inch cubes. This size ensures even cooking.

Next, place the chicken pieces in a bowl. Season with salt and pepper. Add a tablespoon of olive oil. Mix well to coat the chicken evenly. Set the bowl aside while you prepare the vegetables.

Chopping The Vegetables

Vegetables add flavor and nutrients to your chili. Gather the following vegetables:

  • Onion
  • Bell peppers
  • Garlic
  • Jalapeños (optional for extra spice)

Peel and chop the onion into small, even pieces. For the bell peppers, remove the seeds and chop into similar-sized pieces. Mince the garlic finely. If using jalapeños, slice them thinly.

Place the chopped vegetables in separate bowls. This keeps your workspace organized. It also makes cooking smoother.

Cooking Instructions

Ready to make a delicious Southern Chicken Chili? Follow these easy cooking instructions. This recipe is simple, tasty, and perfect for any meal. Let’s get started!

Sauteing The Base

First, heat a large pot over medium heat. Add two tablespoons of olive oil. Once the oil is hot, add chopped onions and minced garlic. Cook for about 5 minutes until the onions are soft and translucent. Stir occasionally to prevent burning.

Next, add diced bell peppers and cook for another 3 minutes. This step builds the flavor base for your chili. Your kitchen will start to smell amazing!

Adding The Broth And Simmering

Now, add chicken broth and bring it to a boil. Reduce the heat to low and let it simmer. Add cooked chicken, canned tomatoes, and beans. Stir well to combine all the ingredients.

Season with chili powder, cumin, salt, and pepper. Let the mixture simmer for about 20 minutes. This allows the flavors to meld together. Stir occasionally to prevent sticking.

Your Southern Chicken Chili is now ready to serve. Enjoy it with your favorite toppings!

Serving Suggestions

Serving your Southern Chicken Chili just got easier with these tasty suggestions. Whether you’re hosting a gathering or enjoying a cozy night in, the right accompaniments can elevate your dish. Let’s dive into some ideal side dishes and topping ideas that will complement your chili perfectly.

Ideal Side Dishes

Pair your Southern Chicken Chili with these mouth-watering sides:

  • Warm Cornbread: Sweet and fluffy, perfect for soaking up the chili.
  • Buttery Biscuits: Their flaky texture adds a delightful crunch.
  • Steamed Rice: A simple base that balances the rich flavors.
  • Mixed Green Salad: Fresh greens provide a crisp contrast.
  • Tortilla Chips: Crunchy and great for scooping up chili.

Topping Ideas

Enhance your Southern Chicken Chili with these delicious toppings:

  • Shredded Cheese: Melty and adds a creamy texture.
  • Sour Cream: A dollop to cool down the spices.
  • Chopped Green Onions: Fresh and adds a bit of bite.
  • Jalapeño Slices: For those who like extra heat.
  • Avocado Slices: Creamy and full of healthy fats.
  • Fresh Cilantro: Adds a burst of fresh flavor.

Tips For The Perfect Chili

Creating the perfect Southern Chicken Chili is an art. Each step matters. Follow these tips to make your chili rich and delicious.

Balancing Flavors

Balancing flavors in your chili is crucial. Here are some key tips:

  • Sweetness: Add a touch of sugar or honey.
  • Acidity: A splash of vinegar or lime juice works wonders.
  • Savory: Use rich chicken broth and a hint of soy sauce.

Use these ingredients to balance the sweet, sour, and savory flavors. Taste your chili often. Adjust to your preference.

Adjusting The Spice Level

Spice level is personal. Here are some ways to adjust it:

  1. Mild Chili: Use mild chili powder and reduce jalapeños.
  2. Medium Heat: Add a bit more chili powder and one jalapeño.
  3. Hot Chili: Include cayenne pepper and extra jalapeños.

For less heat, add more tomatoes or beans. To make it hotter, increase the spices gradually. Always taste before serving.

Spice Level Chili Powder Jalapeños Cayenne Pepper
Mild 1 tbsp None None
Medium 2 tbsp 1 None
Hot 3 tbsp 2 1 tsp

Use these tips and your chili will always hit the spot. Enjoy the process and happy cooking!

Storing And Reheating

Storing and reheating your Southern Chicken Chili properly ensures you enjoy the rich flavors each time. Whether you plan to eat it soon or save it for later, knowing the best ways to store and reheat this dish is key.

Refrigeration Tips

To keep your Southern Chicken Chili fresh in the refrigerator, follow these tips:

  • Let the chili cool to room temperature before storing.
  • Transfer the chili to an airtight container.
  • Store in the refrigerator for up to 4 days.
  • Label the container with the date for easy tracking.

When you’re ready to eat, reheat the chili on the stove over medium heat. Stir occasionally until it’s heated through. You can also use a microwave. Heat it in a microwave-safe bowl for 2-3 minutes, stirring halfway through.

Freezing For Later

If you want to save your chili for a longer period, freezing is the way to go. Here’s how:

  1. Allow the chili to cool completely.
  2. Divide the chili into portions for easier reheating.
  3. Use freezer-safe bags or containers to store each portion.
  4. Remove as much air as possible from the bags before sealing.
  5. Label each container with the date.

Frozen chili can last up to 3 months. To reheat, thaw the chili in the refrigerator overnight. Then, reheat on the stove over medium heat, stirring occasionally. You can also reheat from frozen. Simply place the frozen chili in a pot and heat on low until thawed, then increase to medium heat to warm through.

Southern Chicken Chili Recipe: Irresistibly Flavorful and Easy

Credit: www.southernliving.com

Frequently Asked Questions

What Ingredients Are In Southern Chicken Chili?

Southern Chicken Chili includes chicken, beans, tomatoes, onions, bell peppers, garlic, and spices.

How Long Does It Take To Cook?

It takes about 30 minutes to cook Southern Chicken Chili.

Can I Make This Recipe Ahead Of Time?

Yes, you can make this recipe ahead. It tastes even better the next day.

Is Southern Chicken Chili Spicy?

It can be spicy depending on the amount of chili powder used.

Conclusion

This Southern Chicken Chili recipe is perfect for any meal. Its rich flavors and hearty ingredients make it a family favorite. Enjoy it with friends or at gatherings. It’s simple to make and full of taste. Give it a try today and experience comfort in every bite.

Your taste buds will thank you. Happy cooking!

Ham Based Soup Recipes: Delicious and Hearty Meal Ideas

Soup is a comfort food loved by many. Ham based soup recipes offer delicious options.

These soups are hearty, flavorful, and perfect for any meal. Whether it’s a cold day or you need a filling dinner, ham-based soups can be your go-to choice. Ham brings a rich, savory taste that pairs well with many ingredients.

From vegetables to beans, the combinations are endless. These recipes are not only tasty but also easy to make. They can be a great way to use up leftover ham, making them practical and economical. In this blog, we’ll explore a variety of ham-based soup recipes. Each recipe will bring warmth to your table and delight your taste buds. Get ready to discover soups that are both satisfying and simple to prepare. Enjoy the journey of making these delicious soups!

Classic Ham And Bean Soup

The Classic Ham and Bean Soup is a timeless comfort food. This hearty soup is perfect for chilly days. It’s nutritious, filling, and packed with flavor. The combination of ham and beans creates a savory base. This soup can easily become a family favorite. Let’s dive into the details of making this delicious soup.

Ingredients

You’ll need simple ingredients for this soup. Gather the following items:

  • 1 pound ham, diced
  • 1 pound dried beans (navy or great northern)
  • 1 large onion, chopped
  • 2 carrots, sliced
  • 2 celery stalks, chopped
  • 3 garlic cloves, minced
  • 8 cups chicken broth
  • 1 bay leaf
  • 1 teaspoon thyme
  • Salt and pepper to taste

Preparation Steps

Follow these simple steps to prepare your Classic Ham and Bean Soup:

  1. Soak the beans overnight in water. Drain and rinse them.
  2. In a large pot, heat a bit of oil over medium heat.
  3. Add the diced ham and cook until slightly browned.
  4. Add onions, carrots, and celery. Sauté until vegetables soften.
  5. Stir in minced garlic and cook for another minute.
  6. Add the soaked beans, chicken broth, bay leaf, and thyme.
  7. Bring the mixture to a boil, then reduce the heat.
  8. Simmer the soup for 1.5 to 2 hours, or until beans are tender.
  9. Season with salt and pepper to taste.
  10. Remove the bay leaf before serving.

Enjoy your warm, homemade Classic Ham and Bean Soup!

Ham Based Soup Recipes: Delicious and Hearty Meal Ideas

Credit: cafedelites.com

Creamy Ham And Potato Soup

The Creamy Ham and Potato Soup is a heartwarming dish perfect for chilly evenings. This soup combines the savory flavors of ham with the comforting texture of potatoes. It’s easy to make and will quickly become a family favorite.

Ingredients

  • 2 cups of diced ham
  • 4 cups of diced potatoes
  • 1 cup of chopped onions
  • 3 cups of chicken broth
  • 2 cups of milk
  • 3 tablespoons of butter
  • 3 tablespoons of all-purpose flour
  • Salt and pepper to taste

Cooking Instructions

1. Melt the butter in a large pot over medium heat.

2. Add the chopped onions and cook until they are soft.

3. Stir in the flour and cook for 2 minutes, stirring constantly.

4. Gradually add the chicken broth, stirring until smooth.

5. Add the diced potatoes and bring the mixture to a boil.

6. Reduce the heat and simmer until the potatoes are tender.

7. Stir in the diced ham and cook for another 5 minutes.

8. Add the milk and season with salt and pepper.

9. Cook until the soup is heated through. Serve hot.

Ham And Split Pea Soup

Ham and Split Pea Soup is a classic comfort food. This hearty soup is perfect for chilly days. It combines the savory taste of ham with the earthy flavor of split peas. The result is a thick, satisfying meal in a bowl. This soup is easy to make and full of nutrients.

Ingredients

  • 2 cups dried split peas, rinsed
  • 1 lb ham, diced
  • 1 large onion, chopped
  • 2 carrots, chopped
  • 2 celery stalks, chopped
  • 4 cups chicken broth
  • 2 cups water
  • 2 cloves garlic, minced
  • 1 bay leaf
  • Salt and pepper to taste

Cooking Directions

Start by rinsing the split peas under cold water. Set them aside. In a large pot, heat a bit of oil over medium heat. Add the chopped onion, carrots, and celery. Cook for 5 minutes, stirring often. Add the minced garlic and cook for another minute.

Next, add the diced ham to the pot. Stir and cook for another 5 minutes. Pour in the chicken broth and water. Add the rinsed split peas and the bay leaf. Stir everything together.

Bring the mixture to a boil. Once boiling, reduce the heat to low. Cover the pot and let it simmer for about 1.5 hours. Stir occasionally to prevent sticking. The soup should thicken as the peas break down.

After 1.5 hours, check the consistency. If it is too thick, add more water or broth. Season with salt and pepper to taste. Remove the bay leaf before serving. Enjoy your warm, hearty Ham and Split Pea Soup!

Ham Based Soup Recipes: Delicious and Hearty Meal Ideas

Credit: thecozycook.com

Hearty Ham And Vegetable Soup

Ham based soups are a delightful way to enjoy a comforting meal. The Hearty Ham and Vegetable Soup is a perfect blend of savory ham and fresh vegetables. This soup is a wonderful choice for a cozy lunch or dinner. Its rich flavors will warm your heart and satisfy your taste buds.

Ingredients

Ingredient Quantity
Diced Ham 2 cups
Carrots 1 cup, sliced
Potatoes 1 cup, diced
Celery 1 cup, chopped
Onion 1, diced
Garlic 2 cloves, minced
Chicken Broth 4 cups
Salt To taste
Pepper To taste
Olive Oil 2 tablespoons

Preparation Steps

  1. Heat the olive oil in a large pot over medium heat.
  2. Add diced onion and minced garlic. Sauté until soft.
  3. Add sliced carrots, diced potatoes, and chopped celery. Stir well.
  4. Cook the vegetables for about 5 minutes.
  5. Add the diced ham to the pot. Stir to combine.
  6. Pour in the chicken broth. Bring the mixture to a boil.
  7. Reduce heat to low. Let the soup simmer for 30 minutes.
  8. Season with salt and pepper to taste.
  9. Serve hot and enjoy your hearty ham and vegetable soup.

Ham And Corn Chowder

Looking for a comforting and delicious soup recipe? Ham and Corn Chowder is a perfect choice. This hearty soup combines savory ham with sweet corn in a creamy base. It’s easy to prepare and sure to be a family favorite.

Ingredients

  • 2 cups diced ham
  • 2 cups corn kernels (fresh, frozen, or canned)
  • 1 cup chopped onions
  • 1 cup diced potatoes
  • 2 cloves garlic, minced
  • 4 cups chicken broth
  • 1 cup heavy cream
  • 2 tablespoons butter
  • Salt and pepper to taste
  • 1 tablespoon flour (optional, for thickening)
  • 1/4 cup chopped green onions (for garnish)

Cooking Instructions

  1. In a large pot, melt the butter over medium heat.
  2. Add the chopped onions and garlic. Cook until onions are translucent.
  3. Add the ham and cook for 3-4 minutes.
  4. Stir in the diced potatoes and corn.
  5. Pour in the chicken broth and bring to a boil.
  6. Reduce heat and simmer until potatoes are tender, about 15 minutes.
  7. In a separate bowl, mix the heavy cream with the flour (if using).
  8. Slowly add the cream mixture to the pot, stirring constantly.
  9. Cook for another 5 minutes, until the soup thickens.
  10. Season with salt and pepper to taste.
  11. Garnish with chopped green onions before serving.

This Ham and Corn Chowder is rich, creamy, and full of flavor. Serve it with crusty bread or a side salad for a complete meal. Enjoy!

Spicy Ham And Bean Soup

Looking for a hearty soup with a kick? Try the Spicy Ham and Bean Soup! It’s perfect for those chilly days. This soup combines tender ham, beans, and spices. It will warm you up from the inside out.

Ingredients

  • 1 pound of diced ham
  • 2 cups of dried beans (any kind)
  • 1 large onion, chopped
  • 2 cloves of garlic, minced
  • 1 can of diced tomatoes (14.5 ounces)
  • 4 cups of chicken broth
  • 1 teaspoon of cumin
  • 1 teaspoon of chili powder
  • Salt and pepper to taste
  • 1 tablespoon of olive oil
  • Optional: 1 jalapeño, sliced

Cooking Directions

  1. Prepare the beans: Soak the dried beans overnight. Rinse and drain them before cooking.
  2. Heat the oil: In a large pot, heat the olive oil over medium heat. Add the chopped onion and minced garlic. Sauté until they are soft and fragrant.
  3. Add the ham: Stir in the diced ham and cook for a few minutes.
  4. Combine ingredients: Add the soaked beans, diced tomatoes, chicken broth, cumin, and chili powder. Stir well to combine.
  5. Bring to a boil: Increase the heat and bring the soup to a boil. Once boiling, reduce the heat to low. Let it simmer for about 1.5 hours, or until the beans are tender.
  6. Season: Taste the soup and season with salt and pepper as needed. If you like it extra spicy, add the sliced jalapeño.
  7. Serve: Ladle the soup into bowls. Enjoy the hearty and spicy flavors!

This soup is not just delicious but also nutritious. The beans provide protein and fiber. The spices add depth and warmth. It’s a perfect meal for any time of the year!

Slow Cooker Ham Soup

If you love hearty, comforting soups, then you’ll adore Slow Cooker Ham Soup. This recipe combines the savory taste of ham with fresh vegetables. The slow cooker method makes it easy and convenient. Just set it and forget it! Here’s everything you need to know to make this delicious soup at home.

Ingredients

Ingredient Quantity
Ham, diced 2 cups
Carrots, sliced 1 cup
Celery, chopped 1 cup
Potatoes, diced 2 cups
Onion, chopped 1 medium
Garlic, minced 2 cloves
Chicken broth 4 cups
Bay leaf 1
Salt 1 tsp
Pepper 1/2 tsp

Slow Cooking Method

  1. Place the diced ham in the slow cooker.
  2. Add the sliced carrots, chopped celery, and diced potatoes.
  3. Stir in the chopped onion and minced garlic.
  4. Pour in the chicken broth.
  5. Add the bay leaf, salt, and pepper.
  6. Cover and cook on low for 6-8 hours.
  7. Check if vegetables are tender. Remove the bay leaf.
  8. Serve hot and enjoy!

This Slow Cooker Ham Soup is perfect for a cozy dinner. The flavors blend beautifully. It’s a great way to use leftover ham. Give it a try and savor the rich, comforting taste.

Leftover Ham Soup Ideas

Do you have leftover ham from a recent celebration? Don’t let it go to waste! Turn those delicious leftovers into hearty and flavorful soups. These Leftover Ham Soup Ideas will warm you up and delight your taste buds. Let’s dive into some creative uses and handy storage tips.

Creative Uses

Ham is versatile and adds a smoky flavor to soups. Here are some unique ways to use it:

  • Ham and Potato Soup: Combine diced ham with potatoes, onions, and a creamy broth for a comforting dish.
  • Ham and Bean Soup: Mix ham with white beans, carrots, and celery in a savory broth.
  • Ham and Pea Soup: Pair ham with green peas, onions, and a touch of mint for a fresh taste.
  • Ham and Vegetable Soup: Add ham to a mix of your favorite vegetables for a healthy option.

Storage Tips

Proper storage is key to keeping your ham soup fresh and safe to eat. Here are some tips:

Storage Method Instructions Duration
Refrigerator Store in an airtight container. Keep at 40°F or below. Up to 4 days
Freezer Use freezer-safe bags or containers. Leave some space at the top. Up to 3 months

Label your containers with the date to keep track of freshness. Thaw frozen soup in the refrigerator overnight before reheating.

Ham Based Soup Recipes: Delicious and Hearty Meal Ideas

Credit: www.allrecipes.com

Frequently Asked Questions

What Are The Best Ham Based Soup Recipes?

The best ham based soup recipes include Ham and Potato Soup, Split Pea Soup with Ham, and Ham and Bean Soup. Each offers a unique flavor profile and is perfect for a hearty meal.

How To Make Ham And Potato Soup?

To make ham and potato soup, sauté onions and garlic, add diced ham, potatoes, broth, and seasonings. Simmer until potatoes are tender. Blend some of the soup for a creamy texture.

Can I Use Leftover Ham For Soup?

Yes, you can use leftover ham for soup. It adds great flavor and reduces waste. Simply chop the ham into small pieces and add it to your favorite soup recipe.

What Vegetables Go Well With Ham Soup?

Vegetables that go well with ham soup include carrots, celery, potatoes, onions, and peas. They add flavor, texture, and nutrition to the soup.

Conclusion

Creating delicious ham-based soups can be simple and rewarding. These recipes offer warmth and flavor. Try different variations to find your favorite. Remember to use fresh ingredients for the best taste. Ham-based soups can be a hearty meal for any occasion.

Enjoy experimenting and sharing these comforting dishes with loved ones. Happy cooking!

Pulled Pork Bao Buns Recipe: Irresistibly Delicious & Easy

Craving a delicious fusion dish? Pulled pork bao buns are the answer.

These fluffy buns filled with tender pork offer a taste explosion. Bao buns, also known as steamed buns, are a popular street food in Asia. They are soft, pillowy, and perfect for holding savory fillings. Pulled pork, with its rich and smoky flavor, pairs perfectly with the light texture of bao buns.

This dish combines the best of both worlds, creating a mouthwatering experience. Whether you are new to cooking or an experienced chef, this recipe is easy to follow. Get ready to impress your family and friends with these delightful pulled pork bao buns. Keep reading to learn how to make this tasty treat at home.

Pulled Pork Bao Buns Recipe: Irresistibly Delicious & Easy

Credit: taylahskitchen.com

Ingredients

Creating the perfect pulled pork bao buns starts with the right ingredients. Using fresh, quality ingredients ensures your bao buns taste delicious and authentic. Below, you’ll find a list of essential ingredients and some optional add-ons to enhance your dish.

Essential Ingredients

  • 1 pound of pork shoulder
  • 2 tablespoons soy sauce
  • 2 tablespoons hoisin sauce
  • 1 tablespoon brown sugar
  • 2 cloves garlic, minced
  • 1 teaspoon ginger, grated
  • 1 teaspoon sesame oil
  • 1 package of bao buns
  • 1 cup water
  • 1 tablespoon cornstarch

Optional Add-ons

  • Pickled vegetables (carrots, cucumbers, radishes)
  • Fresh cilantro leaves
  • Sriracha sauce
  • Crushed peanuts
  • Chopped green onions
  • Sesame seeds

These ingredients will help you create a tasty and satisfying meal. The essential ingredients form the base of the dish, providing rich and savory flavors. The optional add-ons let you customize your bao buns to your liking.

Pulled Pork Bao Buns Recipe: Irresistibly Delicious & Easy

Credit: www.thehoneyblonde.com

Preparing The Pulled Pork

Creating the perfect pulled pork for your bao buns involves a few simple steps. The right cut, proper seasoning, and slow cooking are key. Follow these guidelines for tender, flavorful pork that will impress your guests.

Choosing The Right Cut

Start with a pork shoulder, also known as pork butt or Boston butt. This cut is ideal because it has the right amount of fat for slow cooking. The fat melts and keeps the meat juicy.

Cut Features
Pork Shoulder Juicy, flavorful, marbled with fat
Pork Butt Rich, tender, best for long cooking

Seasoning And Cooking

Season the pork with a mix of spices. A simple rub can include:

  • 2 tbsp brown sugar
  • 1 tbsp paprika
  • 1 tsp garlic powder
  • 1 tsp onion powder
  • 1 tsp salt
  • 1/2 tsp black pepper

Rub this mixture all over the pork. Make sure to coat it evenly.

Next, cook the pork slowly. Use a slow cooker or an oven set to low heat. Place the pork in the cooker or a baking dish. Add a cup of water or broth for moisture.

  1. Set the temperature to 225°F (107°C).
  2. Cook for 6-8 hours, until the meat is tender.
  3. Shred the pork using two forks.

The result is tender, flavorful pulled pork. It’s perfect for stuffing into bao buns. Enjoy the delicious combination!

Making The Bao Buns

Creating the perfect bao buns is essential for a delicious pulled pork experience. Soft and fluffy buns make the difference. Let’s dive into the process of making these delightful buns from scratch.

Dough Preparation

Start by gathering all your ingredients. You will need flour, yeast, sugar, baking powder, milk, and water. Mix the flour, yeast, sugar, and baking powder in a large bowl. Slowly add the milk and water. Mix until a dough forms.

Knead the dough for about 10 minutes. The dough should become smooth and elastic. Place the dough in a lightly oiled bowl. Cover it with a damp cloth. Let it rise in a warm place for 1-2 hours. The dough should double in size.

Once the dough has risen, punch it down. Divide it into small, equal pieces. Roll each piece into a ball. Flatten each ball into a small circle. Fold the circle in half, creating a half-moon shape. Place each shaped bun on a piece of parchment paper. Let them rest for another 30 minutes.

Steaming The Buns

Prepare your steamer by adding water to the bottom. Bring the water to a boil. Place the buns in the steamer basket, keeping them on the parchment paper. Ensure there is enough space between each bun.

Steam the buns for about 10-12 minutes. They should be fluffy and slightly firm to the touch. Avoid opening the steamer during cooking. This can cause the buns to collapse. Once done, remove the buns from the steamer. Let them cool slightly before serving.

Your bao buns are now ready to be filled with delicious pulled pork. Enjoy the soft, pillowy texture with every bite. Happy cooking!

Assembling The Bao Buns

Assembling the bao buns is a fun and rewarding part of this recipe. This is where you bring all the flavors together. Each bite should be a delightful mix of textures and tastes. Let’s dive into the steps to make your bao buns perfect.

Filling The Buns

First, take a warm bao bun and gently open it. Be careful not to tear it. Place a generous amount of pulled pork inside. The pork should be tender and juicy. Ensure each bun has enough filling to savor the flavor in every bite.

Toppings And Sauces

Next, add your favorite toppings. Fresh cucumber slices add a crisp texture. Pickled carrots offer a tangy contrast. Don’t forget the fresh cilantro for a burst of freshness.

Now, drizzle your chosen sauce over the top. Hoisin sauce is a popular choice. It adds a sweet and savory element. Another option is sriracha for a spicy kick. Make sure the sauce complements the pulled pork without overpowering it.

Serving Suggestions

Serving Pulled Pork Bao Buns can elevate any meal. These fluffy, savory buns pair well with various sides and beverages. Let’s explore some delightful options to complete your dining experience.

Side Dishes

Consider serving a light cucumber salad. It adds crunch and freshness. The cool, crisp veggies contrast nicely with the rich, tender pork.

Another option is steamed or sautéed greens. Think bok choy or spinach. These add vibrant color and balance to your plate.

Sweet potato fries make a tasty addition too. Their natural sweetness complements the savory pork. They also provide a satisfying crunch.

Beverage Pairings

For beverages, a cold lager pairs well. The beer’s light, refreshing taste cleanses the palate.

Prefer non-alcoholic drinks? Try iced green tea. Its subtle flavors enhance the bao buns’ richness.

A ginger ale also works wonderfully. The ginger’s zing cuts through the pork’s richness. It leaves a pleasant, lingering taste.

Pulled Pork Bao Buns Recipe: Irresistibly Delicious & Easy

Credit: savoredsips.com

Tips And Tricks

Making Pulled Pork Bao Buns at home can be a delicious and fun experience. To get the best results, follow these simple tips and tricks. They will help you create fluffy buns and tender pork. Below are some expert tips on cooking, storage, and reheating.

Cooking Tips

Begin with high-quality pork. Choose pork shoulder or pork butt for the juiciest and most flavorful meat. Here are some additional cooking tips:

  • Marinate the pork for at least 4 hours. This enhances the flavor.
  • Use a slow cooker or pressure cooker. This ensures the meat is tender and easy to pull apart.
  • Add a bit of hoisin sauce or soy sauce. This enriches the taste of the pork.
  • Steam the buns just before serving. They should be light and fluffy.

Storage And Reheating

Sometimes you might have leftovers. Here’s how to store and reheat them properly:

Storage Method Duration
Refrigerator Up to 3 days
Freezer Up to 3 months

To reheat the pork, place it in a pan with a splash of water. Heat it on low until warm. For the buns:

  1. Wrap them in a damp paper towel.
  2. Microwave for 20-30 seconds. This keeps them soft and fluffy.

By following these tips and tricks, you can enjoy delicious Pulled Pork Bao Buns anytime. Store and reheat them correctly to maintain their quality and taste.

Frequently Asked Questions

What Is The Best Pork Cut For Bao Buns?

The best pork cut for bao buns is pork shoulder. It becomes tender and flavorful when slow-cooked.

How Long Should I Cook Pulled Pork?

Cook pulled pork for about 6-8 hours on low. This ensures it is tender and easy to shred.

Can I Make Bao Buns Ahead Of Time?

Yes, you can make bao buns ahead of time. Store them in the refrigerator and steam before serving.

What Toppings Go Well With Pulled Pork Bao Buns?

Popular toppings include pickled vegetables, fresh cilantro, and hoisin sauce. These add a burst of flavor.

Conclusion

Pulled pork bao buns are a tasty delight. Perfect for any meal. The combination of fluffy buns and savory pork is irresistible. Simple ingredients make this recipe accessible. Try it for a fun cooking project. It’s a crowd-pleaser, ideal for gatherings.

Enjoy making and sharing these delicious bao buns. Your taste buds will thank you.

Tilapia Mexican Recipes: Delicious and Easy Cooking Ideas

Tilapia Mexican recipes offer a delightful fusion of flavors. They bring together the mild taste of tilapia with vibrant Mexican spices.

These recipes are perfect for family dinners or special occasions. Mexican cuisine is known for its bold flavors and colorful dishes. Combining these with the versatile tilapia fish creates a culinary treat that’s both delicious and healthy. Whether you love tacos, soups, or grilled dishes, tilapia can be a star ingredient.

Its mild flavor absorbs spices well, making it a great canvas for Mexican seasonings. Ready to explore some mouth-watering tilapia Mexican recipes? Dive into this blog and discover exciting ways to bring a taste of Mexico to your table!

Tilapia Mexican Recipes: Delicious and Easy Cooking Ideas

Credit: tasty.co

Introduction To Tilapia

Tilapia is a versatile fish, perfect for various cuisines, especially Mexican recipes. It’s mild in flavor, making it an excellent canvas for bold, spicy ingredients. Tilapia is also quick to cook, making it ideal for busy weeknight dinners.

What Is Tilapia?

Tilapia is a freshwater fish, popular worldwide. It’s known for its mild taste and flaky texture. Tilapia is often farm-raised, making it an affordable choice. This fish adapts well to different seasonings and cooking methods. It fits perfectly in Mexican dishes, absorbing the rich flavors of spices and herbs.

Health Benefits

Eating tilapia offers several health benefits. It’s a low-calorie protein source, perfect for those watching their weight. Tilapia is rich in omega-3 fatty acids, which are good for heart health. It also contains vitamins and minerals, including vitamin B12, phosphorus, and selenium.

Nutrient Benefit
Protein Builds and repairs tissues
Omega-3 Fatty Acids Supports heart health
Vitamin B12 Boosts energy levels
Phosphorus Strengthens bones and teeth
Selenium Protects cells from damage

Incorporating tilapia into your diet can boost your overall health. It’s a delicious way to stay healthy. Enjoy tilapia in your next Mexican recipe. You’ll love its taste and benefits!

Tilapia Mexican Recipes: Delicious and Easy Cooking Ideas

Credit: www.twopurplefigs.com

Mexican Cuisine Essentials

Mexican cuisine is rich and diverse, blending indigenous and Spanish influences. It offers vibrant flavors and unique dishes. Tilapia recipes are a part of this culinary heritage. They are delicious and easy to prepare. This section explores the essentials of Mexican cooking.

Key Ingredients

Mexican dishes rely on fresh, bold ingredients. These give the food its distinctive taste.

  • Chiles: Jalapeños, serranos, and poblanos add heat and flavor.
  • Tomatoes: Essential for salsas and sauces.
  • Cilantro: Fresh herb used in many dishes.
  • Lime: Adds acidity and brightness.
  • Garlic: Provides depth and aroma.
  • Onions: A staple in many recipes.
  • Avocado: Key for making guacamole.
  • Spices: Cumin, oregano, and coriander are commonly used.

Traditional Cooking Techniques

Mexican cuisine uses various cooking methods. These techniques enhance the flavors of the ingredients.

  • Grilling: Often used for meats and vegetables. Adds a smoky flavor.
  • Sautéing: Quick cooking method for fish, like tilapia.
  • Slow Cooking: Ideal for stews and braises.
  • Steaming: Used for tamales and certain fish dishes.
  • Frying: Common for churros and certain fish recipes.

Mexican cooking also emphasizes the use of fresh ingredients. This ensures each dish has the best possible taste.

Tilapia Tacos

Tilapia Tacos are a delicious, easy-to-make Mexican dish. These tacos are perfect for a quick dinner or a fun gathering with friends. The mild flavor of tilapia pairs wonderfully with bold Mexican spices, making it a favorite for many. Let’s dive into the ingredients and steps needed to create these tasty tilapia tacos.

Ingredients Needed

Ingredients Quantity
Tilapia fillets 4
Corn tortillas 8
Olive oil 2 tbsp
Chili powder 1 tsp
Garlic powder 1 tsp
Onion powder 1 tsp
Ground cumin 1/2 tsp
Salt to taste
Black pepper to taste
Fresh cilantro 1/4 cup, chopped
Lime wedges for serving
Salsa 1/2 cup
Shredded cabbage 1 cup

Step-by-step Instructions

  1. Preheat the oven to 375°F (190°C).
  2. Place tilapia fillets on a baking sheet. Brush with olive oil.
  3. In a small bowl, mix chili powder, garlic powder, onion powder, ground cumin, salt, and black pepper.
  4. Sprinkle the spice mixture evenly over both sides of the tilapia fillets.
  5. Bake the tilapia for 15-20 minutes or until the fish flakes easily with a fork.
  6. While the fish is baking, warm the corn tortillas in a skillet over medium heat.
  7. Once the tilapia is cooked, break it into chunks using a fork.
  8. Assemble the tacos by placing tilapia chunks on each tortilla.
  9. Top with shredded cabbage, salsa, and fresh cilantro.
  10. Serve with lime wedges on the side.

Enjoy your Tilapia Tacos with a squeeze of lime juice. The flavors are vibrant and delightful!

Tilapia Ceviche

Tilapia Ceviche is a delicious and fresh Mexican dish. It features tender tilapia marinated in citrus juices. This dish is perfect for summer. It is light, refreshing, and packed with flavor. Enjoy it as an appetizer or a main course. Let’s dive into how to make this delightful recipe.

Fresh Ingredients

The key to a good tilapia ceviche is fresh ingredients. Always use fresh tilapia. It should smell like the ocean, not fishy. Fresh lime juice is also essential. It adds a bright, tangy flavor. Use ripe tomatoes and crisp onions for the best taste. Fresh cilantro and jalapeños add a nice kick.

Preparation Tips

Start by cutting the tilapia into small cubes. This ensures even marination. Place the fish in a glass bowl. Pour enough lime juice to cover the fish completely. Let it sit in the fridge for at least 30 minutes. The lime juice will “cook” the fish.

While the fish marinates, chop the tomatoes, onions, cilantro, and jalapeños. Mix them in a separate bowl. Add a pinch of salt to enhance the flavors. Once the fish is ready, drain the excess lime juice. Combine the fish with the vegetable mixture. Stir gently to mix everything together.

Serve the ceviche chilled. You can use tortilla chips or tostadas. Garnish with extra cilantro or avocado slices. This adds more flavor and a nice texture.

Grilled Tilapia With Salsa

Grilled Tilapia with Salsa is a delicious dish that combines the mild flavor of tilapia with the fresh, zesty taste of salsa. This recipe is perfect for a quick and healthy meal. It’s easy to prepare and brings a burst of Mexican flavors to your table.

Marinade Recipe

The marinade is the key to a flavorful grilled tilapia. You need simple ingredients to make this marinade. Mix olive oil, lime juice, garlic, cumin, and paprika in a bowl. Add salt and pepper to taste. Coat the tilapia fillets with this mixture. Let them marinate for at least 30 minutes.

Grilling Tips

Grilling tilapia is easy if you follow a few tips. Preheat your grill to medium-high heat. Make sure the grill grates are clean. Lightly oil the grates to prevent sticking. Place the marinated tilapia fillets on the grill. Grill each side for 3-4 minutes. The fish should be opaque and flaky.

Serve the grilled tilapia with fresh salsa. You can make salsa with diced tomatoes, onions, cilantro, and jalapeños. Add lime juice and salt for extra flavor. Enjoy your meal!

Tilapia Mexican Recipes: Delicious and Easy Cooking Ideas

Credit: momsdish.com

Tilapia Enchiladas

Tilapia Enchiladas offer a delightful twist to traditional Mexican cuisine. These enchiladas are filled with tender tilapia, creating a unique and flavorful dish. The combination of fresh ingredients and the rich taste of tilapia makes these enchiladas perfect for any meal.

Filling Ingredients

The filling is the heart of your enchiladas. Gather these ingredients:

  • 1 lb tilapia fillets
  • 1 cup shredded cheese
  • 1/2 cup chopped onions
  • 1/2 cup chopped bell peppers
  • 1 cup salsa
  • 1 teaspoon garlic powder
  • 1 teaspoon cumin
  • Salt and pepper to taste

Baking Instructions

Preheat your oven to 350°F (175°C). Grease a baking dish. Cook the tilapia in a skillet over medium heat until flaky. Break the fillets into small pieces. Mix the tilapia with the chopped onions, bell peppers, garlic powder, cumin, salt, and pepper. Place a portion of the filling in each tortilla. Roll up the tortillas and place them seam-side down in the baking dish. Pour the salsa over the enchiladas, then sprinkle with shredded cheese. Bake for 20 minutes or until the cheese is melted and bubbly. Serve hot and enjoy!

Tilapia Soup

Tilapia Soup is a delightful and warming dish that brings the rich flavors of Mexican cuisine to your table. This soup is perfect for a cozy family dinner or a special occasion. The tender tilapia pieces, combined with a flavorful broth and fresh vegetables, make this soup a healthy and delicious choice.

Broth Preparation

Creating the perfect broth is key to a delicious Tilapia Soup. Start with a base of chicken or vegetable stock. Add chopped onions, garlic, and tomatoes for a rich taste. Enhance the flavor with bay leaves, cumin, and oregano.

Simmer the broth for at least 30 minutes to let the flavors meld together. Then add chunks of tilapia and continue to simmer until the fish is cooked through. The fish should be tender and flake easily.

Serving Suggestions

Serve the Tilapia Soup hot, garnished with fresh cilantro and a squeeze of lime juice. This adds a bright, fresh flavor to the soup. Accompany with warm corn tortillas or crusty bread for a complete meal.

For a more filling dish, add cooked rice or quinoa to the soup. This not only makes the soup heartier but also adds texture. Don’t forget to include a side of avocado slices or a simple green salad for added nutrition.

Ingredient Amount
Chicken or Vegetable Stock 4 cups
Tilapia Fillets 1 lb
Onion 1, chopped
Garlic Cloves 3, minced
Tomatoes 2, chopped
Bay Leaves 2
Cumin 1 tsp
Oregano 1 tsp
Fresh Cilantro For garnish
Lime Juice 1 lime

Serving And Pairing Ideas

Tilapia Mexican recipes are not only delicious but also versatile. The right side dishes and beverages enhance the overall dining experience. This section explores various serving and pairing ideas to complement your Tilapia Mexican dishes.

Side Dishes

Mexican cuisine offers many side dishes that pair well with tilapia. Consider serving rice dishes like Spanish rice. The flavors blend nicely with the tilapia. You can also prepare a fresh salad. Ingredients like tomatoes, avocados, and cucumbers create a refreshing contrast.

Black beans are another excellent choice. They add protein and richness to the meal. Street corn, known as elote, is also a crowd-pleaser. Grilled corn with cheese, chili powder, and lime adds a burst of flavor.

Beverage Recommendations

Pairing the right beverage can elevate your meal. A light beer complements the flavors without overpowering them. Mexican beers like Corona or Modelo work well.

If you prefer non-alcoholic options, consider aguas frescas. These are fruit-based drinks that are both refreshing and flavorful. Popular choices include hibiscus, tamarind, and watermelon.

For those who enjoy wine, a crisp white wine pairs beautifully. Sauvignon Blanc or Pinot Grigio are excellent choices. Their acidity balances the richness of the tilapia.

Frequently Asked Questions

What Are Popular Tilapia Mexican Recipes?

Popular recipes include tilapia tacos, tilapia ceviche, and grilled tilapia with salsa. These dishes are flavorful and easy to make.

How To Make Tilapia Tacos At Home?

To make tilapia tacos, grill tilapia fillets, and serve them in tortillas. Add toppings like cabbage, salsa, and lime.

Is Tilapia Good For Mexican Dishes?

Yes, tilapia is versatile and absorbs flavors well, making it perfect for many Mexican dishes like tacos and ceviche.

Can I Use Frozen Tilapia For Mexican Recipes?

Yes, you can use frozen tilapia. Just thaw it properly before cooking for the best texture and flavor.

Conclusion

Explore the flavors of Mexico with these tasty tilapia recipes. Each dish brings a unique twist to your dinner table. Easy to prepare and packed with flavor, tilapia is a great choice. Impress your family with these simple yet delicious meals.

Try them today and enjoy the vibrant taste of Mexican cuisine. Your taste buds will thank you. Cooking tilapia Mexican style will become a favorite. Dive into these recipes and savor every bite!

Hash Brown Muffin Tin Recipe: Delicious Breakfast Bites

Hash browns are a breakfast favorite for many. But what if you could enjoy them in a fun, new way?

Enter the hash brown muffin tin recipe. This easy and delicious dish combines the crispy goodness of hash browns with the convenience of a muffin tin. Perfect for busy mornings or a weekend brunch, these muffin tin hash browns are sure to impress.

Imagine the delight of biting into a crispy, golden hash brown, perfectly portioned and topped with your favorite ingredients. This recipe offers a creative twist on a classic dish. You can customize each muffin tin cup with cheese, bacon, or veggies. Plus, it’s a great way to get kids excited about breakfast. Ready to transform your morning routine with this tasty treat? Let’s dive into the recipe!

Introduction To Hash Brown Muffin Tins

Welcome to the delightful world of Hash Brown Muffin Tins. This versatile dish brings joy to breakfast tables with ease. Let’s dive into what makes these little cups of goodness so special.

What Makes Them Special

Hash Brown Muffin Tins are a unique twist on traditional hash browns. They are easy to make and packed with flavor. The crispy edges and soft center create a perfect bite every time.

These muffin tins are also highly customizable. You can add your favorite ingredients to suit your taste. Whether you prefer cheese, bacon, or veggies, there’s a combination for everyone.

Another great feature is their size. These muffin tins are portioned perfectly, making them easy to serve. They are ideal for families or hosting brunch with friends.

Perfect For On-the-go Breakfasts

For those busy mornings, Hash Brown Muffin Tins are a lifesaver. They can be prepared ahead of time and quickly reheated.

Grab one or two on your way out the door for a nutritious start to your day. No need to skip breakfast anymore.

These muffin tins also store well in the fridge or freezer. You can make a large batch and enjoy them throughout the week. They are perfect for meal prepping.

Here’s a quick overview of the benefits:

  • Easy to make
  • Highly customizable
  • Perfectly portioned
  • Great for meal prepping
  • Convenient for busy mornings
Hash Brown Muffin Tin Recipe: Delicious Breakfast Bites

Credit: www.delicioustable.com

Ingredients Needed

Creating delicious hash brown muffins is easy with the right ingredients. This section will guide you through the basic ingredients and optional add-ins. These add flavor and variety to your hash brown muffins.

Basic Ingredients

To make hash brown muffins, gather these basic ingredients:

  • 2 cups of grated potatoes
  • 1/2 cup of shredded cheese
  • 1/4 cup of chopped onions
  • 2 eggs
  • 1/2 teaspoon of salt
  • 1/4 teaspoon of black pepper

These ingredients form the foundation of your muffins. Fresh potatoes work best for flavor. Cheese adds creaminess. Onions give a mild bite. Eggs bind everything together.

Optional Add-ins

Enhance your hash brown muffins with these optional add-ins:

  • 1/4 cup of cooked bacon bits
  • 1/4 cup of chopped bell peppers
  • 1/4 cup of chopped spinach
  • 1/4 teaspoon of garlic powder
  • 1/4 teaspoon of paprika

Bacon adds a smoky flavor. Bell peppers introduce a sweet crunch. Spinach boosts nutrition. Garlic powder and paprika elevate the taste profile. Experiment to find your favorite combination.

Preparing The Hash Browns

Preparing the hash browns is a key step in making delicious muffin tin hash browns. The process ensures the perfect texture and flavor for your recipe. Let’s break down the steps involved.

Shredding Potatoes

First, select fresh, firm potatoes. Wash and peel them thoroughly. Grate the potatoes using a box grater or a food processor. The goal is to create thin, even shreds. This allows for uniform cooking and crispy edges.

Removing Excess Moisture

After shredding, place the grated potatoes in a clean kitchen towel. Squeeze out as much moisture as possible. Removing excess water is crucial. It ensures the hash browns become crispy, not soggy.

Repeat this process if necessary. Ensure the potatoes are dry to the touch. This step sets the foundation for perfectly crisp hash browns.

Assembling The Muffin Tins

Creating the perfect hash brown muffin tin recipe begins with proper assembly. This step ensures your muffins cook evenly and come out easily. Follow these simple instructions to achieve a delightful and crispy result.

Greasing The Tins

First, you need to grease the muffin tins. This step prevents the hash browns from sticking. Use a pastry brush to coat each muffin cup with melted butter or oil. Ensure the entire surface is covered, including the sides and bottom.

Alternatively, you can use non-stick cooking spray. Just hold the can about 6 inches away and spray each cup evenly. Make sure to cover all areas to prevent sticking.

Filling With Hash Browns

Next, it’s time to fill the muffin tins with hash browns. Take a spoonful of grated hash browns and place it into each greased muffin cup. Press down the hash browns to create a compact base. Use the back of the spoon to shape them into a nest-like form.

Step Description
1 Spoon hash browns into greased muffin cups.
2 Press down to form a compact base.
3 Shape into a nest using the back of a spoon.

Continue filling all the muffin cups. Ensure the hash browns are evenly distributed. This helps them cook uniformly and achieve the desired crispiness.

Adding The Fillings

Filling your hash brown muffin tins can be fun and creative. The right fillings can add flavor and variety to your dish. Let’s explore some tasty options.

Cheese And Meats

Start with cheese. Cheddar, mozzarella, and feta work well. They melt beautifully. For meats, try cooked bacon, ham, or sausage. They add a savory touch. Mix them for a hearty breakfast treat.

Vegetable Options

Vegetables are a healthy choice. Add chopped spinach, bell peppers, or mushrooms. They add color and nutrients. Tomatoes and onions also work well. Mix and match to find your favorite combination.

Hash Brown Muffin Tin Recipe: Delicious Breakfast Bites

Credit: www.fromvalerieskitchen.com

Baking Instructions

Welcome to the baking instructions for our delicious hash brown muffin tin recipe. Follow these simple steps for perfect, crispy hash browns every time.

Preheating The Oven

Before starting, make sure to preheat your oven to the right temperature. Set your oven to 400°F (200°C). This ensures the hash browns cook evenly and become crispy. Always preheat the oven for at least 10 minutes before baking.

Baking Time And Temperature

Once your oven is preheated, place the muffin tin on the middle rack. This placement helps in even cooking. Bake the hash browns at 400°F (200°C) for 30-35 minutes.

Check for a golden brown color. This indicates they are ready. Use a toothpick or fork to ensure they are cooked through. Insert it into the center of a muffin; if it comes out clean, they are done.

Let the hash browns cool for 5 minutes before removing them from the tin. This helps them set and makes it easier to remove them.

Serving Suggestions

Hash Brown Muffins are versatile and delicious. They can be enjoyed on their own, but they also pair well with various accompaniments. Below are some ideas to make the most of your hash brown muffins.

Pairing With Sauces

Hash brown muffins taste great with a variety of sauces. Ketchup and hot sauce are classic choices. If you prefer something creamy, try ranch dressing or sour cream. For a gourmet twist, drizzle them with hollandaise or aioli. The options are endless, so feel free to experiment.

Ideal Serving Temperature

For the best experience, serve hash brown muffins warm. Reheat them in the oven or microwave if needed. Warm muffins have a crispy exterior and a soft, flavorful interior. They are best enjoyed fresh out of the oven, but they also reheat well.

Hash Brown Muffin Tin Recipe: Delicious Breakfast Bites

Credit: www.delicioustable.com

Storing And Reheating

Hash Brown Muffin Tins are delicious and easy to make. Knowing how to store and reheat them keeps them tasty. This section covers simple steps for storing and reheating. Your leftovers will taste just as good as fresh ones.

Refrigeration Tips

Store leftover hash brown muffins in an airtight container. Keep them in the fridge. They can last up to 5 days. Make sure they are cool before refrigerating. This prevents condensation, which can make them soggy. Use a paper towel to absorb any extra moisture in the container.

Reheating Methods

Reheat hash brown muffins in the oven for the best texture. Preheat your oven to 350°F (175°C). Place muffins on a baking sheet. Heat for about 10 minutes. They will be warm and crispy. You can also use a microwave. Place muffins on a microwave-safe plate. Heat on high for 1-2 minutes. They will be warm but not as crispy. An air fryer can also work well. Set it to 375°F (190°C). Reheat for 5-7 minutes. They will be both warm and crispy.

Frequently Asked Questions

How Do You Make Hash Brown Muffins?

To make hash brown muffins, mix shredded potatoes, cheese, and eggs. Press into muffin tin and bake. They are delicious and easy.

Can You Freeze Hash Brown Muffins?

Yes, you can freeze hash brown muffins. After baking, let them cool, then freeze in an airtight container.

What Ingredients Are Needed For Hash Brown Muffins?

For hash brown muffins, you’ll need shredded potatoes, eggs, cheese, salt, and pepper. Optional add-ins include bacon, onions, and peppers.

How Long Do Hash Brown Muffins Take To Bake?

Hash brown muffins typically take about 20-25 minutes to bake at 375°F. Ensure they are golden and crispy.

Conclusion

These hash brown muffin tin recipes are easy and fun to make. Perfect for breakfast or snacks. Your family will love them. Plus, they are great for meal prep. Simple ingredients, quick to cook. Try them today and enjoy a delicious treat.

Share with friends and spread the love. Happy cooking!

Dried Cherry Cookies Recipe: Irresistibly Delicious Treats

Dried Cherry Cookies are a delightful treat. They combine sweet and tart flavors beautifully.

Imagine biting into a cookie and encountering the chewy goodness of dried cherries. These cookies are perfect for any occasion, from casual snacking to festive gatherings. Their unique flavor profile sets them apart from regular cookies. Plus, they are easy to make and require simple ingredients.

Whether you’re a baking novice or a seasoned pro, this recipe will guide you to delicious results. So, get ready to fill your kitchen with the wonderful aroma of freshly baked cookies. Let’s dive into the recipe and create something scrumptious together!

Dried Cherry Cookies Recipe: Irresistibly Delicious Treats

Credit: cakedbykatie.com

Ingredients

Creating the perfect dried cherry cookies starts with the right ingredients. Fresh, quality components make a significant difference. Let’s dive into the essential components and optional add-ins that make these cookies delightful.

Essential Components

Ingredient Quantity
All-purpose flour 2 1/2 cups
Unsalted butter 1 cup (softened)
Granulated sugar 1 cup
Brown sugar 1/2 cup
Large eggs 2
Vanilla extract 1 teaspoon
Baking soda 1 teaspoon
Salt 1/2 teaspoon
Dried cherries 1 cup (chopped)

The ingredients listed above form the base of your cookies. All-purpose flour gives structure, while unsalted butter adds richness. Granulated sugar and brown sugar provide the perfect sweetness. Eggs bind the ingredients together, and vanilla extract adds depth of flavor. Baking soda helps the cookies rise, and salt enhances the overall taste. Finally, the star ingredient, dried cherries, brings a delightful chewiness and tartness.

Optional Add-ins

  • Chocolate chips – 1 cup
  • Chopped nuts (like walnuts or pecans) – 1/2 cup
  • Coconut flakes – 1/2 cup
  • Orange zest – 1 tablespoon
  • Cinnamon – 1/2 teaspoon

These optional add-ins allow you to customize your cookies to your liking. Chocolate chips add a touch of indulgence. Chopped nuts bring crunch, while coconut flakes add a tropical twist. Orange zest gives a zesty brightness, and a hint of cinnamon provides warmth.

Experiment with these add-ins to create your unique version of dried cherry cookies. The possibilities are endless!

Preparation Steps

Ready to make some delicious dried cherry cookies? Follow these simple preparation steps to get started. This guide will help you create the perfect dough and ensure the dried cherries are well-incorporated.

Mixing The Dough

First, gather all your ingredients. You will need flour, butter, sugar, eggs, and vanilla extract. Start by creaming the butter and sugar together. Use a mixer for best results. Once the mixture is light and fluffy, add the eggs one at a time. Make sure each egg is well-mixed before adding the next.

Next, add the vanilla extract. Mix again until everything is combined. Slowly add the flour. Do this in batches to avoid a mess. Mix until the dough forms. It should be smooth and slightly sticky.

Incorporating Dried Cherries

Now it’s time to add the dried cherries. Make sure they are chopped into small pieces. This helps them spread evenly in the dough. Gently fold the dried cherries into the dough. Use a spatula for this step. Make sure the cherries are well-distributed.

Once the cherries are mixed in, cover the dough. Chill it in the refrigerator for at least 30 minutes. Chilling makes the dough easier to handle. After chilling, your dough is ready for baking.

Baking Instructions

Creating the perfect dried cherry cookies requires precise baking instructions. Following these steps ensures the cookies turn out delicious every time. Let’s dive into the crucial aspects of baking: the oven temperature and baking time.

Oven Temperature

Preheat your oven to 350°F (175°C). This temperature is ideal for baking cookies. It allows them to cook evenly. Make sure your oven is fully preheated before placing the cookies inside. This ensures consistent baking results.

Baking Time

Place the cookie sheets in the oven. Bake the cookies for 10 to 12 minutes. Check the cookies at the 10-minute mark. They should be golden brown around the edges. The centers will still be soft. This is what gives them a chewy texture. Once baked, remove the cookies from the oven. Let them cool on the baking sheet for 5 minutes. Then transfer them to a wire rack to cool completely. Enjoy your delightful dried cherry cookies!

Cooling And Storage

Cooling and storing your dried cherry cookies correctly ensures they stay fresh and delicious. Follow these simple steps to keep your cookies at their best.

Proper Cooling Techniques

Once your cookies are baked, allow them to cool on the baking sheet for five minutes. This initial cooling period helps them set and prevents breakage when moved.

After that, transfer the cookies to a wire rack. This allows air to circulate around them. Ensure the cookies are completely cool before storing. Warm cookies can become soggy if stored too soon.

Best Storage Practices

For optimal freshness, store your dried cherry cookies in an airtight container. This prevents them from becoming stale. Use a container that fits the number of cookies you have, minimizing air exposure.

Consider placing a piece of parchment paper between cookie layers. This prevents sticking and keeps them in good shape.

If you plan to keep the cookies for longer than a week, freezing is an excellent option. Follow these steps for the best results:

  1. Ensure cookies are completely cool.
  2. Place cookies in a single layer on a baking sheet.
  3. Freeze for about an hour, until firm.
  4. Transfer to a freezer-safe bag or container.
  5. Label with the date and freeze for up to three months.

When ready to eat, thaw cookies at room temperature for about 30 minutes.

Storage Method Duration Notes
Airtight Container 1 Week Room Temperature
Freezer 3 Months Thaw Before Eating

Following these simple cooling and storage techniques ensures your dried cherry cookies remain fresh and delicious. Enjoy every bite!

Serving Suggestions

Dried cherry cookies are versatile and delightful. They can be enjoyed on many occasions. From a cozy family gathering to a festive celebration, these cookies fit perfectly. Here are some tips to enhance your serving experience.

Ideal Pairings

Pair dried cherry cookies with a hot cup of tea. The flavors complement each other. Another great option is black coffee. The cookies add a touch of sweetness to your drink. For a more indulgent treat, serve them with a scoop of vanilla ice cream. The contrast in textures is delightful.

Milk is a classic pairing. It’s perfect for kids and adults alike. You can also serve the cookies with a glass of cold almond milk for a dairy-free option. These pairings make the cookies even more enjoyable.

Presentation Tips

Presentation matters. Arrange the cookies on a decorative plate. Add some fresh cherries for a pop of color. You can also use a tiered serving tray. It adds a touch of elegance.

Another tip is to wrap the cookies in a clear cellophane bag. Tie it with a ribbon. This makes a charming gift. For a festive look, sprinkle some powdered sugar on top. It gives the cookies a snowy effect.

Using these simple tips, you can make your dried cherry cookies look as good as they taste. Enjoy them with friends and family. They will appreciate the effort and the delicious results.

Dried Cherry Cookies Recipe: Irresistibly Delicious Treats

Credit: www.twopeasandtheirpod.com

Nutritional Information

Nutritional information is crucial for health-conscious bakers. Let’s explore the nutritional details of dried cherry cookies. This section covers calorie count and health benefits.

Calorie Count

Each dried cherry cookie contains around 80 calories. This includes the calories from dried cherries, butter, sugar, and flour. Portion control helps keep calorie intake in check. Enjoy these cookies in moderation.

Health Benefits

Dried cherries are rich in antioxidants. They help fight inflammation and boost immunity. These cookies also provide dietary fiber. Fiber aids digestion and promotes satiety. Butter offers a source of healthy fats. Healthy fats are essential for brain function.

Incorporating dried cherry cookies into a balanced diet can be beneficial. They offer a sweet treat with added nutritional value.

Variations And Tips

Dried Cherry Cookies are a delightful treat. They are loved for their sweet and tangy taste. This section covers variations and tips. It will help you create the best cookies.

Flavor Variations

Experiment with different flavors to suit your taste. Add white chocolate chips for extra sweetness. Or try dark chocolate for a richer flavor. You can also mix in nuts like almonds or pecans. They add a nice crunch. For a festive touch, sprinkle in some cinnamon or nutmeg. These spices add warmth and depth.

Baking Tips

Use softened butter for a smooth dough. This ensures even mixing. Chill the dough for at least 30 minutes. This helps the cookies hold their shape. Bake the cookies on a parchment-lined sheet. It prevents sticking and makes cleanup easy. Watch the baking time closely. Overbaking can make cookies dry. Aim for a light golden color. Let the cookies cool on the baking sheet. They continue to firm up as they cool.

Dried Cherry Cookies Recipe: Irresistibly Delicious Treats

Credit: mycookiejourney.com

Frequently Asked Questions

How Do You Make Dried Cherry Cookies?

To make dried cherry cookies, mix butter, sugar, eggs, flour, and dried cherries. Bake at 350°F for 12-15 minutes.

Can I Substitute Dried Cherries In Cookies?

Yes, you can substitute dried cherries with cranberries, raisins, or other dried fruits in your cookie recipe.

Are Dried Cherry Cookies Healthy?

Dried cherry cookies can be healthy if made with whole grain flour and less sugar. They provide antioxidants.

How Long Do Dried Cherry Cookies Last?

Dried cherry cookies last up to 1 week when stored in an airtight container at room temperature.

Conclusion

Baking dried cherry cookies is simple and rewarding. The sweet, tart cherries add a unique flavor. These cookies are perfect for any occasion. Enjoy them with family or share with friends. Try this easy recipe today. Your taste buds will thank you.

Happy baking!

Best Nutella Cake Recipe: Irresistibly Delicious and Easy to Make

Who doesn’t love Nutella? This creamy, chocolate-hazelnut spread has won hearts worldwide.

Now, imagine it in a cake. Tempting, right? Nutella cake is a dream for dessert lovers. It’s rich, moist, and absolutely delicious. Whether you’re baking for a birthday, a special event, or just to satisfy your sweet tooth, this cake hits the spot.

It’s not just about the taste; the simplicity of the recipe makes it perfect for both beginners and seasoned bakers. With a few basic ingredients and a little bit of love, you can whip up a cake that looks like it came from a bakery. So, get ready to impress your friends and family with the best Nutella cake recipe ever. Dive in and discover the magic of Nutella in cake form!

Best Nutella Cake Recipe: Irresistibly Delicious and Easy to Make

Credit: richanddelish.com

Introduction To Nutella Cake

Nutella cake has taken the dessert world by storm. This cake combines the rich, creamy goodness of Nutella with the classic texture of a moist cake. It’s perfect for any celebration or just as a delightful treat.

Why Nutella Cake?

Nutella cake offers a unique flavor profile. The hazelnut spread brings a nutty sweetness that is hard to resist. Imagine biting into a piece of cake that melts in your mouth, leaving a rich, chocolatey taste that lingers.

Here are a few reasons to try Nutella cake:

  • Easy to make with simple ingredients
  • Versatile for any occasion
  • Loved by all age groups
  • Pairs well with various toppings and fillings

Popularity And Appeal

The popularity of Nutella cake has grown rapidly. Social media platforms showcase countless variations, each more tantalizing than the last. Its appeal lies in its simplicity and the universal love for Nutella.

Nutella cake is celebrated for:

  1. Its rich, decadent flavor
  2. Being a crowd-pleaser at gatherings
  3. Ease of customization with different ingredients

Many find Nutella cake the perfect dessert. It’s easy, delicious, and universally appealing. Whether you bake it for a birthday party or a simple family dinner, it never disappoints.

Feature Nutella Cake
Preparation Time 30 minutes
Cooking Time 25 minutes
Difficulty Level Easy

Ingredients

Creating the best Nutella cake starts with gathering the right ingredients. Here, we will list the essential ingredients and optional additions for a delightful Nutella cake. Ensuring you have everything beforehand makes the baking process smoother and more enjoyable.

Essential Ingredients

Ingredient Quantity
Nutella 1 cup
All-purpose flour 1 and 1/2 cups
Sugar 1 cup
Eggs 3 large
Butter 1/2 cup (melted)
Milk 1/2 cup
Baking powder 1 teaspoon
Salt 1/2 teaspoon
Vanilla extract 1 teaspoon

Optional Additions

  • Chopped hazelnuts: Add 1/2 cup for a crunchy texture.
  • Chocolate chips: Mix in 1/2 cup for extra chocolate flavor.
  • Cocoa powder: Add 2 tablespoons for a richer taste.
  • Whipped cream: Use as a topping for a creamy finish.
  • Fresh strawberries: Serve on the side for a fruity touch.

These optional additions can enhance the flavor and texture of your Nutella cake. Feel free to experiment and find your favorite combination!

Preparation Steps

Making a Nutella Cake is easier than you think. Follow these simple preparation steps to create a delicious and mouth-watering dessert.

Gathering Ingredients

Begin by gathering all the necessary ingredients. Here is a quick list:

  • 1 cup of all-purpose flour
  • 1/2 cup of cocoa powder
  • 1 teaspoon of baking powder
  • 1/2 teaspoon of baking soda
  • 1/4 teaspoon of salt
  • 1 cup of sugar
  • 2 large eggs
  • 1/2 cup of vegetable oil
  • 1 teaspoon of vanilla extract
  • 1/2 cup of milk
  • 1/2 cup of Nutella

Make sure you have everything measured and ready. This will make the process smooth.

Prepping Your Workspace

Before you start mixing, make sure your workspace is ready. Here are the steps:

  1. Clean your countertop to ensure it’s free of clutter.
  2. Preheat your oven to 350°F (175°C).
  3. Grease and flour your cake pan to prevent sticking.
  4. Set out mixing bowls, a whisk, and a spatula.

A well-prepped workspace makes baking enjoyable. You can focus on creating a perfect cake.

With these steps, you are ready to create a delicious Nutella Cake. Happy baking!

Best Nutella Cake Recipe: Irresistibly Delicious and Easy to Make

Credit: simplyhomecooked.com

Mixing The Batter

Mixing the batter is a crucial step in making the best Nutella cake. It sets the foundation for a moist and fluffy dessert. Follow these steps to ensure a perfect mix.

Combining Dry Ingredients

Start with a large mixing bowl. Add flour, sugar, cocoa powder, baking powder, and a pinch of salt. Use a whisk to combine these ingredients. Make sure there are no lumps. This ensures a smooth batter.

Adding Wet Ingredients

In another bowl, combine eggs, milk, vanilla extract, and melted butter. Whisk until smooth. Now, slowly pour the wet mixture into the dry ingredients. Stir gently. Avoid over-mixing. This keeps the batter light and airy.

Finally, add a generous amount of Nutella. Fold it in gently. The goal is to have streaks of Nutella throughout the batter. This gives a marbled effect in the finished cake.

Baking Process

The baking process is crucial for a perfect Nutella cake. Follow these steps to ensure your cake turns out moist and delicious.

Setting The Oven

Begin by preheating your oven to 350°F (175°C). This ensures the oven is at the right temperature. Proper preheating is essential for even baking. Place the oven rack in the middle position. This allows the cake to bake evenly. Use an oven thermometer if needed. This guarantees an accurate temperature reading.

Monitoring The Bake

Once the cake is in the oven, keep an eye on it. Baking times may vary. Set a timer for 25 minutes to start. Check the cake by inserting a toothpick in the center. If it comes out clean, the cake is ready. If not, bake for an additional 5 minutes. Keep checking every few minutes. Avoid opening the oven door too often. This can cause the cake to sink.

Frosting And Decoration

Creating the perfect Nutella cake is only half the fun. The other half? Frosting and decoration. This is where you can truly let your creativity shine. Below, we will guide you through preparing a delicious Nutella frosting and share some decorating tips to make your cake look as good as it tastes.

Preparing Nutella Frosting

Nutella frosting is rich, creamy, and incredibly easy to make. Here’s a simple recipe to get you started:

Ingredients Amount
Butter (room temperature) 1 cup
Nutella 1 cup
Powdered Sugar 2 cups
Vanilla Extract 1 teaspoon
Heavy Cream 2-3 tablespoons

Instructions:

  1. In a large bowl, beat the butter until smooth and creamy.
  2. Add Nutella and beat until well combined.
  3. Gradually add powdered sugar, mixing until smooth.
  4. Add vanilla extract and mix well.
  5. Add heavy cream, one tablespoon at a time, until the desired consistency is reached.

Decorating Tips

Once your Nutella frosting is ready, it’s time to decorate. Here are some tips:

  • Smooth Finish: Use a spatula to evenly spread frosting over the cake.
  • Piping: Use a piping bag for detailed decorations. Choose different tips for various designs.
  • Garnish: Add chopped hazelnuts, chocolate shavings, or fresh berries on top.
  • Layered Cake: Apply frosting between layers for added flavor and height.

Decorating your Nutella cake is your chance to get creative. Whether you prefer a simple finish or intricate designs, these tips will help make your cake beautiful and delicious.

Serving Suggestions

The Best Nutella Cake Recipe is a treat. But how you serve it can elevate your experience. Here, we explore the best ways to serve this delicious cake. These suggestions will help you make the most of each bite.

Ideal Serving Sizes

When serving Nutella cake, portion size matters. A small slice can be very satisfying. Aim for a slice that is about 2 inches wide. This size is perfect for dessert. If you have a bigger appetite, you can go for a 3-inch slice. Always remember, it’s rich and indulgent. Smaller slices are often more enjoyable.

Complementary Pairings

Pairing your Nutella cake with the right items can enhance the flavor. Fresh berries are a great choice. Strawberries, raspberries, and blueberries work well. They add a fresh contrast to the rich cake. A scoop of vanilla ice cream is another excellent pairing. The cold ice cream balances the warm, gooey Nutella. For a simple touch, a dollop of whipped cream is perfect.

Drinks can also complement your Nutella cake. A hot cup of coffee or espresso pairs nicely. The bitterness of the coffee balances the sweetness. If you prefer something cold, try a glass of milk. It adds a refreshing element to your dessert.

Storing And Reheating

Enjoying a slice of Nutella cake is pure bliss. But what to do with leftovers? Proper storing and reheating can keep your cake fresh. Let’s explore the best methods to store and reheat Nutella cake. This ensures every bite tastes as delightful as the first.

Proper Storage Methods

Store Nutella cake in an airtight container. This keeps the cake moist and flavorful. You can keep it at room temperature for up to two days. For longer storage, refrigerate it. Wrap the cake in plastic wrap before placing it in the fridge. This prevents the cake from drying out.

To store for an extended period, freeze the cake. Wrap it tightly in plastic wrap. Then, place it in a freezer-safe bag. The cake can last up to three months in the freezer. Thaw it at room temperature before serving.

Reheating Tips

Reheat Nutella cake to enjoy it warm and fresh. Use a microwave for quick reheating. Place a slice on a microwave-safe plate. Cover it with a damp paper towel. Microwave on medium power for 20-30 seconds. Check if it is warm enough. If not, heat for a few more seconds.

An oven is another option for reheating. Preheat the oven to 300°F (150°C). Wrap the cake slice in aluminum foil. Place it on a baking sheet. Heat for 10-15 minutes. The cake will be warm and just as delicious as when first baked.

Best Nutella Cake Recipe: Irresistibly Delicious and Easy to Make

Credit: chelsweets.com

Frequently Asked Questions

What Are The Main Ingredients In A Nutella Cake?

The main ingredients in a Nutella cake include flour, sugar, eggs, butter, and Nutella. These create a delicious, moist cake.

How Long Does It Take To Bake A Nutella Cake?

Baking a Nutella cake typically takes around 30 to 40 minutes. Ensure the cake is fully baked by testing with a toothpick.

Can I Use A Different Frosting For Nutella Cake?

Yes, you can use different frostings for Nutella cake. Cream cheese frosting or whipped cream pairs well with Nutella.

Is Nutella Cake Suitable For Vegetarians?

Yes, Nutella cake is suitable for vegetarians. Just ensure all other ingredients are also vegetarian-friendly.

Conclusion

This Nutella cake recipe offers a delightful treat for any occasion. Simple ingredients create a rich, moist cake. Perfect for birthdays, gatherings, or casual desserts. Your guests will love every bite. Enjoy making this easy recipe and share the joy.

Happy baking!

Roasted Peppers And Onions Recipe: Delicious and Easy Guide

Roasted peppers and onions make a delicious, colorful side dish. This simple recipe brings out their natural sweetness and flavors.

Imagine a dish that’s easy to make and bursting with flavor. Roasted peppers and onions are perfect for any meal. They pair well with meat, fish, or even on their own. The roasting process caramelizes the vegetables, enhancing their taste.

This recipe requires minimal ingredients, making it a favorite for busy cooks. Plus, it’s healthy and full of nutrients. Whether you are an experienced chef or a beginner, this recipe is straightforward and satisfying. Ready to add some vibrant colors and rich flavors to your table? Let’s dive into the details of making roasted peppers and onions.

Roasted Peppers And Onions Recipe: Delicious and Easy Guide

Credit: www.knowyourproduce.com

Ingredients

This Roasted Peppers and Onions recipe features fresh bell peppers and sweet onions. Seasoned with olive oil, garlic, and herbs. Perfect for any meal.

Roasting peppers and onions brings out their natural sweetness and enhances their flavor. This recipe is simple, healthy, and incredibly delicious. Let’s start by discussing the ingredients needed to make this delightful dish.

List Of Ingredients

For this roasted peppers and onions recipe, you will need: – 3 bell peppers (red, yellow, and green) – 2 large onions – 2 tablespoons olive oil – 1 teaspoon salt – 1/2 teaspoon black pepper – 1 teaspoon dried oregano – 1 teaspoon garlic powder These ingredients are easy to find at any grocery store.

Choosing Fresh Produce

Fresh produce is key for this recipe. Choose firm bell peppers. They should be bright and vibrant. Avoid any with soft spots or wrinkles. For onions, select ones that feel heavy. Their skins should be dry and papery. Fresh produce will ensure your dish tastes the best. Using fresh ingredients makes a huge difference. It enhances the flavors and texture. Enjoy the process of selecting the best produce for this simple, yet tasty recipe.

Preparation

Preparing roasted peppers and onions is an easy and enjoyable process. With a few simple steps, you can enhance the flavors of these vegetables. Follow the guide below to ensure your dish is flavorful and well-prepared.

Cleaning And Slicing

Start by cleaning the peppers and onions. Rinse them under cold water. Ensure all dirt is removed. Dry them with a clean towel.

Next, slice the vegetables. Cut the peppers into strips. Remove the seeds and inner membranes. Slice the onions into thin rings. Keep the slices even for uniform cooking.

Marinating Tips

Marinating adds flavor to your roasted peppers and onions. Combine olive oil, salt, and pepper in a bowl. Optionally, add garlic and herbs. Mix well.

Place the sliced vegetables in the bowl. Toss them in the marinade. Ensure each piece is coated. Let them sit for 15-20 minutes. This allows the flavors to penetrate.

Cooking Methods

Roasting peppers and onions brings out their natural sweetness. It adds a delicious depth of flavor. Different cooking methods can achieve this tasty result. Let’s explore two popular methods: oven roasting and grill roasting.

Oven Roasting

Oven roasting is an easy way to cook peppers and onions. Preheat your oven to 400°F (200°C). Slice the peppers and onions into strips. Spread them evenly on a baking sheet. Drizzle olive oil over the vegetables. Sprinkle with salt and pepper. Toss everything to coat well. Place the sheet in the oven. Roast for 20-25 minutes. Stir the vegetables halfway through. The edges should be slightly charred. The vegetables will be tender and caramelized. The aroma will fill your kitchen. Enjoy them hot or at room temperature.

Grill Roasting

Grill roasting adds a smoky flavor to peppers and onions. Preheat your grill to medium-high heat. Slice the vegetables into thick strips. Brush them with olive oil. Season with salt and pepper. Place the peppers and onions directly on the grill. Cook for about 4-5 minutes per side. Use tongs to turn them. You want grill marks and a bit of char. The vegetables should be tender and flavorful. Remove from the grill. Serve them warm or let them cool. This method brings a unique taste to your dish.

Roasted Peppers And Onions Recipe: Delicious and Easy Guide

Credit: www.eatingwell.com

Seasoning Options

Seasoning options for roasted peppers and onions can transform this simple dish into a flavorful delight. Whether you prefer basic seasonings or more advanced flavor profiles, there are endless ways to enhance the taste of your roasted vegetables. Let’s explore some seasoning options to make your dish stand out.

Basic Seasoning

Start with simple seasonings. Salt and pepper are essential. Add olive oil for a rich flavor. Garlic powder can bring a mild pungency. A touch of dried oregano or basil can provide an earthy note. These basic seasonings can elevate your roasted peppers and onions.

Advanced Flavoring

For a more complex taste, try advanced flavoring. Use smoked paprika for a hint of smokiness. Add cumin for a warm, earthy flavor. A splash of balsamic vinegar can add sweetness and tang. Fresh herbs like thyme or rosemary can bring aromatic depth. Experiment with these advanced options to create a unique dish.

Serving Suggestions

Roasted peppers and onions are a versatile side dish. They can complement a range of meals with their sweet and savory flavors. Below are some serving suggestions to elevate your dining experience.

Pairing With Dishes

Roasted peppers and onions can pair well with various dishes. Here are some delicious ideas:

  • Grilled meats: Serve alongside grilled chicken, steak, or fish for a smoky flavor.
  • Pasta: Toss with pasta, olive oil, and fresh herbs for a simple meal.
  • Sandwiches: Add to sandwiches or wraps for a burst of flavor.
  • Salads: Mix into salads for extra color and taste.
  • Pizza: Use as a topping on homemade pizzas.

Presentation Tips

Make your roasted peppers and onions look as good as they taste with these tips:

  1. Color contrast: Use a mix of red, yellow, and green peppers for a vibrant look.
  2. Garnish: Sprinkle with fresh herbs like parsley or basil before serving.
  3. Serving dishes: Present in a colorful bowl or on a platter.
  4. Layering: Layer the veggies with other side dishes for a visually appealing plate.
  5. Temperature: Serve warm but not too hot, to enhance their natural sweetness.

By following these serving suggestions, you can turn a simple dish of roasted peppers and onions into a delightful addition to any meal.

Storage Tips

Storing roasted peppers and onions properly can help extend their freshness and flavor. This section provides essential storage tips to ensure your dish remains delicious for as long as possible. Learn how to store your leftovers in the fridge or freezer for optimal results.

Refrigeration

Place the roasted peppers and onions in an airtight container. This will keep them fresh and prevent odor transfer. Store the container in the refrigerator. They will last for up to 5 days. Before eating, reheat them on the stove or in the microwave.

Freezing

For longer storage, freezing is the best option. Allow the roasted peppers and onions to cool completely. Spread them on a baking sheet in a single layer. Freeze for about 1-2 hours. Transfer the frozen pieces to a freezer-safe bag or container. Label with the date. They can be stored for up to 3 months. To use, thaw in the refrigerator overnight. Reheat thoroughly before serving.

Health Benefits

Roasted peppers and onions are not only delicious but also packed with numerous health benefits. These vegetables offer vital nutrients and can be a great addition to a balanced diet. Let’s explore their nutritional value and dietary advantages.

Nutritional Value

Peppers and onions are rich in vitamins and minerals. Below is a table highlighting their key nutrients:

Nutrient Peppers Onions
Vitamin C 97% DV 12% DV
Vitamin A 11% DV 0% DV
Fiber 2.1g 1.7g
Potassium 211mg 146mg

Both vegetables are low in calories and contain no cholesterol. Peppers are especially high in Vitamin C, while onions provide a good amount of fiber.

Dietary Advantages

Eating roasted peppers and onions offers several dietary benefits:

  • Boosts Immunity: High in Vitamin C, which supports immune function.
  • Promotes Digestion: Fiber aids in digestion and prevents constipation.
  • Anti-inflammatory Properties: Onions contain antioxidants that reduce inflammation.
  • Supports Heart Health: Potassium helps maintain healthy blood pressure.

Including these vegetables in your diet can improve overall health. They are versatile and easy to add to various dishes.

Roasted Peppers And Onions Recipe: Delicious and Easy Guide

Credit: thehappierhomemaker.com

Frequently Asked Questions

How Do You Roast Peppers And Onions?

Roast peppers and onions by slicing them, tossing with olive oil, salt, and pepper. Spread on a baking sheet and bake at 400°F for 20-25 minutes, flipping halfway.

What Spices Go Well With Roasted Peppers And Onions?

Common spices include garlic powder, paprika, thyme, and Italian seasoning. They enhance the natural flavors, making the dish more delicious.

Can Roasted Peppers And Onions Be Frozen?

Yes, roasted peppers and onions can be frozen. Allow them to cool, then store in airtight containers or freezer bags for up to 3 months.

How Long Do Roasted Peppers And Onions Last?

Roasted peppers and onions last up to 5 days when stored in an airtight container in the refrigerator. Always reheat before consuming.

Conclusion

Roasted peppers and onions are a delicious, easy-to-make side dish. Their flavors blend perfectly. They add color and taste to any meal. You can enjoy them with meats, pasta, or salads. This recipe is simple and quick. It’s perfect for weeknight dinners or gatherings.

Try making roasted peppers and onions today. Your taste buds will thank you. Enjoy the vibrant flavors and healthy benefits. Happy cooking!