Beef Fried Noodles Recipe: Delicious and Easy Weeknight Dinner

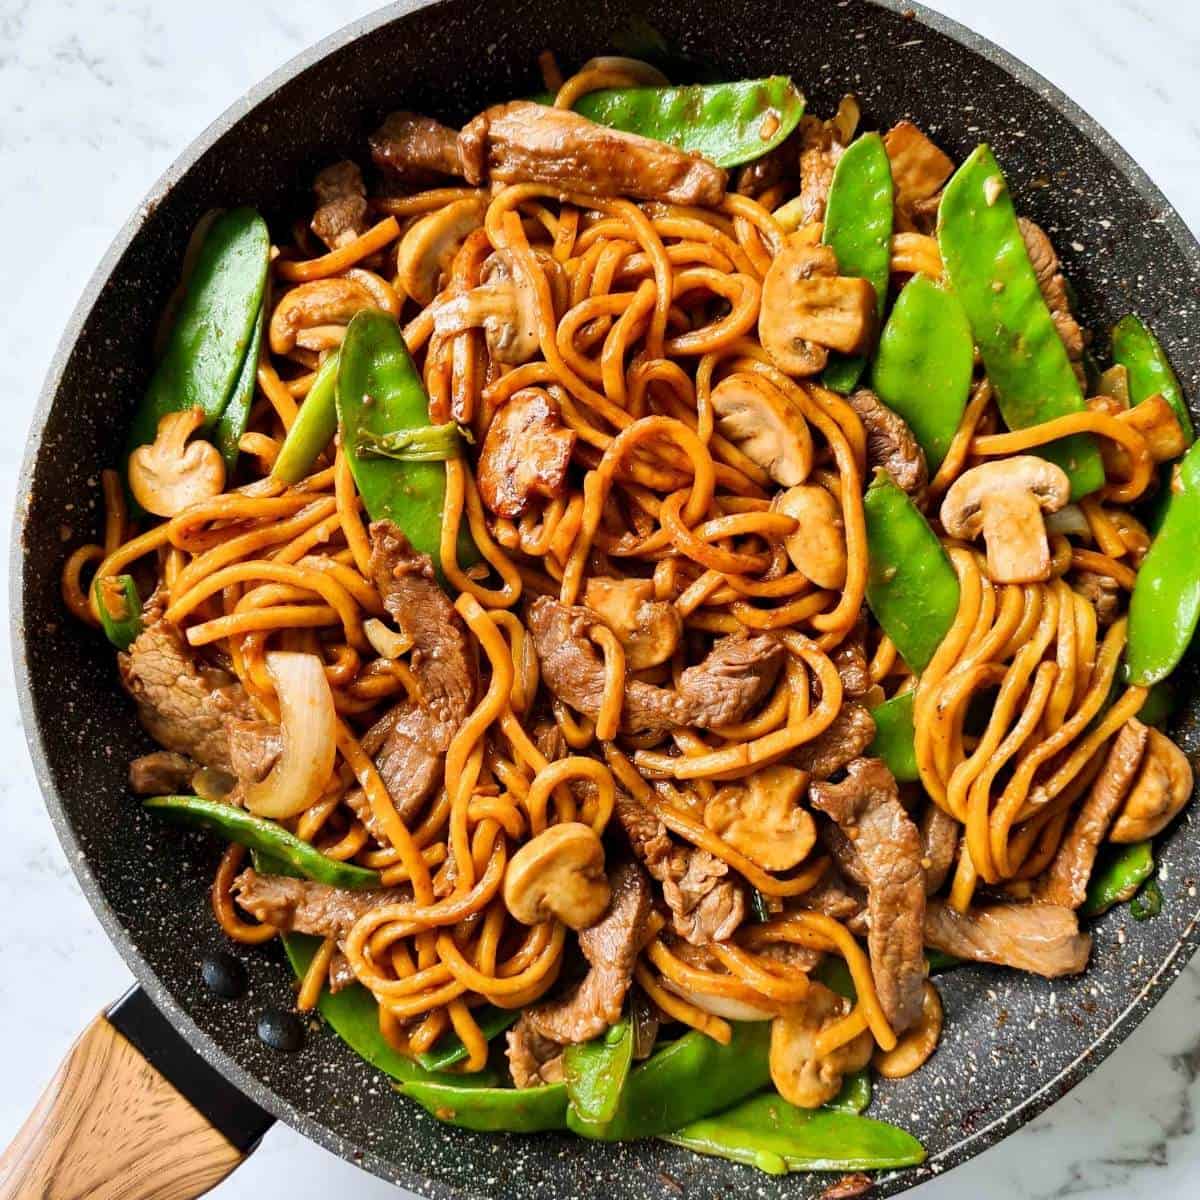
Craving a delicious, easy-to-make meal? Try this Beef Fried Noodles recipe.

It’s a perfect mix of savory beef and tasty noodles, ready in just minutes. Beef Fried Noodles is a popular dish in many Asian cuisines. The combination of tender beef, fresh vegetables, and flavorful noodles creates a mouthwatering experience. Whether you’re a kitchen newbie or a seasoned cook, this recipe is simple to follow.

The ingredients are easy to find, making it a convenient choice for any night of the week. Plus, the dish is versatile. You can adjust the flavors to suit your taste. Ready to impress your family or friends with a restaurant-quality meal? Let’s dive into this scrumptious Beef Fried Noodles recipe!

Beef Fried Noodles Recipe: Delicious and Easy Weeknight Dinner

Credit: www.recipetineats.com

Ingredients

When preparing Beef Fried Noodles, the ingredients are crucial. Each component brings its unique flavor to the dish. Below, we break down the essential ingredients needed for this delicious recipe.

Beef

Choose tender cuts of beef. Sirloin or ribeye work well. Slice the beef thinly. This helps it cook quickly and evenly. Marinate the beef for added flavor.

Noodles

Use egg noodles for this recipe. They absorb the sauce well. Cook the noodles until they are al dente. This ensures they don’t become mushy in the stir-fry.

Vegetables

Fresh vegetables add crunch and color. Common choices include bell peppers, carrots, and broccoli. Slice them thinly to match the beef strips. This helps them cook evenly.

Sauce

The sauce ties everything together. A mix of soy sauce, oyster sauce, and sesame oil works great. It adds a savory and slightly sweet flavor. Adjust the sauce to your taste preference.

Spices

Spices enhance the overall taste. Garlic and ginger are must-haves. They add depth and warmth. A pinch of pepper adds a bit of heat. Adjust the spices to suit your palate.

Preparation Steps

Creating the perfect Beef Fried Noodles requires some essential preparation steps. These steps ensure your dish is flavorful and well-cooked. Follow these easy steps to prepare your ingredients efficiently.

Marinating Beef

Marinating beef is crucial for flavor. Start with fresh beef slices. Place them in a bowl.

  • Add soy sauce, oyster sauce, and a pinch of sugar.
  • Include minced garlic and a splash of sesame oil.
  • Mix well and let it sit for 20 minutes.

This step allows the beef to absorb all the flavors, making it tender and delicious.

Chopping Vegetables

Properly chopped vegetables enhance the dish’s texture and taste.

Vegetable Cutting Style
Carrots Julienne
Bell Peppers Thin strips
Onions Slices
Broccoli Small florets

Keep all vegetables in separate bowls for easy access during cooking.

Cooking Noodles

Cook the noodles according to package instructions.

  1. Boil water in a large pot.
  2. Add noodles and cook until al dente.
  3. Drain and rinse with cold water.
  4. Toss with a bit of oil to prevent sticking.

Cooking noodles properly ensures they remain firm and do not turn mushy.

Cooking Beef

Try this delicious beef fried noodles recipe. Quick and easy, it combines tender beef, fresh vegetables, and savory noodles. Perfect for a tasty weeknight dinner.

Cooking the beef is a crucial step in making beef fried noodles. The beef must be tender and flavorful. Follow these steps to ensure the best results.

Heating The Pan

Start by heating your pan on medium-high heat. Ensure it is hot before adding any oil. A hot pan sears the beef better. It creates a nice crust.

Searing The Beef

Add a small amount of oil to the hot pan. Then, add the beef slices. Sear the beef on one side until browned. This should take about 2-3 minutes. Flip the beef and sear the other side. The goal is to lock in the juices.

Setting Beef Aside

Once the beef is seared, remove it from the pan. Set it aside on a plate. This step ensures the beef does not overcook. You will add the beef back to the noodles later. “`

Stir-frying Vegetables

The secret to delicious beef fried noodles lies in the perfect stir-fry of vegetables. This step ensures your dish is colorful, flavorful, and nutritious. Let’s dive into the process of stir-frying vegetables, which is a crucial part of this recipe.

Heating Oil

Begin by heating a generous amount of oil in a wok or large skillet. Use high heat to ensure the vegetables cook quickly and retain their crunch. Peanut oil or sesame oil are great options due to their high smoke points and rich flavors. Once the oil is hot, you’re ready to add the vegetables.

Adding Vegetables

Start with the hardest vegetables first, like carrots and bell peppers. Stir-fry these for a couple of minutes until they begin to soften. Next, add the softer vegetables such as broccoli, snap peas, and baby corn. Keep the vegetables moving in the pan to ensure even cooking and prevent burning.

Cooking Until Tender

Continue stir-frying the vegetables until they are tender-crisp. This means they should be cooked through but still have a slight crunch. Avoid overcooking the vegetables as they will lose their texture and nutrients. Once done, remove the vegetables from the wok and set them aside. They will be added back to the pan later with the noodles and beef.

Combining Ingredients

Combining ingredients is a crucial step in making delicious beef fried noodles. Each component must meld well with the others. Start by preparing your noodles, beef, vegetables, and sauce. Ensure all are ready before you begin cooking. This guarantees a smooth process and a tasty result.

Adding Noodles

Add the noodles to boiling water. Cook them until they are al dente. This means they should be firm to the bite. Drain the noodles and rinse them under cold water. This stops the cooking process and keeps them from sticking together. Set the noodles aside for later.

Mixing Beef And Vegetables

Heat oil in a large pan or wok. Add thinly sliced beef to the hot oil. Stir-fry until the beef is browned and cooked through. Remove the beef from the pan and set it aside. In the same pan, add your choice of vegetables. Common choices are bell peppers, carrots, and broccoli. Stir-fry the vegetables until they are tender but still crisp. Return the cooked beef to the pan. Mix well to combine the beef and vegetables.

Pouring Sauce

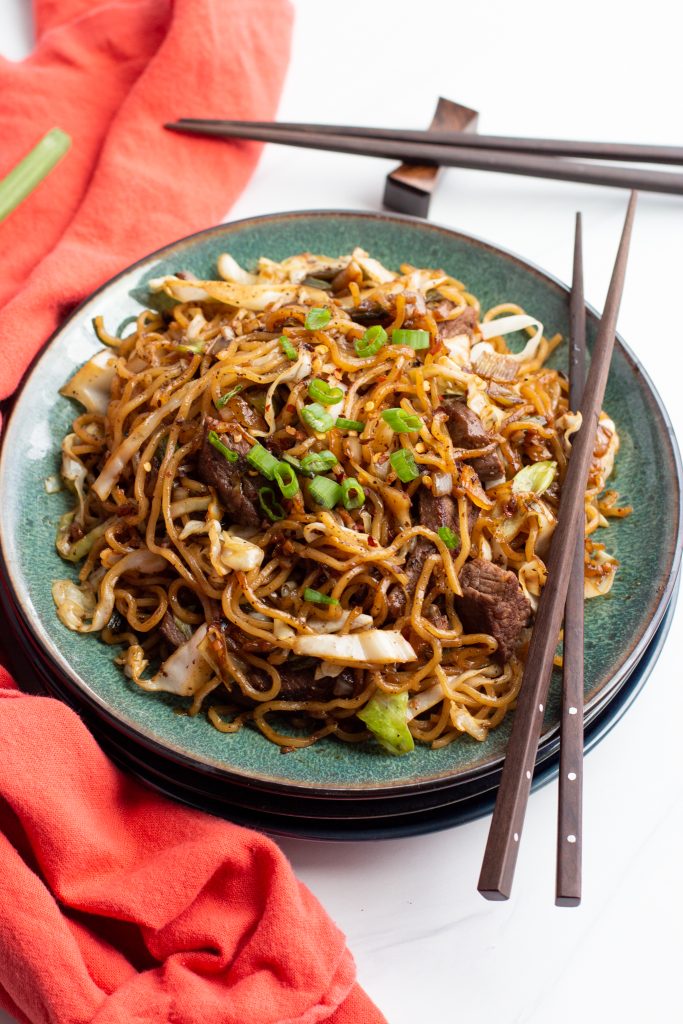
Prepare the sauce while the beef and vegetables cook. A simple sauce includes soy sauce, oyster sauce, and a bit of sugar. Mix the ingredients in a bowl. Pour the prepared sauce over the beef and vegetables. Stir well to coat everything evenly. Add the cooked noodles to the pan. Toss everything together until the noodles are well-coated with sauce. Serve hot and enjoy!

Beef Fried Noodles Recipe: Delicious and Easy Weeknight Dinner

Credit: m.youtube.com

Final Touches

Adding the final touches to your Beef Fried Noodles makes all the difference. These small steps enhance the flavor and presentation of your dish. Let’s dive into the key aspects of this process.

Adjusting Seasoning

After cooking, taste your noodles. This step is essential. You need to ensure the seasoning is perfect. If it tastes bland, add a bit more soy sauce or a pinch of salt.

If it’s too salty, balance it with a splash of rice vinegar. You can also add a bit of sugar to enhance the flavors. Remember, the goal is to achieve a balanced taste.

Garnishing

Garnishing adds visual appeal and extra flavor to your dish. Top your noodles with fresh herbs like chopped cilantro or green onions. These herbs add a burst of freshness.

For a bit of crunch, sprinkle some toasted sesame seeds. A few slices of red chili can add a nice color contrast and a touch of heat. Don’t forget to add a wedge of lime on the side. This allows everyone to add a bit of tanginess if they like.

Serving

Serving your Beef Fried Noodles correctly is key to a great dining experience. Use a shallow bowl or a plate with a bit of depth. This helps to keep all the ingredients together.

Place the noodles in the center and arrange the beef slices on top. Make sure to distribute the garnishes evenly. This not only looks good but also ensures every bite is flavorful.

Serve immediately while it’s hot to enjoy the best taste and texture. Pairing with a simple side salad or steamed vegetables can make the meal complete.

Serving Suggestions

Pairing your Beef Fried Noodles with the right side dishes and beverages can elevate the meal. Presenting the dish attractively can also make it more appealing. Here are some serving suggestions to make your meal special.

Side Dishes

The right side dish complements the rich flavors of beef fried noodles. Here are some options:

  • Steamed Vegetables: Broccoli, carrots, and snap peas balance the meal.
  • Spring Rolls: Light and crispy, they add texture.
  • Cucumber Salad: Refreshing and cool, it contrasts the warm noodles.

Beverage Pairings

Choosing the right drink enhances the dining experience. Consider these options:

  • Green Tea: Cleanses the palate and aids digestion.
  • Lemon Water: Refreshing and balances the flavors.
  • Light Beer: Pairs well with the hearty noodles.

Presentation Tips

A well-presented dish is more appealing. Here are some tips:

  1. Garnish with Fresh Herbs: Sprinkle chopped green onions or cilantro.
  2. Serve in a Bowl: Keeps the noodles warm and looks inviting.
  3. Add a Lemon Wedge: Adds color and a fresh option.

These serving suggestions ensure your beef fried noodles are both delicious and visually appealing.

Beef Fried Noodles Recipe: Delicious and Easy Weeknight Dinner

Credit: blackberrybabe.com

Tips And Variations

Beef fried noodles are a delicious and easy dish. You can make it even better with these tips and variations. Try different proteins, vegetarian options, and spice levels. Let’s dive in!

Alternative Proteins

Beef is great, but you can use other proteins too. Here are some options:

  • Chicken: Use boneless, skinless chicken breasts or thighs. Slice them thin.
  • Pork: Pork tenderloin or chops work well. Slice them thin too.
  • Shrimp: Shrimp cooks quickly. Add it in the last few minutes of cooking.
  • Tofu: Firm tofu is a great protein. Press it to remove water, then cube it.

Vegetarian Options

Want a vegetarian version? No problem! Try these ideas:

  • Mushrooms: Use a mix of mushrooms like shiitake, oyster, and button. They add a meaty texture.
  • Tempeh: Tempeh is a fermented soy product. Slice it thin and sauté it for a nutty flavor.
  • Seitan: Also known as wheat meat, seitan is high in protein. Slice it thin.

Spice Level Adjustments

Adjust the spice level to suit your taste. Here are some tips:

  1. Mild: Use less chili flakes or omit them. Add sweet bell peppers for flavor.
  2. Medium: Use a moderate amount of chili flakes or a mild chili sauce.
  3. Spicy: Add more chili flakes or use a hot chili sauce. You can also add fresh chili peppers.

Remember, you can always add more spice, but it’s hard to take it away. Adjust slowly!

Protein Cooking Time
Chicken 4-5 minutes
Pork 3-4 minutes
Shrimp 2-3 minutes
Tofu 5-7 minutes

Experiment with these tips and variations. Make your beef fried noodles unique and tasty!

Frequently Asked Questions

How To Make Beef Fried Noodles?

To make beef fried noodles, cook beef strips until browned. Stir-fry vegetables, add cooked noodles, and mix everything together with sauce.

What Ingredients Are In Beef Fried Noodles?

Beef fried noodles typically include beef strips, noodles, soy sauce, garlic, ginger, and mixed vegetables like bell peppers and carrots.

Can I Use Other Meats Instead Of Beef?

Yes, you can substitute beef with chicken, pork, or shrimp. Adjust the cooking time accordingly to ensure the meat is properly cooked.

Are Beef Fried Noodles Healthy?

Beef fried noodles can be healthy if made with lean beef, lots of vegetables, and minimal oil. Use whole-grain noodles for added fiber.

Conclusion

Enjoy creating this beef fried noodles recipe at home. It’s quick and easy. Perfect for busy weeknights. Packed with flavor and nutritious ingredients. Your family will love it. Happy cooking! Savor the delicious taste of homemade noodles. Share this delightful recipe with friends.

They’ll thank you. Remember, cooking is fun. Experiment with different vegetables and spices. Make it your own. Satisfy your taste buds. Simple, hearty, and delicious. Enjoy every bite!

Cheesecake Factory Piccata Recipe: Authentic & Delicious Copycat

Craving a delicious dish from Cheesecake Factory at home? The Chicken Piccata recipe is a fantastic choice.

It’s flavorful, easy to make, and sure to impress. The Cheesecake Factory’s Chicken Piccata is a beloved dish. It’s known for its tender chicken, tangy lemon sauce, and capers. Preparing this dish at home can seem daunting, but it’s simpler than you think.

With the right ingredients and steps, you can recreate this restaurant favorite in your own kitchen. This recipe is perfect for a family dinner or a special occasion. Let’s explore how to make this mouthwatering Chicken Piccata, bringing the Cheesecake Factory experience to your table.

Cheesecake Factory Piccata Recipe: Authentic & Delicious Copycat

Credit: copykat.com

Introduction To Piccata

Piccata is a classic Italian dish. It’s known for its bright flavors. The dish usually features thinly sliced meat. Chicken or veal are common choices. The meat is cooked in a tangy lemon and caper sauce.

The flavors are fresh and vibrant. Piccata is simple yet elegant. It offers a delightful balance of tastes. The sauce is key to its unique flavor. Lemon juice, white wine, and capers create magic.

History Of Piccata

Piccata has roots in Italian cuisine. It originated in Italy centuries ago. The dish was first made with veal. Veal was a popular meat in Italy. The recipe evolved over time. Chicken became a common substitute.

Italian immigrants brought Piccata to America. The dish gained popularity quickly. It became a restaurant favorite. Many variations emerged. Each adds a unique twist to the original recipe.

Popularity In Modern Cuisine

Piccata is a favorite in modern kitchens. It’s loved for its simple preparation. The dish fits well with healthy diets. The fresh ingredients make it nutritious. Many home cooks enjoy making Piccata.

Restaurants like the Cheesecake Factory feature Piccata. They add their unique touches. This keeps the dish exciting. Piccata remains a beloved dish today. Its flavors are timeless and appealing.

Ingredients Needed

Creating the perfect Cheesecake Factory Piccata at home starts with having the right ingredients. Each component plays a crucial role in delivering the authentic taste and texture. Let’s break down the essential ingredients needed to recreate this delightful dish.

Main Ingredients

Chicken breasts, thinly sliced and pounded
Lemon juice, freshly squeezed for a tangy flavor
Capers, to add a touch of briny saltiness
Butter, unsalted for a creamy base
Chicken broth, for added depth and moisture
Olive oil, for sautéing the chicken and vegetables
Garlic, minced for a rich aroma
All-purpose flour, for dredging the chicken
White wine, to enhance the sauce with a subtle acidity
Parsley, chopped for garnish

Optional Additions

Shallots, finely chopped for a mild onion flavor
Mushrooms, sliced for an earthy taste
Heavy cream, to make the sauce richer
Spinach, for added greens and nutrients
Grated Parmesan cheese, for a savory finish

Preparing The Chicken

Preparing the chicken for the Cheesecake Factory Piccata Recipe is crucial. You want tender, flavorful chicken that pairs perfectly with the tangy piccata sauce. Follow these steps to ensure your chicken is just right.

Slicing The Chicken

Start with boneless, skinless chicken breasts. Place each breast on a cutting board. Use a sharp knife to slice the chicken breast in half horizontally. This gives you thinner pieces that cook evenly and quickly.

You can also pound the chicken to make it even thinner. Place the chicken between two pieces of plastic wrap. Use a meat mallet or rolling pin to gently pound the chicken to an even thickness. This ensures the chicken cooks uniformly.

Seasoning Tips

Seasoning the chicken well is key. Begin by sprinkling both sides with salt and pepper. For extra flavor, consider adding garlic powder and onion powder. These seasonings enhance the taste without overpowering the dish.

You can also marinate the chicken for added flavor. Use a simple marinade of olive oil, lemon juice, and minced garlic. Let the chicken sit in the marinade for at least 30 minutes. This step infuses the chicken with a delicious, zesty flavor.

Here’s a quick table for easy reference:

Ingredients Amount
Salt 1 tsp
Pepper 1/2 tsp
Garlic Powder 1/2 tsp
Onion Powder 1/2 tsp
Olive Oil 2 tbsp
Lemon Juice 2 tbsp
Minced Garlic 2 cloves

Cooking The Chicken

Cooking the chicken is the foundation of the Cheesecake Factory Piccata Recipe. The right techniques ensure the chicken is tender, juicy, and full of flavor. In this section, we’ll explore the best methods for pan-frying the chicken and achieving the perfect texture.

Pan-frying Techniques

Pan-frying chicken for the Piccata recipe requires attention to detail. Use a heavy-bottomed skillet to ensure even heat distribution. Preheat the skillet over medium-high heat. Add enough oil to cover the bottom of the pan. This prevents sticking and ensures even cooking.

Place the chicken breasts in the skillet without crowding. Overcrowding can lead to uneven cooking. Let the chicken cook undisturbed for 3-4 minutes on each side. This creates a golden-brown crust.

Achieving Perfect Texture

Achieving the perfect texture is key for the Piccata recipe. The chicken should be both crispy on the outside and tender on the inside. Use a meat thermometer to check the internal temperature. The safe temperature for chicken is 165°F (74°C).

To keep the chicken tender, avoid overcooking. Overcooked chicken becomes dry and tough. If the chicken cooks too quickly on the outside, reduce the heat. This allows the inside to cook without burning the outside.

Once the chicken reaches the desired temperature, remove it from the skillet. Let it rest for a few minutes before serving. This helps the juices redistribute, keeping the chicken moist and flavorful.

Making The Piccata Sauce

The Piccata Sauce is the heart of the Cheesecake Factory Piccata Recipe. This sauce is tangy, buttery, and full of flavor. It’s what makes the dish so special. Let’s dive into the key ingredients and how to balance them for a perfect sauce.

Key Sauce Ingredients

To make the Piccata Sauce, you need a few essential ingredients. These are:

  • Butter: Adds richness and a creamy texture.
  • Lemon Juice: Provides the tangy flavor.
  • Chicken Broth: Adds depth and umami.
  • Capers: Bring a salty, briny taste.
  • Garlic: Adds a warm, aromatic flavor.
  • White Wine: Adds acidity and complexity.
  • Parsley: Freshens up the sauce with a hint of green.

Balancing Flavors

Balancing the flavors in the Piccata Sauce is crucial. Follow these tips:

  1. Start with Butter: Melt the butter over medium heat. Ensure it doesn’t brown.
  2. Add Garlic: Sauté the minced garlic until fragrant. This takes about 30 seconds.
  3. Pour in White Wine: Let it simmer and reduce to half. This removes the alcohol but keeps the flavor.
  4. Add Chicken Broth: Stir in the broth for a savory base. Let it simmer.
  5. Squeeze in Lemon Juice: Add fresh lemon juice. It should be tangy but not overpowering.
  6. Mix in Capers: Add capers for a salty, briny flavor. They provide a nice contrast.
  7. Finish with Parsley: Sprinkle chopped parsley. It adds a fresh, green note.

Taste the sauce as you go. Adjust each ingredient as needed. The goal is a balanced, flavorful sauce. Perfect for your Piccata dish.

Combining Chicken And Sauce

One of the most beloved dishes from the Cheesecake Factory is the Chicken Piccata. The key to its delicious flavor lies in the perfect combination of tender chicken and a rich, zesty sauce. This combination creates a mouth-watering experience that is sure to delight your taste buds. Let’s dive into the process of combining chicken and sauce to make this dish truly spectacular.

Simmering Together

Once your chicken is cooked to golden perfection, it’s time to let it simmer in the sauce. The sauce, a blend of lemon juice, white wine, and capers, brings a tangy and savory flavor to the dish.

Place the chicken back into the pan with the sauce. Ensure each piece is well-coated. Let it simmer gently. This allows the flavors to meld. The chicken absorbs the sauce, making it juicy and flavorful.

Here’s a quick tip: don’t rush the simmering process. Slow cooking ensures the chicken remains tender. Use medium-low heat to avoid burning the sauce. Stir occasionally to prevent sticking.

Final Adjustments

Before serving, taste the sauce. This is crucial. Adjust the seasoning if needed. A pinch of salt or a squeeze of lemon can enhance the flavors.

Garnish with fresh parsley. It adds a pop of color and a hint of freshness. Serve immediately, preferably with a side of pasta or steamed vegetables.

Ingredient Adjustment
Salt Add a pinch
Lemon Juice Add a squeeze
Parsley Garnish generously

Follow these steps for a delicious Cheesecake Factory Chicken Piccata. Enjoy the perfect balance of tender chicken and rich sauce!

Serving Suggestions

The Cheesecake Factory Piccata Recipe is a delightful dish. It combines tender chicken with a zesty lemon-caper sauce. But what truly elevates it is how you serve it. Here are some serving suggestions to make your meal memorable.

Pairing With Sides

Pair this piccata with a light, fresh salad. A mixed greens salad with a simple vinaigrette works well. Steamed vegetables are also a good choice. Asparagus or green beans add color and texture to your plate. For a heartier meal, serve with garlic mashed potatoes. The creamy potatoes balance the tangy sauce. You can also opt for a side of pasta. Angel hair pasta tossed with olive oil is perfect.

Presentation Tips

Presentation matters. Arrange the chicken pieces neatly on a plate. Spoon the sauce over the chicken. Sprinkle fresh parsley on top for a burst of color. Use a white plate for a clean look. Position the sides artfully around the chicken. Create contrast with the colors and textures. For a restaurant-style touch, add a lemon slice as a garnish. Remember, a well-presented dish is always more appetizing.

Cheesecake Factory Piccata Recipe: Authentic & Delicious Copycat

Credit: www.theslowroasteditalian.com

Common Mistakes To Avoid

Preparing Cheesecake Factory Piccata at home can be tricky. Avoid common mistakes to ensure your dish tastes perfect. Here are some tips to help you.

Overcooking Chicken

One major mistake is overcooking chicken. This can make the chicken dry and tough. To avoid this, follow these steps:

  • Use a meat thermometer.
  • Cook chicken until it reaches 165°F (74°C).
  • Remove chicken from heat once it reaches the right temperature.

Overcooking chicken can ruin your meal. Pay attention to cooking time. Don’t rush. Keep an eye on the thermometer.

Sauce Consistency Issues

The sauce consistency is crucial for a delicious piccata. Common issues include:

Problem Solution
Sauce too thin Simmer longer to reduce liquid.
Sauce too thick Add a bit of chicken broth.

For the best results, monitor the sauce as it cooks. Adjust thickness as needed. This will ensure a rich, flavorful sauce.

Storing And Reheating

Storing and reheating your Cheesecake Factory Piccata can keep it fresh and tasty. Proper methods ensure your dish retains its flavor and texture. Below, we’ll cover the best ways to store and reheat your leftovers.

Proper Storage Methods

Store your piccata in an airtight container. This helps keep it fresh. Place the container in the refrigerator within two hours of cooking. This prevents bacteria from growing. If you plan to keep it for more than three days, consider freezing it.

For freezing, use a freezer-safe container or a heavy-duty freezer bag. Label the container with the date. This helps you remember how long it’s been stored. Piccata can stay in the freezer for up to three months.

Reheating Techniques

Reheat your piccata gently. This maintains its flavor and texture. You can use a microwave or a stovetop. For microwaving, place the piccata in a microwave-safe dish. Cover it with a microwave-safe lid or plastic wrap. Heat on medium power in 30-second intervals. Stir between intervals to ensure even heating.

For stovetop reheating, use a non-stick pan. Heat the pan over medium heat. Add a small amount of water or broth. This prevents drying out. Add the piccata and stir occasionally. Heat until it reaches your desired temperature.

Never reheat your piccata more than once. This can affect its flavor and safety. Enjoy your Cheesecake Factory Piccata just as delicious as the first time!

Cheesecake Factory Piccata Recipe: Authentic & Delicious Copycat

Credit: www.thefoodhussy.com

Frequently Asked Questions

What Ingredients Are In Cheesecake Factory Piccata?

Cheesecake Factory Piccata features chicken breast, lemon, capers, white wine, and butter. It is typically served with pasta and vegetables.

How To Make Cheesecake Factory Piccata?

To make Cheesecake Factory Piccata, cook chicken, then make a sauce with lemon, capers, white wine, and butter. Serve with pasta.

Can I Use Chicken Thighs For Piccata?

Yes, you can use chicken thighs for Piccata. However, the traditional recipe uses chicken breasts for a lighter taste.

What Wine Pairs Well With Piccata?

A crisp white wine like Sauvignon Blanc or Pinot Grigio pairs well with Piccata. They complement the lemony sauce.

Conclusion

This Cheesecake Factory Piccata recipe brings restaurant flavors to your home. The ingredients are easy to find. The steps are simple to follow. You can impress your family and friends with this delicious dish. Cooking at home can be fun and rewarding.

Try this recipe today and enjoy the taste of Cheesecake Factory in your own kitchen. Happy cooking!

Lowcountry Red Rice Recipe: A Flavorful Southern Classic

Lowcountry Red Rice is a Southern classic. It’s a flavorful, hearty dish.

This recipe brings together rich ingredients to create a comforting meal. Originating from the coastal regions of South Carolina and Georgia, Lowcountry Red Rice is a staple in many homes. It’s known for its vibrant red color, which comes from tomatoes and spices.

This dish is not only delicious but also carries a piece of Southern heritage. Whether you’re a seasoned cook or a beginner, this recipe is easy to follow. Get ready to enjoy a taste of the South with every bite. Dive into the flavors of Lowcountry Red Rice and bring a bit of Southern charm to your kitchen.

Lowcountry Red Rice Recipe: A Flavorful Southern Classic

Credit: www.southyourmouth.com

Ingredients

The Lowcountry Red Rice recipe is a cherished Southern delight. The dish offers a rich blend of flavors that can be adjusted to suit individual tastes. The base ingredients provide the traditional essence, while optional additions can add a unique twist.

Essential Ingredients

The essential ingredients form the foundation of this classic dish. You will need long-grain white rice, as it absorbs flavors well. Onion and bell pepper are crucial for their aromatic qualities. Garlic adds a depth of flavor that complements the dish.

Tomato sauce or crushed tomatoes give the rice its signature red color. Chicken stock or broth is vital for cooking the rice and enhancing its taste. Bacon or smoked sausage provides the necessary smoky flavor. Salt, black pepper, and cayenne pepper are essential spices to balance the flavors.

Optional Additions

Optional additions can customize the dish to your liking. Adding shrimp gives the rice a seafood twist. You can include diced celery for extra crunch. Fresh thyme or bay leaves can enhance the aroma and taste.

For a spicier version, consider adding hot sauce or red pepper flakes. Some people like to include a splash of Worcestershire sauce for added depth. Green onions or parsley can be used for garnish to bring a fresh touch.

Lowcountry Red Rice Recipe: A Flavorful Southern Classic

Credit: www.pinchmeimeating.com

Preparation

Preparation is key to making a delicious Lowcountry Red Rice. It involves a few steps to ensure all ingredients are ready to go. Let’s dive into the preparation process.

Gathering Supplies

Before you start cooking, gather all your supplies. You will need a large pot or Dutch oven. A wooden spoon is great for stirring. Have measuring cups and spoons handy. Also, grab a sharp knife and cutting board. This makes the process smooth and efficient.

Prepping Ingredients

First, rinse the rice under cold water. This removes excess starch. Next, chop onions, bell peppers, and celery. These add flavor and texture. Mince the garlic cloves. Fresh garlic enhances the dish.

Prepare the bacon or sausage by cutting it into small pieces. This adds a smoky taste. Measure out your chicken broth. Also, have your tomato paste and diced tomatoes ready. These provide the rich red color.

Lastly, gather your spices. You will need salt, pepper, and paprika. These seasonings bring out the best flavors. Now, all your ingredients are prepped and ready.

Cooking Method

The cooking method for Lowcountry Red Rice plays a crucial role in its flavor. This Southern dish can be cooked on the stovetop or using alternative methods. Each method offers a unique texture and taste. Below, we will explore these methods in detail.

Stovetop Instructions

Cooking Lowcountry Red Rice on the stovetop is a traditional method. Here’s how you can do it:

  1. First, heat a large pot over medium heat.
  2. Add diced bacon and cook until crispy.
  3. Remove the bacon and set it aside, leaving the fat in the pot.
  4. Add chopped onions, bell peppers, and celery to the pot.
  5. Cook until the vegetables are soft, about 5 minutes.
  6. Next, add minced garlic and cook for another minute.
  7. Stir in long-grain rice and coat it with the vegetable mixture.
  8. Add canned tomatoes, chicken broth, and seasonings.
  9. Bring the mixture to a boil, then reduce the heat to low.
  10. Cover the pot and let it simmer for about 20 minutes.
  11. Fluff the rice with a fork and stir in the cooked bacon.

This method gives the rice a rich, smoky flavor. It also ensures that the rice absorbs all the spices and seasonings. Stovetop cooking is ideal for those who enjoy a hands-on approach.

Alternative Methods

If you prefer a more hands-off approach, consider these alternative methods:

Method Instructions
Oven-Baked
  • Preheat oven to 350°F (175°C).
  • Follow stovetop steps until adding the rice.
  • Transfer the mixture to an oven-safe dish.
  • Cover with foil and bake for 30-40 minutes.
Slow Cooker
  • Combine all ingredients in a slow cooker.
  • Cook on low for 4-5 hours or high for 2-3 hours.

Baking in the oven gives the rice a more uniform texture. Using a slow cooker allows the flavors to meld over time. Both methods are great for busy cooks. Choose the one that suits your schedule best.

Flavor Enhancements

Enhancing the flavor of Lowcountry Red Rice is key to its rich taste. With the right spices and seasonings, this dish stands out. Regional variations also add unique twists, making each version special.

Spices And Seasonings

Spices and seasonings bring life to Lowcountry Red Rice. Common choices include smoked paprika, cayenne pepper, and bay leaves. These spices add depth and a hint of heat.

Garlic and onions are essential. They provide a savory base. Many recipes also use thyme and oregano. These herbs offer a fragrant touch.

Salt and black pepper are basics. They balance the flavors. Some cooks add a splash of hot sauce for an extra kick.

Regional Variations

Lowcountry Red Rice has regional variations. In Charleston, shrimp is a popular addition. It adds a coastal flavor.

Savannah’s version often includes sausage. This ingredient brings a smoky taste. Some areas use ham hocks or bacon. These meats add richness.

Vegetables also vary by region. Bell peppers and celery are common in some recipes. They add crunch and color.

Regional variations make Lowcountry Red Rice versatile. Each version tells a story. Each bite offers a taste of local culture.

Serving Suggestions

Serving Lowcountry Red Rice is an experience. This Southern dish, rich in history and flavor, needs the right accompaniments and presentation to shine. Here are some serving suggestions to make your meal memorable.

Accompaniments

Lowcountry Red Rice pairs beautifully with a variety of sides. Consider these options:

  • Collard Greens: Their slight bitterness contrasts well with the rice’s richness.
  • Fried Catfish: The crispy texture complements the soft, flavorful rice.
  • Black-Eyed Peas: Add a traditional Southern touch to your meal.
  • Pickled Okra: Offers a tangy and crunchy balance.

These sides enhance the meal, providing a full Southern dining experience.

Presentation Tips

Presentation matters to make your dish appealing. Follow these tips:

  1. Use a Large Platter: Show off the vibrant colors of the rice.
  2. Garnish with Fresh Herbs: Sprinkle chopped parsley or green onions on top.
  3. Serve in Cast Iron Skillets: Adds a rustic touch and keeps the dish warm.
  4. Pair with Colorful Sides: Create a visually appealing plate.

These tips ensure your Lowcountry Red Rice looks as good as it tastes.

Common Mistakes

Common mistakes can ruin your Lowcountry Red Rice recipe. Understanding these mistakes helps you create a delicious dish every time.

Avoiding Overcooking

Overcooking is a common problem. Rice can turn mushy and lose its texture. To avoid this, keep an eye on the cooking time. Check the rice often. Make sure it is tender but not too soft. Use a timer if needed. This helps you keep track of the cooking time.

Balancing Flavors

Balancing flavors is key to a great Lowcountry Red Rice. Too much salt can overpower the dish. Too little seasoning makes it bland. Taste as you cook. Adjust the seasoning gradually. Add a little salt, pepper, or spices at a time. This ensures a well-balanced flavor profile.

Nutritional Information

Lowcountry Red Rice is a beloved dish in Southern cuisine. While savoring its rich flavor, it’s also important to understand its nutritional value. This section dives into the caloric content and health benefits of this delicious recipe.

Caloric Content

The caloric content of Lowcountry Red Rice can vary. It depends on the ingredients used and portion size. Here’s a general breakdown for a one-cup serving:

Nutrient Amount per Serving
Calories 220
Fat 5 grams
Protein 6 grams
Carbohydrates 37 grams
Fiber 3 grams

These values are approximate. They provide a good overview of the nutritional content.

Health Benefits

Lowcountry Red Rice offers several health benefits. These come from its key ingredients:

  • Tomatoes: High in vitamins C and K. They also contain antioxidants.
  • Brown Rice: Rich in fiber. Supports digestive health. Helps maintain a healthy weight.
  • Bell Peppers: Packed with vitamins A and C. Great for skin and immune health.
  • Onions: Provide antioxidants. May help reduce inflammation.
  • Garlic: Known for its immune-boosting properties. Also promotes heart health.

These ingredients make Lowcountry Red Rice a nutritious choice. It combines flavor with essential nutrients.

Lowcountry Red Rice Recipe: A Flavorful Southern Classic

Credit: spicedblog.com

Frequently Asked Questions

What Is Lowcountry Red Rice?

Lowcountry Red Rice is a traditional dish from the coastal regions of South Carolina and Georgia. It features rice cooked with tomatoes, onions, bell peppers, and smoked sausage or bacon. The dish is known for its rich, savory flavor and deep red color.

How To Make Lowcountry Red Rice?

To make Lowcountry Red Rice, cook rice with tomatoes, onions, bell peppers, and smoked sausage or bacon. Season with salt, pepper, and other spices. Simmer until the rice absorbs the flavors and becomes tender. Serve hot.

What Ingredients Are In Lowcountry Red Rice?

Lowcountry Red Rice typically includes rice, tomatoes, onions, bell peppers, smoked sausage or bacon, and seasonings. Some recipes may also add garlic, celery, and other spices for extra flavor.

Is Lowcountry Red Rice Spicy?

Lowcountry Red Rice is usually mildly spiced. The level of spiciness can be adjusted based on personal preference. Adding more spices or hot peppers can increase the heat.

Conclusion

Enjoy making this Lowcountry Red Rice recipe at home. It’s simple and delicious. Perfect for family meals or gatherings. This dish brings Southern comfort to your table. Your guests will love the rich flavors. Try it today and share the joy of cooking.

You won’t regret adding this to your recipe collection. Remember, good food brings people together. Happy cooking!

Small Crab Boil Recipe: Easy, Flavorful, and Fun!

Craving a delicious crab boil but short on time? A small crab boil recipe is perfect for you.

It’s simple, quick, and packed with flavor. Imagine gathering with friends or family and enjoying a delightful seafood feast without the hassle. This small crab boil recipe offers a perfect balance of spices and fresh ingredients, making it an easy yet impressive dish.

You don’t need to be a seasoned chef to pull this off. With a few basic ingredients and steps, you can create a memorable meal. Whether you’re hosting a casual get-together or just want a special dinner, this recipe fits the bill. Dive into the world of seafood boils and discover the joy of a homemade crab boil that’s as delicious as it is straightforward.

Small Crab Boil Recipe: Easy, Flavorful, and Fun!

Credit: www.youtube.com

Ingredients

Creating a delicious small crab boil at home starts with the right ingredients. Fresh, high-quality ingredients make all the difference. Use this guide to gather everything you need for a mouth-watering meal.

Essential Ingredients

For a small crab boil, you need fresh crabs. Choose blue crabs or Dungeness crabs. You will also need baby potatoes. They cook quickly and absorb flavors well. Corn on the cob is a must. Cut it into smaller pieces for easy eating.

Andouille sausage adds a rich, smoky taste. Use lemon halves to add a zesty flavor. Garlic cloves and onions bring depth to the broth. Old Bay seasoning is essential. It gives the crab boil its signature taste. Finally, you need water and salt for boiling.

Optional Add-ins

Consider adding shrimp for extra seafood goodness. Mussels and clams also work well. They add variety and taste. Some people like to include mushrooms. They absorb the flavors of the broth beautifully.

Add a few bay leaves for an aromatic touch. Red pepper flakes can add a spicy kick. Butter can make the dish richer and more indulgent. Fresh herbs like parsley or dill can be sprinkled on top for a fresh finish.

Small Crab Boil Recipe: Easy, Flavorful, and Fun!

Credit: champagne-tastes.com

Preparation

Preparation is key to a successful small crab boil. Ensuring everything is ready before you start cooking will make the process smooth and enjoyable. Let’s dive into the steps needed to prepare for a delicious crab boil.

Prepping The Crabs

First, rinse the crabs under cold water. Use a brush to clean the shells and remove any debris. Check for any damaged crabs and discard them. Place the cleaned crabs in a large bowl. Keep them in the refrigerator until you are ready to cook.

Chopping Vegetables

Next, gather your vegetables. Typically, a crab boil includes potatoes, corn, and onions. Wash the potatoes thoroughly. Cut them into halves or quarters, depending on their size. Husk the corn and cut each ear into thirds.

Peel and quarter the onions. You can also add garlic cloves for extra flavor. Place all the vegetables in a large bowl. Keep them ready for the boiling pot.

Cooking Process

The cooking process for a small crab boil is simple and fun. With a few steps, you can create a delicious meal that everyone will enjoy. Follow these steps to ensure your crab boil turns out perfect every time.

Boiling The Water

Start by filling a large pot with water. Use enough water to cover all the ingredients. Bring the water to a rolling boil over high heat. Add salt to taste, enhancing the flavors of the ingredients.

Next, add your favorite crab boil seasoning. Popular choices include Old Bay or Zatarain’s. Stir to dissolve the seasoning in the boiling water. This step creates a flavorful base for your crab boil.

Adding Ingredients In Stages

First, add potatoes to the boiling water. These take the longest to cook. Boil for about 10 minutes, ensuring they start to soften.

Next, add corn on the cob and sausage slices. These ingredients add sweetness and richness to the boil. Cook for another 5 minutes, allowing the flavors to meld together.

Finally, add the crabs to the pot. They cook quickly, usually within 5-7 minutes. Once they turn bright red, they are done.

Drain the water from the pot. Serve the crab boil hot, with melted butter and lemon wedges on the side. Enjoy your delicious meal!

Seasoning Tips

Creating the perfect small crab boil starts with the right seasoning. It’s the seasoning that makes all the difference. Here, we’ll dive into some essential tips for seasoning your crab boil to perfection.

Choosing The Right Spices

Choosing the right spices is essential for a flavorful crab boil. A good mix includes:

  • Old Bay Seasoning: A classic choice for seafood boils.
  • Cayenne Pepper: Adds a spicy kick.
  • Garlic Powder: Enhances the overall flavor.
  • Onion Powder: Adds depth to the taste.
  • Bay Leaves: Gives a subtle aroma.

These spices create a balanced and flavorful base. For a unique twist, try adding your favorite herbs.

Adjusting Heat Levels

Heat levels can make or break your crab boil. Adjusting the heat is key for the right flavor balance.

Spice Heat Level
Cayenne Pepper High
Black Pepper Medium
Red Pepper Flakes High

Start with small amounts. Taste and adjust as needed. Use a mix of spices for a balanced heat.

Remember, it’s easier to add more heat than to reduce it.

Serving Suggestions

Serving a delicious small crab boil can be an art in itself. The right presentation and side dishes can elevate your meal. Let’s dive into some creative serving suggestions that will make your crab boil a hit.

Presentation Ideas

Spread newspaper or butcher paper over your table. This makes clean-up easy. Pile the crabs and other ingredients in the center. This communal style adds to the fun. Use large trays or platters for a more formal look. Garnish with lemon wedges and fresh herbs. Add some melted butter in small bowls. This adds extra flavor to each bite.

Side Dishes To Pair

Corn on the cob is a classic choice. Boil or grill it for extra flavor. Potatoes are another staple. Small, red potatoes work best. Boil them with the crabs or roast them separately. Coleslaw adds a refreshing crunch. Choose a tangy or creamy dressing based on your preference. Garlic bread is always a hit. It soaks up the delicious juices. For a lighter option, consider a fresh green salad. A simple vinaigrette works best.

Cleanup Tips

Enjoy a delightful small crab boil with easy cleanup tips. Use disposable table covers and utensils to save time. Collect all shells and scraps in a single bag for quick disposal.

After enjoying a delicious small crab boil, the cleanup can seem overwhelming. Don’t worry! With a few simple steps, you can make the process quick and easy. Follow these cleanup tips to ensure your kitchen stays spotless.

Disposing Of Shells

Dispose of crab shells properly to avoid unpleasant smells. Place all shells in a large trash bag. Seal the bag tightly to contain any odors. Consider using a double bag for extra protection. If possible, take the trash out immediately.

Cleaning Pots And Utensils

Fill pots with warm soapy water and let them soak. This will loosen any stuck-on food. Use a scrub brush to clean the pots thoroughly. Rinse them well to remove all soap residue. For utensils, scrub them with soapy water. Rinse and dry them completely. This prevents rust and keeps them in good condition. “`

Variations

Exploring variations of the small crab boil recipe can be exciting. Different regions and preferences give unique twists to this classic dish. Whether you want to try new flavors or accommodate different seafood, there are many options.

Regional Twists

Regional variations offer distinct flavors. In Louisiana, add more cayenne pepper for a spicy kick. Maryland crab boils often include Old Bay seasoning. This gives a zesty and aromatic taste. Southern boils might include sausage and corn on the cob. These ingredients add texture and heartiness. Each region’s twist makes the dish unique and flavorful.

Alternative Seafood Options

Not a fan of crab? No problem. Swap crab for shrimp or crawfish. Both seafood options absorb the spices well. You can also try mussels or clams. These shellfish add a different but delicious flavor. Mixing various seafood can create a rich and diverse boil. This makes every bite a new experience.

Small Crab Boil Recipe: Easy, Flavorful, and Fun!

Credit: www.wenthere8this.com

Frequently Asked Questions

What Ingredients Are Needed For A Small Crab Boil?

For a small crab boil, you need crabs, corn, potatoes, sausage, Old Bay seasoning, and lemons.

How Long Should You Boil Crabs?

Boil crabs for about 15-20 minutes. Make sure they turn a bright red color.

Can You Add Other Seafood To A Crab Boil?

Yes, you can add shrimp, clams, or mussels. Adjust cooking times accordingly.

What Sides Go Well With A Crab Boil?

Common sides include coleslaw, cornbread, and garlic butter. They complement the flavors perfectly.

Conclusion

Enjoying a small crab boil is easy and fun. This recipe brings joy to any gathering. Fresh crab, seasoned well, tastes amazing. Friends and family will love it. Cooking together creates lasting memories. Simple ingredients make it budget-friendly. The flavors will impress everyone.

Try this recipe at your next event. You won’t regret it. Happy cooking!

Bisquick Chocolate Chip Cookie Recipe: Easy & Delicious Treat

Who doesn’t love chocolate chip cookies? They’re a classic treat.

But what if you could make them even easier? That’s where Bisquick comes in. Bisquick Chocolate Chip Cookies are a delightful twist on the traditional recipe. Using Bisquick mix cuts down on prep time and simplifies the process. With just a few ingredients, you can whip up a batch of warm, gooey cookies in no time.

These cookies are perfect for quick snacks, unexpected guests, or satisfying a sudden sweet tooth craving. Plus, they’re kid-friendly, making them a great baking project for little helpers. Ready to learn this simple and delicious recipe? Let’s get started!

Introduction To Bisquick Cookies

Discover the delightful Bisquick Chocolate Chip Cookie Recipe. Make soft, chewy cookies quickly with Bisquick mix and chocolate chips. Perfect for easy, delicious baking.

Bisquick cookies are a delightful treat. They are easy to make and taste amazing. Whether you are a novice baker or an expert, Bisquick cookies are a great choice. They have a unique texture and flavor that everyone loves. Bisquick mix is versatile and saves time. You can whip up a batch of cookies in no time. Bisquick cookies are perfect for any occasion. They are great for parties, school events, or just a sweet snack at home.

History Of Bisquick

Bisquick was first introduced in 1931. It was created by General Mills. The idea came from a chef on a train. He wanted to make baking easier. Bisquick became popular quickly. It was originally used for biscuits. But people soon realized it could be used for many recipes. Pancakes, waffles, and even cookies. Today, Bisquick is a pantry staple in many homes.

Why Choose Bisquick For Cookies

Bisquick is convenient. It saves time and effort. You do not need to measure flour, baking powder, or salt. Everything is already mixed for you. Bisquick cookies have a consistent texture. They are soft and chewy. You can add your favorite ingredients. Chocolate chips, nuts, or dried fruit. The possibilities are endless. Bisquick is also affordable. You can make a lot of cookies without spending a lot of money. It is perfect for budget-conscious bakers. Bisquick cookies are also kid-friendly. Children can help mix the dough. It is a fun activity for the whole family. You can create wonderful memories while baking together. “`
Bisquick Chocolate Chip Cookie Recipe: Easy & Delicious Treat

Credit: togetherasfamily.com

Ingredients Needed

Making delicious Bisquick chocolate chip cookies starts with the right ingredients. This section will guide you through the essential and optional ingredients needed to bake the perfect batch.

Key Ingredients

  • Bisquick mix: 2 3/4 cups. This is the base of your cookies.
  • Brown sugar: 1 cup, packed. Adds sweetness and a chewy texture.
  • Butter: 1/2 cup, softened. Gives a rich flavor.
  • Eggs: 1 large. Helps bind the ingredients together.
  • Vanilla extract: 1 teaspoon. Adds a hint of vanilla flavor.
  • Chocolate chips: 1 cup. The star ingredient for those delicious pockets of chocolate.

Optional Add-ins

To make your cookies even more delightful, consider these optional add-ins:

  • Chopped nuts: 1/2 cup. Adds a crunchy texture.
  • Shredded coconut: 1/2 cup. Gives a tropical twist.
  • Oats: 1/2 cup. Adds a hearty texture and flavor.
  • Dried fruits: 1/2 cup. Adds a chewy, sweet bite.

Preparing The Dough

Preparing the dough is a crucial step in making perfect Bisquick chocolate chip cookies. It sets the foundation for the texture and taste of your cookies. Let’s dive into the details with two essential steps: mixing the ingredients and achieving the right consistency.

Mixing The Ingredients

Start by gathering all your ingredients. You will need:

  • 2 1/4 cups of Bisquick mix
  • 1 cup of brown sugar
  • 1/2 cup of softened butter
  • 1 teaspoon of vanilla extract
  • 1 egg
  • 1 cup of chocolate chips

In a large bowl, combine the Bisquick mix and brown sugar. Stir well to blend. Add the softened butter, vanilla extract, and egg. Use a wooden spoon to mix everything until a dough forms. Finally, fold in the chocolate chips.

Consistency Tips

The dough should be firm but not too dry. If it feels too sticky, add a bit more Bisquick mix, one tablespoon at a time. If it’s too dry, add a few drops of water.

Here’s a quick table for adjustments:

Issue Solution
Too sticky Add more Bisquick mix
Too dry Add a few drops of water

Mix until the dough is smooth and holds its shape well. This balance ensures your cookies bake evenly and have the right texture.

Bisquick Chocolate Chip Cookie Recipe: Easy & Delicious Treat

Credit: www.mysequinedlife.com

Shaping The Cookies

Shaping the cookies is a crucial step in making Bisquick chocolate chip cookies. It ensures that the cookies bake evenly and look appealing. By following these simple tips, you will achieve perfect cookie shapes every time.

Forming The Dough Balls

Begin by scooping out the dough with a spoon or a cookie scoop. Roll the dough between your palms to create smooth, round balls. The dough should be firm yet pliable. This step helps in achieving a uniform shape. Place the dough balls on a baking sheet lined with parchment paper.

Size And Thickness Guide

Keep the dough balls about 1 inch in diameter. This size ensures that the cookies bake evenly. If the dough balls are too large, the cookies may spread too much. Flatten the dough balls slightly with your fingers. They should be about 1/2 inch thick. This thickness helps in achieving the perfect texture: crispy edges with a chewy center.

Baking Instructions

Making the perfect Bisquick Chocolate Chip Cookies is easy. Follow these simple baking instructions for delicious and chewy cookies every time.

Oven Temperature

Preheat your oven to 375°F (190°C). This temperature ensures the cookies bake evenly. It also gives them a golden-brown color. Make sure your oven is fully preheated before putting in the cookies.

Baking Time

Place your cookie dough on a baking sheet. Use a tablespoon to scoop dough onto the sheet, leaving enough space between each cookie. Bake the cookies for 8-10 minutes. Check the cookies at the 8-minute mark. The edges should be golden brown while the centers remain soft.

Let the cookies cool on the baking sheet for 2 minutes. Then move them to a wire rack to cool completely. This helps them set and keeps them from breaking apart.

Cooling And Storing

Cooling and storing your freshly baked Bisquick chocolate chip cookies are crucial steps. Proper cooling helps maintain their texture and flavor. Correct storage ensures they stay fresh and delicious longer. Follow these simple tips to enjoy your cookies at their best.

Cooling Methods

After baking, let the cookies cool on the baking sheet for 5 minutes. This allows them to firm up. Then, transfer the cookies to a wire rack. This step prevents the bottoms from becoming soggy. Make sure they are in a single layer. Leave them on the rack until completely cool. This process takes about 20 minutes.

Storage Tips

Once the cookies are cool, place them in an airtight container. This keeps them fresh. Store the container at room temperature. The cookies will stay good for up to one week. If you want to keep them longer, consider freezing them. Place the cookies in a freezer-safe bag. They can last up to three months in the freezer. When ready to eat, let them thaw at room temperature for 30 minutes.

Serving Suggestions

Serving your freshly baked Bisquick Chocolate Chip Cookies can be a delightful experience. The right pairings and presentation can elevate the taste and make them even more enjoyable. Here are some ideas to get the best out of your cookie experience.

Best Pairings

  • Milk: A classic choice. The creamy texture complements the sweetness of the cookies.
  • Hot Chocolate: Perfect for a cozy evening. The rich flavor of hot chocolate enhances the cookie’s taste.
  • Coffee: Ideal for adults. The bitterness of coffee balances the sweetness.
  • Ice Cream: Make an ice cream sandwich. Place a scoop of vanilla or chocolate ice cream between two cookies.
  • Fruit: Fresh berries or sliced apples add a refreshing touch.

Presentation Ideas

How you present your Bisquick Chocolate Chip Cookies can make a big difference. Here are some creative ideas:

  1. Cookie Platter: Arrange the cookies on a decorative platter. Add some fresh mint leaves for color.
  2. Gift Boxes: Place cookies in a small box with a ribbon. Perfect for gifts.
  3. Cookie Jar: Store cookies in a clear jar. It looks inviting and keeps them fresh.
  4. Stacked Cookies: Stack cookies in a pyramid shape. Tie with a ribbon for a festive look.
  5. Dip Station: Set up a station with different dips. Chocolate, caramel, and whipped cream are great choices.
Pairing Why It Works
Milk Creamy and complements sweetness
Hot Chocolate Rich flavor enhances taste
Coffee Bitterness balances sweetness
Ice Cream Makes a fun ice cream sandwich
Fruit Adds a refreshing touch

Variations And Customizations

Every baker loves a good Bisquick Chocolate Chip Cookie Recipe. What makes it even more exciting is the ability to tweak the recipe to suit personal preferences. Variations and customizations can elevate your cookies to a whole new level. Let’s explore some delightful ways to make your cookies unique.

Flavor Variations

The basic Bisquick Chocolate Chip Cookie Recipe is delicious, but adding different flavors can make it extraordinary.

  • Vanilla Extract: Add a teaspoon of vanilla extract for a richer flavor.
  • Cinnamon: Sprinkle some cinnamon for a warm, spicy touch.
  • Peanut Butter: Mix in 1/2 cup of peanut butter for a nutty flavor.
  • Mint: Drop a few drops of mint extract for a refreshing twist.

Adding Nuts And Fruits

Nuts and fruits can add texture and extra flavor to your cookies.

Consider these options:

  • Walnuts: Chop and add 1 cup of walnuts for a crunchy texture.
  • Almonds: Sliced almonds can add a delicate crunch.
  • Raisins: Add 1/2 cup of raisins for a chewy bite.
  • Dried Cranberries: These add a tart and sweet flavor.
  • Coconut Flakes: Sprinkle in some coconut flakes for a tropical touch.

Mix and match these variations to create your perfect Bisquick Chocolate Chip Cookies. Your family and friends will love the personalized touch!

Troubleshooting Common Issues

Baking the perfect Bisquick Chocolate Chip Cookies can sometimes be tricky. You may encounter some common issues during the process. This section helps you troubleshoot these common problems, ensuring your cookies turn out just right.

Flat Cookies

Flat cookies can be disappointing. They often spread too much and become thin. To avoid this, ensure your butter is not too soft. Soft butter causes cookies to spread excessively. Also, check your baking powder. Old or expired baking powder may not give the desired lift. Lastly, chill your dough for at least 30 minutes before baking. This helps the cookies maintain their shape.

Dry Or Crumbly Texture

Dry or crumbly cookies can ruin the experience. This usually happens if there is too much flour. Measure your flour correctly using the spoon and level method. Avoid packing flour into the measuring cup. Another reason could be overbaking. Keep a close eye on the cookies and remove them from the oven just as the edges turn golden. Adding a bit of milk to the dough can also help. This keeps the cookies moist and soft.

Bisquick Chocolate Chip Cookie Recipe: Easy & Delicious Treat

Credit: www.plainchicken.com

Frequently Asked Questions

How Do I Make Bisquick Chocolate Chip Cookies?

To make Bisquick chocolate chip cookies, mix Bisquick, sugar, butter, and chocolate chips. Bake at 350°F for 10-12 minutes. Enjoy!

Can I Substitute Butter In Bisquick Cookies?

Yes, you can substitute butter with margarine or shortening. This may slightly alter the taste and texture.

Are Bisquick Chocolate Chip Cookies Chewy Or Crispy?

Bisquick chocolate chip cookies are typically chewy. However, baking them longer can make them crispier.

Can I Freeze Bisquick Cookie Dough?

Yes, you can freeze Bisquick cookie dough. Roll the dough into balls and freeze for up to three months.

Conclusion

Enjoy making this easy Bisquick chocolate chip cookie recipe. It’s quick and delicious. Perfect for busy days or sudden cravings. Mix the ingredients, bake, and savor the taste. Share with friends and family. They will love it too. Baking has never been so simple and fun.

Try it today and enjoy homemade cookies anytime. Happy baking!

Romanian Cabbage Rolls Recipe: Authentic and Delicious

Romanian Cabbage Rolls, or “sarmale,” are a beloved traditional dish. They feature tender cabbage leaves filled with a savory mix of meat and rice.

This recipe has been passed down through generations, bringing families together around the dinner table. Its rich flavors and comforting texture make it a favorite in Romanian cuisine. Whether you’re new to cooking or a seasoned chef, this dish offers a delightful culinary experience.

With simple ingredients and straightforward steps, you can create a meal that warms the heart. Let’s dive into the world of Romanian cabbage rolls and discover the joy of this classic recipe. Ready to start cooking? Let’s go!

Introduction To Romanian Cabbage Rolls

Romanian Cabbage Rolls, also known as Sarmale, are a beloved dish in Romania. This traditional recipe features cabbage leaves filled with a delicious mixture of rice and meat. It’s a dish that embodies the rich history and cultural heritage of Romania.

Historical Background

The origins of Sarmale can be traced back to the Ottoman Empire. This dish has evolved over centuries, with each region adding its own unique twist. Historically, it was a meal for special occasions, often prepared for holidays and family gatherings.

During the 19th century, Romanian cooks started adding pork to the filling. This innovation made the dish heartier and more satisfying. Over time, Sarmale became a staple in Romanian cuisine, symbolizing warmth and hospitality.

Cultural Significance

In Romania, Sarmale is more than just a meal. It’s a symbol of family and tradition. Preparing this dish is often a communal activity, bringing families together in the kitchen.

During holidays, especially Christmas and Easter, Sarmale is a must-have. It represents the spirit of celebration and togetherness. Each bite is a taste of Romanian culture and history.

Many Romanians believe that Sarmale tastes better after a day or two. This belief adds to its cultural significance, as it allows flavors to meld and deepen. This practice reflects the patience and care inherent in Romanian cooking.

In summary, Romanian Cabbage Rolls are a cherished dish with a rich historical background and deep cultural significance. They bring people together and celebrate the essence of Romanian heritage.

Romanian Cabbage Rolls Recipe: Authentic and Delicious

Credit: cookingwithalison.com

Ingredients Needed

Creating the perfect Romanian Cabbage Rolls requires the right ingredients. The magic lies in the combination of simple yet flavorful components. Let’s dive into the essentials and some optional additions to elevate your dish.

Core Ingredients

These are the must-have ingredients for your Romanian Cabbage Rolls:

  • Cabbage Leaves – Fresh or pickled, medium to large size.
  • Ground Meat – Traditionally pork, but beef or a mix can work.
  • Rice – Uncooked, regular or long grain.
  • Onion – Finely chopped.
  • Garlic – Minced, for added flavor.
  • Dill – Fresh, chopped finely.
  • Thyme – Dried, for a hint of earthiness.
  • Salt – To taste.
  • Pepper – Freshly ground, to taste.
  • Tomato Paste – For a rich sauce.
  • Water – To cook the rolls in.

Optional Additions

Consider these optional ingredients to customize your Romanian Cabbage Rolls:

  • Bacon – Adds a smoky flavor.
  • Smoked Sausage – For an extra layer of taste.
  • Carrots – Grated, for sweetness and color.
  • Celery – Chopped, for a crunchy texture.
  • Bay Leaves – Enhances the aroma.
  • Parsley – Fresh, chopped finely.
  • Vegetable Broth – Instead of water, for richer flavor.

Use these ingredients wisely to create a delicious and authentic Romanian Cabbage Rolls dish. Experiment with the optional additions to make the recipe your own.

Preparing The Cabbage

Preparing the cabbage is an essential step in making authentic Romanian Cabbage Rolls. The process involves selecting the right cabbage and then blanching the leaves. Let’s dive into the details.

Selecting The Cabbage

Choose a large, firm cabbage with loose leaves. It should feel heavy for its size. The leaves should be free of blemishes and tears. A fresh cabbage has a bright green color and crisp texture.

Blanching The Leaves

To soften the cabbage leaves, blanch them in boiling water. Follow these simple steps:

  1. Remove the core from the cabbage using a sharp knife.
  2. Bring a large pot of water to a boil.
  3. Place the cabbage in the boiling water for 2-3 minutes.
  4. Carefully remove the cabbage and peel off the outer leaves.
  5. Repeat until you have enough leaves for your rolls.

Blanching makes the leaves pliable and easy to roll. It also enhances their flavor. Once blanched, let the leaves cool before using them to wrap your filling.

Making The Filling

The heart of any delicious Romanian cabbage roll is its filling. The filling brings the rolls to life with a perfect blend of flavors and textures. Let’s dive into the essential steps for making the filling: the meat and rice mixture, and seasoning the filling.

Meat And Rice Mixture

To create the filling, you need a mix of meat and rice. Most traditional recipes use ground pork, but you can also use beef or a combination of both.

  • 1 pound of ground meat (pork, beef, or a mix)
  • 1 cup of uncooked rice

Start by combining the ground meat and rice in a large bowl. Use your hands to mix them well. This ensures an even distribution of rice throughout the meat. The rice will cook inside the rolls, absorbing flavors and adding texture.

Seasoning The Filling

Proper seasoning is key to a flavorful filling. Here’s what you need:

Ingredient Amount
Salt 1 teaspoon
Black Pepper 1/2 teaspoon
Chopped Onion 1 medium
Minced Garlic 2 cloves
Paprika 1 teaspoon
Dill 1 tablespoon

Mix these ingredients into the meat and rice mixture. The salt enhances the taste of the meat. Black pepper adds a bit of heat. Chopped onion and minced garlic offer depth and aroma. Paprika provides a smoky flavor, and dill gives a fresh, herbal note.

Once combined, let the mixture sit for a few minutes. This allows the flavors to meld together, ensuring every bite of your cabbage rolls is packed with deliciousness.

Assembling The Rolls

Assembling Romanian Cabbage Rolls is the most rewarding part of the process. Ensuring each roll is perfectly shaped and secure is key. Follow these steps to make sure every roll is just right.

Rolling Technique

The rolling technique is crucial for perfect cabbage rolls. Start with a large cabbage leaf. Place about two tablespoons of filling at the center of the leaf. Spread the filling evenly, forming a small log shape.

Fold the sides of the leaf over the filling. Then, start rolling from the stem end. Roll tightly to keep the filling from falling out. Continue until you have a neat, compact roll.

Securing The Rolls

Securing the rolls ensures they stay intact during cooking. Use toothpicks to pin the rolls if needed. This step is optional but recommended for beginners.

Arrange the rolls seam-side down in a baking dish. This helps them stay closed. If you have extra cabbage leaves, use them to line the dish. This keeps the rolls from sticking and adds flavor.

Here is a quick summary table:

Step Description
1 Place filling on the leaf
2 Fold sides over filling
3 Roll tightly from stem end
4 Secure with toothpicks if needed
5 Arrange seam-side down in dish

Cooking The Cabbage Rolls

Cooking the cabbage rolls is a crucial step to bring out the rich flavors of this traditional Romanian dish. Depending on your preference, you can choose between the stovetop method or the oven method. Both methods have their unique benefits and flavors. Here’s how you can cook delicious Romanian cabbage rolls.

Stovetop Method

The stovetop method is a traditional way to cook cabbage rolls. It allows the flavors to blend beautifully.

  1. Place a large pot over medium heat.
  2. Add a layer of sauerkraut at the bottom.
  3. Arrange the cabbage rolls in the pot, seam side down.
  4. Cover the rolls with more sauerkraut and tomato sauce.
  5. Pour enough water to cover the rolls.
  6. Bring to a boil, then reduce heat to low.
  7. Simmer for 2-3 hours until the rolls are tender.

Oven Method

The oven method is a convenient option, offering a hands-off cooking experience. It also results in evenly cooked cabbage rolls.

  1. Preheat your oven to 350°F (175°C).
  2. In a large baking dish, spread a layer of sauerkraut.
  3. Place the cabbage rolls on top, seam side down.
  4. Cover the rolls with sauerkraut and tomato sauce.
  5. Add water until the rolls are submerged halfway.
  6. Cover the dish with aluminum foil.
  7. Bake for 2 hours until the rolls are tender and cooked through.

Both methods ensure your Romanian cabbage rolls are flavorful and tender. Choose the one that suits your cooking style best.

Serving Suggestions

Romanian Cabbage Rolls are a delightful dish that brings warmth and flavor to any meal. How you serve them can make the experience even more memorable. Below are some traditional and modern serving suggestions to enhance your enjoyment of this classic recipe.

Traditional Sides

Traditional sides can truly complement the rich flavors of Romanian Cabbage Rolls. Here are some classic options:

  • Polenta: This cornmeal dish is a staple in Romanian cuisine. Serve it warm and creamy.
  • Sour Cream: A dollop of sour cream adds a tangy balance to the savory rolls.
  • Garlic Bread: Freshly baked garlic bread is perfect for soaking up the delicious sauce.
  • Pickled Vegetables: Pickles add a crunchy and tangy contrast to the soft cabbage rolls.

Modern Variations

If you’re looking to put a modern twist on your serving suggestions, consider these creative options:

  • Quinoa Salad: A light and nutritious quinoa salad with fresh herbs and lemon.
  • Avocado Slices: Creamy avocado can add a refreshing touch to your meal.
  • Sweet Potato Fries: Baked sweet potato fries offer a sweet and crispy side.
  • Yogurt Sauce: A yogurt-based sauce with cucumber and dill can provide a cool, refreshing flavor.

Feel free to mix and match these sides to create your perfect meal. Enjoy!

Romanian Cabbage Rolls Recipe: Authentic and Delicious

Credit: www.jocooks.com

Storing And Reheating

Cabbage rolls are a staple in Romanian cuisine. They are loved for their rich flavors and comforting texture. Knowing how to store and reheat them is crucial to maintain their taste and quality. Below are some useful tips for refrigeration and freezing.

Refrigeration Tips

To keep your Romanian cabbage rolls fresh in the refrigerator, follow these simple steps:

  • Cool the rolls completely before storing.
  • Place them in an airtight container. This prevents moisture loss and odor absorption.
  • Store in the refrigerator for up to five days.
  • When reheating, use a microwave-safe dish or reheat in a saucepan on low heat.

Freezing Instructions

Freezing cabbage rolls helps to extend their shelf life. Here’s how:

  1. Allow the rolls to cool completely.
  2. Wrap each roll individually in plastic wrap or aluminum foil.
  3. Place the wrapped rolls in a freezer bag or airtight container.
  4. Label the container with the date. This helps you keep track of their storage time.
  5. Freeze for up to three months.

To reheat frozen cabbage rolls:

  • Thaw them in the refrigerator overnight.
  • Reheat in a microwave or an oven preheated to 350°F (175°C) for 20-30 minutes.

By following these steps, you can enjoy your Romanian cabbage rolls anytime without losing their delicious flavor and texture.

Romanian Cabbage Rolls Recipe: Authentic and Delicious

Credit: mostly-greek.com

Frequently Asked Questions

What Ingredients Are Needed For Romanian Cabbage Rolls?

Romanian cabbage rolls require cabbage, minced meat, rice, onions, and spices. Optional ingredients include bacon and tomato sauce.

How Do You Prepare The Cabbage Leaves?

Boil the whole cabbage for a few minutes. Separate the leaves gently to avoid tearing.

Can I Make Cabbage Rolls Ahead Of Time?

Yes, you can prepare cabbage rolls ahead. Store them in the fridge or freeze for later use.

How Long Do You Cook Romanian Cabbage Rolls?

Cook cabbage rolls for about 2 hours on a low simmer. Ensure they are fully cooked and tender.

Conclusion

Enjoy making Romanian cabbage rolls with this easy recipe. The flavors are rich. The process is simple. Serve them at your next family dinner. Your guests will love them. This dish brings people together. It’s a classic comfort food. Try it and see for yourself.

Happy cooking!

What Does Baking Soda Do in a Cookie Recipe: Ultimate Guide

Baking soda plays a crucial role in cookie recipes. It helps cookies rise and become fluffy.

But how exactly does this happen? Baking soda, also known as sodium bicarbonate, is a leavening agent. It reacts with acids in the dough, releasing carbon dioxide gas. This gas forms bubbles, making the cookies soft and airy. Without baking soda, cookies would be dense and flat.

It also affects the color and flavor. It can create a golden brown color and improve taste. Adding the right amount is key. Too little, and cookies won’t rise. Too much, and they might taste bitter. So, understanding baking soda’s role ensures perfect cookies every time. Let’s dive deeper into how this simple ingredient works magic in your baking.

Role Of Baking Soda

Baking soda is a key ingredient in many cookie recipes. It plays a vital role in how cookies turn out. Understanding its function can help improve your baking skills. Let’s delve into its primary roles.

Leavening Agent

Baking soda acts as a leavening agent in cookies. It helps the dough rise during baking. This results in cookies that are light and fluffy. Without it, cookies would be dense and flat. When baking soda reacts with acidic ingredients, it produces carbon dioxide. This gas creates tiny bubbles in the dough, making it expand.

Chemical Reactions

Baking soda triggers important chemical reactions. It neutralizes the acids in the dough. This balance affects the taste and texture of cookies. The neutralization process also impacts the browning of cookies. Proper browning adds flavor and color. Baking soda helps achieve that perfect golden-brown hue.

Texture Enhancement

Baking soda is a key ingredient that transforms the texture of cookies. Its role is not just about flavor, but also about how the cookies feel when you bite into them. Whether you prefer crispy cookies or chewy ones, baking soda can make a big difference.

Crispy Cookies

If you love your cookies with a satisfying crunch, baking soda is your friend. The alkaline nature of baking soda helps the cookies spread more during baking. This creates a thinner, crispier texture. Here’s how it works:

  • Spreading: Baking soda makes the dough spread out more.
  • Browning: It also enhances the Maillard reaction, which helps cookies turn golden brown.
  • Crunch: The spread and browning combine to create a crispy bite.

So, for those perfect crispy edges, a bit of baking soda is essential.

Chewy Cookies

On the other hand, if you prefer chewy cookies, baking soda still plays a crucial role. It helps create a soft and tender texture. Here’s how it contributes:

  1. Leavening: Baking soda helps the dough rise slightly, making it softer.
  2. Moisture: It retains moisture within the cookie, keeping it chewy.
  3. Texture: The slight rise and retained moisture create a delightful chewiness.

For a cookie that bends rather than snaps, baking soda is the secret ingredient.

Flavor Development

Baking soda plays a crucial role in cookie recipes. It does more than just help the dough rise. It significantly impacts flavor development. This might seem surprising, but it’s true. Let’s dive into the details.

Neutralizing Acidity

Many cookie recipes include acidic ingredients. Examples are brown sugar, molasses, or buttermilk. Baking soda neutralizes these acids. This creates a balanced flavor profile. It makes the cookies taste less tangy and more rounded. The result is a more enjoyable bite.

Browning Effect

Baking soda also aids in browning. This is due to the Maillard reaction. This reaction happens between amino acids and reducing sugars. The result is a golden-brown color on the cookie surface. This browning process also enhances the flavor. It adds a rich, toasty note to the cookies.

What Does Baking Soda Do in a Cookie Recipe: Ultimate Guide

Credit: www.reddit.com

Interaction With Ingredients

Baking soda is a key ingredient in many cookie recipes. It interacts with other ingredients to create the perfect texture and flavor. Understanding these interactions can help you bake better cookies.

Sugar

Sugar and baking soda work together in a cookie recipe. Sugar helps to tenderize the dough. Baking soda reacts with the sugar during baking. This reaction causes the dough to spread and rise. The result is a light, airy cookie.

Fat

Fat, like butter or shortening, plays a crucial role in cookies. Baking soda interacts with fat to create a tender texture. The fat coats the baking soda, slowing down its reaction. This helps control the spread of the dough. The end result is a cookie that is both crispy and soft.

Measuring Baking Soda

Measuring baking soda correctly is crucial for baking perfect cookies. Too much or too little can affect the texture and taste. Let’s explore the proper way to measure baking soda for your cookie recipe.

Correct Proportions

Using the right amount of baking soda is essential. Typically, a cookie recipe calls for about 1/4 to 1/2 teaspoon per cup of flour. This small amount helps cookies rise and become light and fluffy. Always level off the measuring spoon to avoid adding too much. This ensures accurate measurement and consistent results.

Common Mistakes

Many bakers make common mistakes when measuring baking soda. One frequent error is using too much. This can result in cookies with a bitter taste. Another mistake is not leveling off the spoon. This can cause an uneven texture. Always measure over the sink or a bowl to catch any excess. Lastly, avoid using old baking soda. It loses potency over time, leading to flat cookies. Check the expiration date before use.

What Does Baking Soda Do in a Cookie Recipe: Ultimate Guide

Credit: www.allrecipes.com

Baking Soda Alternatives

Sometimes, you might find that you’re out of baking soda while baking cookies. It’s good to know there are alternatives to keep your recipe on track. Let’s explore some common substitutions you can use when you don’t have baking soda.

Baking Powder

Baking powder can be a great alternative to baking soda. It contains a mix of baking soda, an acid, and a moisture-absorbing ingredient. You can use it as a 1:3 substitute. This means if your recipe needs 1 teaspoon of baking soda, use 3 teaspoons of baking powder instead.

Keep in mind, baking powder includes an acid already. So, you won’t need to add extra acidic ingredients like lemon juice or vinegar. This can change the taste slightly, but your cookies will still rise and be delicious.

Self-rising Flour

Self-rising flour is another good option. It has all-purpose flour, baking powder, and salt mixed in. This can simplify your recipe and save you time. If your recipe calls for 1 teaspoon of baking soda, you can use 1 1/2 cups of self-rising flour instead of the plain flour and baking soda.

Remember to adjust the salt in your recipe, as self-rising flour already includes salt. You might need to reduce or omit the additional salt to balance the flavors.

Having these alternatives in mind can save your baking project. With a bit of knowledge, you can make delicious cookies even without baking soda.

Troubleshooting Tips

Baking soda plays a crucial role in cookie recipes. It affects the texture, spread, and rise of your cookies. Understanding how baking soda works can help you troubleshoot common cookie problems. Below are some tips for fixing flat and overly puffy cookies.

Flat Cookies

Flat cookies can be disappointing. They may spread too much and become thin. Here are some tips to avoid flat cookies:

  • Check your baking soda: Make sure it’s fresh. Old baking soda loses its effectiveness.
  • Chill your dough: Cold dough spreads less. Refrigerate your dough for at least 30 minutes before baking.
  • Use parchment paper: Greased baking sheets can cause cookies to spread more. Use parchment paper instead.
  • Adjust oven temperature: Ensure your oven is preheated. Baking at a higher temperature can help set the edges before the cookies spread too much.

Overly Puffy Cookies

Overly puffy cookies can be an issue too. They may not spread enough and remain too thick. Here are some tips to avoid overly puffy cookies:

  • Reduce baking soda: Too much baking soda can cause excessive puffiness. Measure carefully.
  • Flatten the dough: Press down the dough balls slightly before baking. This helps them spread more evenly.
  • Check your ingredients: Ensure you are using the correct type of flour. High-protein flour can absorb more moisture, affecting the cookie’s texture.
  • Mix thoroughly: Make sure the baking soda is evenly distributed in the dough. Uneven distribution can cause inconsistent results.
What Does Baking Soda Do in a Cookie Recipe: Ultimate Guide

Credit: www.biggerbolderbaking.com

Experimenting With Recipes

Experimenting with recipes can be a fun and rewarding experience. It allows you to understand the role of each ingredient in your cookie recipe. One key ingredient is baking soda. It affects the texture, spread, and color of the cookies. By tweaking your recipe, you can achieve your desired cookie outcome.

Adjusting Ratios

Baking soda helps cookies rise and spread. Adjusting the amount of baking soda can change the cookie’s texture. More baking soda makes cookies fluffier. Less baking soda results in denser cookies.

Experiment with different ratios to find the best balance. Start with a small change. Too much baking soda can make cookies taste bitter. Too little can make them flat. Keep notes on your adjustments. This helps you find the perfect ratio for your cookies.

Trying Different Flours

The type of flour you use also affects the cookies. All-purpose flour is common, but other flours can offer unique textures. Whole wheat flour adds a nutty flavor. Almond flour creates a denser, chewier texture.

Experiment by replacing some all-purpose flour with other types. Start with small amounts. This helps you understand how each flour changes the cookies. Keep notes on the results. This makes it easier to replicate your favorite version.

Frequently Asked Questions

What Is The Role Of Baking Soda In Cookies?

Baking soda acts as a leavening agent in cookies. It helps the dough rise by releasing carbon dioxide. This creates a light and fluffy texture.

How Does Baking Soda Affect Cookie Texture?

Baking soda makes cookies spread and become crispier. It reacts with acids in the dough, creating bubbles that help the cookies rise.

Can You Substitute Baking Powder For Baking Soda In Cookies?

Yes, but the texture and flavor may change. Baking powder contains acids, which can alter the taste and consistency of cookies.

Does Baking Soda Make Cookies Chewy?

Baking soda can make cookies chewy by promoting spread and moisture retention. It helps create a soft, tender texture.

Conclusion

Baking soda plays a key role in cookie recipes. It helps cookies rise and spread. The result is a soft and chewy texture. Without it, cookies might be dense and flat. Always measure baking soda accurately. Too much can affect taste.

Remember, balance is crucial. It’s amazing how one ingredient can change so much. Happy baking! Enjoy your perfect cookies.

Keto Sweetened Condensed Milk Recipe: Easy, Delicious & Low-Carb

Craving something sweet but sticking to a keto diet? You’re in luck.

Discover a Keto Sweetened Condensed Milk recipe that’s easy and delicious. This recipe is perfect for those on a low-carb diet who miss sweet treats. Traditional condensed milk is loaded with sugar, making it a no-go for keto followers. But with a few simple tweaks, you can enjoy a similar taste without breaking your diet.

This keto version uses low-carb sweeteners, ensuring you stay on track. Whether you want to make desserts or simply have a sweet addition to your coffee, this recipe will satisfy your cravings. Ready to dive into making your own keto-friendly condensed milk? Let’s get started!

Keto Sweetened Condensed Milk Recipe: Easy, Delicious & Low-Carb

Credit: www.wholesomeyum.com

Introduction To Keto Sweetened Condensed Milk

Looking for a low-carb alternative to traditional sweetened condensed milk? Keto sweetened condensed milk is the perfect solution. It’s a sugar-free version that fits perfectly into your ketogenic lifestyle. This easy recipe gives you a delicious, creamy milk that you can use in various desserts and beverages.

What Is Keto Sweetened Condensed Milk?

Keto sweetened condensed milk is a low-carb, sugar-free alternative to regular sweetened condensed milk. It is made using keto-friendly ingredients like heavy cream, butter, and a low-carb sweetener. The result is a thick, rich, and creamy milk that has all the sweetness and texture of traditional condensed milk but without the carbs.

Ingredient Typical Amount Keto-Friendly Substitute
Sugar 1 cup Erythritol or Stevia
Milk 2 cups Heavy Cream
Butter 2 tablespoons Same

Benefits Of Keto Sweetened Condensed Milk

Keto sweetened condensed milk offers several benefits:

  • Low in Carbs: Perfect for keeping your carb count low.
  • Sugar-Free: Uses natural sweeteners like erythritol or stevia.
  • Easy to Make: Simple ingredients and quick preparation.
  • Versatile: Use it in baking, beverages, or as a topping.

Here are some more advantages:

  1. Healthy Fats: Contains healthy fats from butter and heavy cream.
  2. Satisfying: Keeps you full and satisfied longer.
  3. Customizable: Adjust sweetness to your preference.

With these benefits, keto sweetened condensed milk is a great addition to your keto diet. It helps you enjoy sweet treats without breaking your carb limits.

Keto Sweetened Condensed Milk Recipe: Easy, Delicious & Low-Carb

Credit: africa-ird.org

Ingredients Needed

Creating your own keto sweetened condensed milk at home is surprisingly simple. This recipe requires only a handful of ingredients. You can also customize it with some optional add-ins to suit your taste.

Essential Ingredients

To make the basic keto sweetened condensed milk, you will need the following ingredients:

  • Heavy Cream: This is the base of your condensed milk. It provides richness and creaminess.
  • Butter: Adds flavor and helps to thicken the mixture.
  • Sugar-free Sweetener: Erythritol, monk fruit, or stevia are good choices. They keep the recipe keto-friendly.
  • Vanilla Extract: Enhances the flavor and adds a sweet aroma.

Optional Add-ins

To give your keto sweetened condensed milk a unique twist, consider these optional add-ins:

  • Salt: A pinch of salt can balance the sweetness.
  • Almond Extract: For a nutty flavor.
  • Cinnamon: Adds a warm spice note.
  • Coconut Cream: For a hint of coconut flavor.

Step-by-step Preparation

Creating your own Keto Sweetened Condensed Milk at home is simple and rewarding. By following this step-by-step guide, you will enjoy a delicious and keto-friendly alternative to regular sweetened condensed milk. Let’s dive into the process.

Preparing The Ingredients

Start with gathering all the necessary ingredients. You need heavy cream, unsalted butter, and a low-carb sweetener like erythritol or monk fruit sweetener. Measure out 2 cups of heavy cream, 2 tablespoons of unsalted butter, and 1/2 cup of your chosen sweetener. Having everything ready will make the cooking process smoother.

Cooking The Mixture

Pour the heavy cream into a medium saucepan. Add the unsalted butter and the sweetener. Place the saucepan over medium heat. Stir the mixture constantly until the butter melts. Once melted, reduce the heat to low. Let the mixture simmer gently. Stir occasionally to prevent it from sticking to the pan. The goal is to reduce the volume by half. This process takes about 30-45 minutes.

Final Touches

After the mixture has reduced, remove it from the heat. Let it cool for a few minutes. Pour the mixture into a glass jar or an airtight container. Allow it to cool completely before sealing. Store the condensed milk in the refrigerator. It will thicken as it cools. When ready to use, give it a quick stir. Your Keto Sweetened Condensed Milk is now ready for your favorite recipes.

Keto Sweetened Condensed Milk Recipe: Easy, Delicious & Low-Carb

Credit: mouthwateringmotivation.com

Tips For Perfect Texture

Creating the perfect keto sweetened condensed milk can be a challenge. Achieving the right texture is crucial for delicious results. Here are some tips to ensure your condensed milk turns out smooth and creamy.

Achieving The Right Consistency

The consistency of your keto sweetened condensed milk is important. Use a low heat setting to avoid burning. Stir the mixture often to prevent clumping. Allow the mixture to simmer and reduce slowly. This will ensure it thickens evenly. Patience is key. Rushing can result in a gritty texture. Let it cool completely before using. This will help it set properly.

Troubleshooting Common Issues

Sometimes, your condensed milk may not turn out as expected. If it’s too thin, simmer it longer. This will help it thicken more. If it’s too thick, add a bit more liquid. Stir well to blend it in. A gritty texture can be fixed by reheating gently. Stir continuously until smooth. If the taste is off, check your sweetener. Some sweeteners can have an aftertaste. Try a different one if needed. Always taste and adjust sweetness to your liking.

Storage And Shelf Life

Learning how to store your Keto Sweetened Condensed Milk can help maintain its taste and texture. Proper storage also extends its shelf life. Below are some essential tips to ensure your homemade keto milk stays fresh.

Proper Storage Techniques

To store your keto sweetened condensed milk, you need an airtight container. A glass jar with a tight-fitting lid works best. Before pouring the milk into the jar, make sure it cools completely. This prevents condensation inside the jar.

Once the milk is in the jar, seal it tightly. Label the jar with the date. This helps you keep track of its freshness. Store the jar in the refrigerator. The cold temperature will keep the milk fresh longer.

How Long It Lasts

In the refrigerator, your keto sweetened condensed milk can last up to two weeks. To keep it fresh, always use a clean spoon. Do not leave the jar open for too long.

If you want to store it for longer, consider freezing it. Pour the milk into an ice cube tray and freeze. Once frozen, transfer the cubes to a freezer-safe bag. Label the bag with the date.

Storage Method Shelf Life
Refrigerator Up to 2 weeks
Freezer Up to 3 months

In the freezer, the milk can last up to three months. Thaw it in the refrigerator overnight before use. Stir well after thawing to restore its creamy texture.

Uses In Keto Recipes

Keto Sweetened Condensed Milk is a versatile ingredient in the keto diet. It enhances the flavor and texture of many dishes. Here are some popular ways to use this delicious ingredient in your keto recipes.

Desserts and Sweets

Keto desserts can be tricky without the right ingredients. Keto Sweetened Condensed Milk makes it easier. It helps create creamy and rich desserts.

Consider using it in:

  • Keto Cheesecakes: Add it to your cheesecake mixture for a smooth, sweet flavor.
  • Keto Fudge: It helps achieve a rich and creamy texture in fudge.
  • Keto Ice Cream: Use it to make your ice cream base creamy and sweet.
Beverages and Other Uses

Keto Sweetened Condensed Milk also works well in keto beverages. It adds sweetness without the carbs.

Here are some ideas:

  • Keto Coffee: Stir it into your coffee for a sweet, creamy touch.
  • Keto Smoothies: Blend it into your smoothies for added richness and sweetness.
  • Keto Hot Chocolate: Mix it into hot chocolate for a creamy, indulgent drink.

Other creative uses include:

  • Keto Pancake Syrup: Use it as a syrup for your keto pancakes.
  • Keto Frosting: Mix it into frosting for a sweet and creamy topping.

Nutritional Information

Understanding the nutritional information of Keto Sweetened Condensed Milk is important. This helps you make informed choices about your diet. This section will cover the calorie count, macros, and a comparison with regular condensed milk.

Calorie Count And Macros

Keto Sweetened Condensed Milk is low in carbs. A single tablespoon contains about 50 calories. Most of these calories come from fats. This makes it an ideal choice for keto dieters. The macros for this serving are 4 grams of fat, 2 grams of protein, and 1 gram of net carbs.

Comparison With Regular Condensed Milk

Regular condensed milk has a much higher carb content. A tablespoon contains about 130 calories. It also has 21 grams of sugar. This makes it unsuitable for keto diets. Keto Sweetened Condensed Milk is healthier. It has fewer carbs and sugars. This makes it a better option for those on a low-carb diet.

Frequently Asked Questions

What Is Keto Sweetened Condensed Milk?

Keto sweetened condensed milk is a low-carb, sugar-free alternative. It’s made with keto-friendly ingredients. Perfect for desserts.

How To Make Keto Condensed Milk?

To make keto condensed milk, use heavy cream, butter, and sweetener. Simmer until thickened. Cool before using.

Can I Store Keto Condensed Milk?

Yes, store keto condensed milk in an airtight container. Keep it in the refrigerator. Use within a week.

Is Keto Condensed Milk Dairy-free?

No, keto condensed milk typically contains dairy. Use coconut milk and dairy-free butter for a dairy-free version.

Conclusion

Creating keto sweetened condensed milk is simple and rewarding. This recipe offers a delicious, low-carb alternative. It fits perfectly in various desserts. Enjoy the rich, creamy taste without the sugar guilt. Making it at home ensures quality and freshness. Now, you can sweeten your keto treats effortlessly.

Try this easy recipe today. Your taste buds will thank you. Share this recipe with friends and family. They will love it too. Happy cooking and enjoy your keto journey!

Best Banana Bread Ever All Recipes: Ultimate Guide & Tips

Banana bread is a timeless favorite. It’s a go-to recipe for many households.

Banana bread is perfect for breakfast or a snack. It’s easy to make and loved by all ages. This blog post will explore the best banana bread recipes ever. We will share tips and tricks for making your banana bread perfect.

Whether you like it plain or with nuts, we’ve got you covered. Dive in and discover the secrets to the best banana bread that will make your taste buds dance. Get ready to bake the most delicious banana bread you’ve ever tasted!

Best Banana Bread Ever All Recipes: Ultimate Guide & Tips

Credit: sallysbakingaddiction.com

Introduction To Banana Bread

Banana bread holds a special place in many kitchens around the world. This delightful treat combines simplicity with rich flavors. Made from overripe bananas, it turns waste into a delicious loaf. It’s easy to make, moist, and always a crowd-pleaser.

Origins And Popularity

Banana bread has an interesting history. It became popular in the United States during the 1930s. The Great Depression led people to find creative ways to use overripe bananas. Baking banana bread was an affordable solution. This quick bread soon found its way into many cookbooks.

Today, banana bread remains a beloved staple. It’s enjoyed by people of all ages. Many families have their own treasured recipes. Some add nuts, chocolate chips, or spices. Each variation adds a unique twist to the classic loaf.

Why Banana Bread?

Banana bread is more than just a way to use old bananas. It’s a comfort food that brings joy. The sweet aroma fills the kitchen while baking. It’s perfect for breakfast, snacks, or dessert.

This bread is also versatile. You can make it with or without dairy. It can be gluten-free with the right flour. There’s a recipe for everyone. Its simplicity means even beginners can bake it.

So, if you have ripe bananas, don’t throw them away. Make some delicious banana bread. You won’t regret it.

Essential Ingredients

Banana bread is a beloved treat that many enjoy. The key to making the best banana bread ever lies in the ingredients you choose. Each component plays a crucial role in flavor and texture. Let’s delve into these essential ingredients.

Choosing The Right Bananas

Bananas are the star of the show. Use ripe bananas with brown spots. These bananas are sweeter and mash easier. They give the bread a rich, natural sweetness. Avoid green bananas. They are too starchy and not sweet enough. Overripe bananas work best. They blend smoothly into the batter.

Other Key Ingredients

Flour is the foundation. Use all-purpose flour for the best results. It provides structure without making the bread too dense. Sugar adds sweetness. Brown sugar enhances the flavor. It gives a slight caramel taste. Eggs bind the ingredients together. They add moisture and richness. Use fresh eggs for the best texture.

Baking soda helps the bread rise. It creates a light and fluffy texture. Salt balances the sweetness. It enhances the overall flavor. Butter adds richness. It makes the bread tender and moist. Use unsalted butter to control the salt level. Vanilla extract adds depth. It complements the banana flavor. Use pure vanilla extract for the best taste.

Baking Equipment

Creating the best banana bread ever requires the right baking equipment. Using the correct tools makes the process easier and the results better. Below, you will find information on must-have tools and optional gadgets for baking banana bread.

Must-have Tools

  • Mixing Bowls: Choose different sizes for various ingredients.
  • Measuring Cups and Spoons: Accurate measurements are key.
  • Whisk: Essential for mixing dry ingredients.
  • Spatula: A rubber spatula helps fold wet and dry ingredients.
  • Loaf Pan: Use a standard 9×5 inch pan for best results.
  • Oven: Ensure it is preheated to the correct temperature.
  • Cooling Rack: Allows the bread to cool evenly.

Optional Gadgets

While not necessary, these gadgets can enhance your baking experience:

Gadget Benefits
Stand Mixer Mixes batter evenly and saves time.
Banana Masher Mashes bananas quickly and evenly.
Digital Scale Ensures precise ingredient measurements.
Sifter Aerates flour for lighter texture.
Silicone Baking Mat Prevents sticking and easy cleanup.

Using these tools and gadgets can make baking more enjoyable. And your banana bread will be the best ever.

Best Banana Bread Ever All Recipes: Ultimate Guide & Tips

Credit: www.allrecipes.com

Step-by-step Recipe

Baking the best banana bread ever starts with a great recipe. Follow this easy step-by-step guide to create a delicious, moist banana bread that everyone will love. Let’s dive into the preparation and baking instructions.

Preparation Steps

Gather all your ingredients first. You will need ripe bananas, flour, sugar, eggs, butter, baking soda, and salt. Preheat your oven to 350°F (175°C). Grease a loaf pan with butter or line it with parchment paper.

In a large bowl, mash the bananas until smooth. Add melted butter and mix well. Stir in sugar, beaten eggs, and vanilla extract. Combine flour, baking soda, and salt in another bowl. Gradually add the dry mixture to the wet mixture. Stir until just combined. Do not overmix to keep the bread tender.

Baking Instructions

Pour the batter into the prepared loaf pan. Spread it evenly with a spatula. Place the pan in the preheated oven. Bake for 60 minutes or until a toothpick inserted into the center comes out clean.

Remove the pan from the oven. Let the bread cool in the pan for 10 minutes. Transfer it to a wire rack to cool completely. Slice and enjoy your homemade banana bread with family and friends.

Tips For Perfect Banana Bread

Creating the perfect banana bread is both an art and a science. Attention to detail can result in a moist, flavorful loaf that will impress anyone. Below are some essential tips to help you bake the best banana bread ever.

Moisture Control

Maintaining the right moisture level is key. Start with overripe bananas. They should be soft and covered in brown spots. This ensures they are sweet and easy to mash.

  • Banana Ripeness: Use bananas that are overripe. They add more moisture and sweetness.
  • Yogurt or Sour Cream: Add a tablespoon of yogurt or sour cream. This can make the bread extra moist.
  • Do Not Overmix: Mix the batter until just combined. Overmixing can lead to dense bread.

Flavor Enhancements

Elevate your banana bread with extra flavors. Simple additions can make a big difference.

  • Spices: Add a teaspoon of cinnamon or nutmeg. These spices complement the banana flavor.
  • Vanilla Extract: A teaspoon of vanilla extract adds depth.
  • Mix-Ins: Consider adding nuts, chocolate chips, or dried fruits. These mix-ins add texture and flavor.

Here is a quick reference table for common flavor enhancements:

Enhancement Quantity
Cinnamon 1 tsp
Nutmeg 1/2 tsp
Vanilla Extract 1 tsp
Chopped Nuts 1/2 cup
Chocolate Chips 1/2 cup
Best Banana Bread Ever All Recipes: Ultimate Guide & Tips

Credit: www.allrecipes.com

Common Mistakes

Banana bread is a favorite treat for many. But even with a great recipe, mistakes can happen. Knowing common mistakes can help you bake perfect banana bread every time. Let’s look at two key issues.

Avoiding Dense Bread

No one likes dense banana bread. It should be light and moist. Overmixing the batter can make it dense. Mix just until combined. Also, use ripe bananas. They add moisture and sweetness. If the bananas are too green, the bread will be dry and heavy.

Another tip: Measure flour correctly. Too much flour makes the bread dense. Spoon flour into the measuring cup, then level off with a knife. Do not scoop directly from the bag. This packs the flour and adds extra weight.

Preventing Overbaking

Overbaking leads to dry banana bread. Keep an eye on the baking time. Check for doneness a few minutes before the end time. Insert a toothpick into the center. If it comes out clean or with a few crumbs, it is done.

Oven temperature is key. Use an oven thermometer to ensure accuracy. If the oven is too hot, the bread will cook too fast. The outside will burn while the inside remains raw. Set the oven to the correct temperature and preheat it fully before baking.

Creative Variations

One of the joys of baking banana bread is the endless possibilities for creative variations. From adding nuts and fruits to experimenting with alternative flours and sweeteners, you can make your banana bread unique every time. These ideas not only enhance the flavor but also add nutritional value to your homemade bread. Let’s dive into some creative variations that will elevate your banana bread to the next level.

Adding Nuts And Fruits

Incorporating nuts and fruits into your banana bread can add a delightful crunch and burst of flavor. Here are some popular options:

  • Walnuts: Add chopped walnuts for a rich, nutty flavor.
  • Pecans: Pecans add a buttery taste and crunchy texture.
  • Almonds: Sliced almonds provide a subtle, sweet flavor.
  • Blueberries: Fresh or frozen blueberries add a juicy sweetness.
  • Cranberries: Dried cranberries give a tart contrast to the sweet banana.

To incorporate these ingredients, fold them into the batter just before pouring it into the baking pan. This ensures even distribution throughout the bread.

Alternative Flours And Sweeteners

Using alternative flours and sweeteners can make your banana bread healthier and suitable for different dietary needs. Here are some ideas:

Alternative Flour Benefits
Almond Flour Gluten-free and adds a nutty flavor.
Coconut Flour High in fiber and provides a slight coconut taste.
Oat Flour Gluten-free and adds a mild, sweet taste.

When using alternative sweeteners, consider the following options:

  1. Honey: Adds a natural sweetness and moist texture.
  2. Maple Syrup: Provides a rich, caramel-like flavor.
  3. Agave Nectar: A lighter, mild sweetness.
  4. Coconut Sugar: A lower-glycemic index option with a hint of caramel.

Experimenting with these ingredients can help you discover your favorite version of banana bread. Whether you prefer a nutty crunch, fruity bursts, or a healthier twist, these variations will keep your banana bread exciting and delicious.

Serving Suggestions

Once you’ve baked the best banana bread ever, the next step is serving it in a way that enhances its deliciousness. Here are some ideas to help you make the most of your banana bread.

Best Pairings

Pairing your banana bread with the right accompaniments can elevate its taste. Here are some suggestions:

  • Fresh Fruit: Slices of strawberries, blueberries, or apple wedges.
  • Butter: Spread a thin layer of salted or unsalted butter.
  • Nut Butter: Almond or peanut butter adds a creamy texture.
  • Yogurt: Serve with a side of Greek yogurt for a protein boost.
  • Honey: Drizzle with honey for extra sweetness.

Storage And Reheating

Proper storage ensures your banana bread stays fresh and tasty for days. Follow these tips:

  1. Let the bread cool completely before storing.
  2. Wrap it tightly in plastic wrap or aluminum foil.
  3. Place it in an airtight container or a resealable plastic bag.
  4. Store at room temperature for up to 3 days.
  5. For longer storage, keep it in the refrigerator for up to a week.
  6. Freeze for up to 3 months by wrapping in plastic wrap and foil.

Reheating is simple:

  • Microwave: Heat a slice for 10-15 seconds.
  • Oven: Warm at 350°F for 10 minutes.

Enjoy your banana bread warm with your favorite pairings.

Frequently Asked Questions

What Makes This Banana Bread Recipe The Best?

This recipe uses ripe bananas for extra sweetness and moisture. The perfect blend of ingredients creates a rich, flavorful loaf. It’s easy to make and consistently delicious.

Can I Add Nuts To The Banana Bread?

Yes, you can add nuts like walnuts or pecans. They add a nice crunch and extra flavor. Simply fold them into the batter before baking.

How Do I Keep Banana Bread Moist?

Use ripe bananas and don’t overmix the batter. Store the bread in an airtight container. Wrapping it in plastic wrap or aluminum foil also helps retain moisture.

Can I Freeze Banana Bread?

Yes, banana bread freezes well. Wrap it tightly in plastic wrap and aluminum foil. Store it in a freezer bag for up to three months.

Conclusion

This banana bread recipe will delight your taste buds. It’s simple to make. The ingredients are easy to find. Just follow the steps, and you’ll enjoy fresh, homemade banana bread. Perfect for breakfast or a snack. Your family and friends will love it.

Try it today and see why it’s the best. Baking banana bread has never been so rewarding. Enjoy every bite of this delicious treat.

Simple Leche Flan Recipe: Creamy Delight in Minutes

Leche flan is a classic dessert loved by many. It’s creamy, smooth, and simply delicious.

Imagine ending a meal with a dessert that is both delightful and easy to make. Leche flan, a popular treat, offers just that. This simple leche flan recipe brings the taste of a traditional favorite to your kitchen with minimal effort.

You don’t need to be a master chef to create this creamy, rich dessert. With a handful of ingredients and a bit of time, you can enjoy a homemade flan that impresses everyone. Ready to learn how to make this sweet delight? Let’s dive into the easy steps of creating a perfect leche flan.

Introduction To Leche Flan

Leche Flan is a classic Filipino dessert loved by many. Its creamy texture and rich flavor make it a delightful treat. This dessert is simple to make and perfect for any occasion.

Brief History

Leche Flan has its roots in Spanish cuisine. The Spaniards introduced it to the Philippines during their colonization. The word “leche” means milk in Spanish. The dessert is a custard made from eggs, milk, and sugar.

Over time, Filipinos adapted the recipe. They added their own twist, making it distinct and unique. Today, it is a staple in many Filipino households. It is often served during special celebrations and holidays.

Why It’s A Popular Dessert

Leche Flan is popular for several reasons:

  • Simple Ingredients: It requires only a few basic ingredients.
  • Easy to Prepare: The recipe is straightforward and beginner-friendly.
  • Delicious Flavor: The combination of caramel and custard is irresistible.

Additionally, its versatility makes it a favorite. It can be paired with various other desserts. For example, it goes well with fruits, cakes, and ice cream.

Many people also appreciate its rich, creamy texture. The smooth custard melts in your mouth, providing a delightful experience. This makes Leche Flan a go-to dessert for many Filipino families.

Key Ingredient Role in Recipe
Eggs Provide structure and richness
Milk Adds creaminess
Sugar Sweetens and caramelizes

In summary, Leche Flan’s simplicity, deliciousness, and versatility make it a beloved dessert. It is a perfect choice for any gathering or celebration.

Simple Leche Flan Recipe: Creamy Delight in Minutes

Credit: www.foxyfolksy.com

Essential Ingredients

Creating a delicious leche flan begins with the right ingredients. The quality and type of ingredients directly affect the flan’s taste and texture. Let’s explore the essential components needed for a perfect leche flan.

Key Components

The main ingredients for leche flan are eggs, milk, and sugar. These form the base of this classic dessert. Each component plays a crucial role in achieving the rich, creamy consistency.

Eggs are the backbone of leche flan. They provide structure and a smooth texture. Use fresh, large eggs for the best results.

Milk is another vital ingredient. It enhances the flan’s creaminess. Use either evaporated milk or whole milk. Sweetened condensed milk adds sweetness and thickens the mixture.

Sugar is essential for both the custard and the caramel. For the custard, it adds sweetness. For the caramel, it creates a golden, glossy topping. Use white granulated sugar for a smooth caramel.

Choosing Quality Ingredients

Quality ingredients make a significant difference in the final product. Fresh eggs ensure a smooth, lump-free custard. Check the expiration date and avoid cracked eggs.

For milk, opt for high-quality brands. Evaporated milk should be creamy and thick. Condensed milk should be sweet and rich.

Use pure, white granulated sugar. It melts evenly and forms a perfect caramel layer. Avoid brown sugar as it can alter the taste and texture.

Lastly, consider using organic ingredients if possible. They often have a better flavor and contribute to a more delicious flan.

Preparation Steps

Creating a delicious leche flan begins with careful preparation. Each step is crucial. Let’s explore the key stages. The following sections will guide you through mixing the flan mixture and preparing the caramel. Simple steps. Delicious results.

Mixing The Flan Mixture

First, gather all your ingredients. You will need eggs, condensed milk, evaporated milk, and vanilla extract. Crack the eggs and separate the yolks. Use only the yolks. Beat the yolks gently. Avoid creating bubbles. Add condensed milk and evaporated milk. Mix well. Stir in the vanilla extract. Ensure the mixture is smooth and well-blended.

Preparing The Caramel

Next, make the caramel. In a saucepan, add sugar. Heat the sugar over medium heat. Stir constantly. Watch as it melts and turns golden brown. Be careful not to burn it. Once melted, pour the caramel into your flan mold. Swirl the mold to coat the bottom evenly. Let it cool and harden. Your caramel base is now ready.

Cooking Techniques

Cooking techniques play a vital role in achieving the perfect Leche Flan. There are two popular methods for cooking this delicious dessert: the Steaming Method and the Baking Method. Each method has its own unique process and benefits. Let’s dive into each technique to understand how to make the best Leche Flan.

Steaming Method

The steaming method is a traditional way to cook Leche Flan. It results in a smooth, creamy texture. To steam Leche Flan, follow these steps:

  1. Prepare your flan mixture by combining eggs, milk, and sugar in a bowl.
  2. Strain the mixture to remove any lumps.
  3. Pour the mixture into a heatproof mold or llanera.
  4. Cover the mold with aluminum foil to prevent water droplets from entering.
  5. Place the mold in a steamer with boiling water.
  6. Steam for 30-45 minutes until the flan is set.
  7. Let it cool before refrigerating.

Baking Method

The baking method is another popular way to cook Leche Flan. It offers a slightly firmer texture. To bake Leche Flan, follow these steps:

  1. Preheat your oven to 350°F (175°C).
  2. Prepare the flan mixture by combining eggs, milk, and sugar.
  3. Strain the mixture to ensure it’s smooth.
  4. Pour the mixture into a heatproof mold or llanera.
  5. Place the mold in a larger baking dish filled with water (water bath).
  6. Cover the mold with aluminum foil.
  7. Bake for 45-60 minutes until the flan is set.
  8. Allow it to cool before placing in the refrigerator.

Both methods produce delicious Leche Flan. Choose the one that suits your kitchen setup. Enjoy making this delightful dessert!

Perfecting The Texture

Creating the perfect leche flan is about achieving the right texture. A smooth, creamy texture makes it delightful. Let’s dive into how to perfect it.

Tips For Creaminess

  • Use fresh and high-quality ingredients. Fresh eggs and milk are crucial.
  • Mix the ingredients well. Ensure the sugar dissolves completely.
  • Strain the mixture. This removes lumps and ensures a smooth texture.
  • Bake using a water bath. This helps the flan cook evenly.

Avoiding Common Mistakes

Mistake Solution
Overcooking Check the flan often. It should be firm but not solid.
Too many bubbles Mix gently. Strain the mixture to remove bubbles.
Grainy texture Use a water bath. Cook at a low and steady temperature.

Follow these tips for a creamy and smooth leche flan every time. Your family will love it!

Simple Leche Flan Recipe: Creamy Delight in Minutes

Credit: www.kawalingpinoy.com

Serving Suggestions

Leche Flan is a delightful dessert that is loved by many. Its creamy texture and caramel topping make it a favorite at any gathering. To make your Leche Flan experience even better, consider these serving suggestions. They will help you present and pair your dessert in the best possible way.

Presentation Ideas

Presentation is key when serving Leche Flan. Use a decorative plate to enhance its visual appeal. You can also add a mint leaf on top for a fresh look. Another idea is to sprinkle some powdered sugar over the flan. It adds a touch of elegance and a bit of sweetness.

For a more festive presentation, place the flan on a bed of fresh fruits. Strawberries, blueberries, and kiwi slices work well. They add color and contrast to the creamy flan. You can also use edible flowers to give it an exotic appearance. Remember, a well-presented dish always tastes better!

Pairing With Other Desserts

Leche Flan pairs wonderfully with other desserts. Serve it alongside a slice of chocolate cake. The rich chocolate complements the smooth flan perfectly. Another great pairing is with a scoop of vanilla ice cream. The cold ice cream and warm flan create a delightful texture contrast.

You can also pair Leche Flan with some traditional Filipino sweets. Bibingka or Puto are excellent choices. These rice cakes add a chewy texture that contrasts well with the flan’s creaminess. Lastly, consider serving it with a cup of hot coffee. The bitterness of the coffee balances the sweetness of the flan beautifully.

Storing And Reheating

Store your leche flan in the refrigerator to keep it fresh. When ready to serve, gently reheat it in a water bath. This keeps the flan smooth and delicious.

Storing and reheating your homemade leche flan can help maintain its creamy texture and rich flavor. Proper storage and reheating techniques ensure your dessert stays fresh and delicious. Let’s explore the best methods for storing and reheating leche flan.

Proper Storage

Store leche flan in the refrigerator to keep it fresh. Place it in an airtight container. This prevents it from absorbing other odors. Cover the flan with plastic wrap or a lid. This keeps it moist. Use the flan within three to four days for the best taste.

Reheating Tips

Reheat leche flan gently to avoid overcooking. Place a slice on a microwave-safe plate. Heat it on low power for 20-30 seconds. Check the flan’s temperature and texture. If needed, heat for another 10 seconds. Avoid using high heat. High heat can ruin the delicate texture. You can also reheat it in a water bath. Preheat your oven to 300°F (150°C). Place the flan in an oven-safe dish. Set the dish in a larger pan filled with hot water. Heat for 10-15 minutes. The water bath helps warm it evenly.
Simple Leche Flan Recipe: Creamy Delight in Minutes

Credit: www.pinterest.com

Variations And Twists

Leche flan is a beloved dessert in many households. While the classic recipe is delicious, there are many variations and twists to explore. These can add a unique touch to the traditional treat. Let’s dive into some exciting options.

Flavored Leche Flans

Adding different flavors can enhance your leche flan. Vanilla extract is a simple addition. It gives a richer taste. You can also try citrus zest. Lemon or orange zest works great. They add a fresh, tangy flavor.

For a tropical twist, add coconut milk. This changes the texture slightly. It makes the flan creamier. You could also use coffee. A shot of espresso can create a delightful coffee-flavored flan. Chocolate lovers can add cocoa powder. This gives the flan a rich, chocolatey taste.

Healthy Alternatives

Leche flan can be made healthier without losing its charm. Use low-fat milk instead of whole milk. This reduces the fat content. You can also use a sugar substitute. Stevia or erythritol are good options. They help cut down on sugar.

For a dairy-free version, use almond or soy milk. These plant-based milks work well. They give a slightly different flavor but are still delicious. You can also use egg whites instead of whole eggs. This reduces cholesterol and makes the flan lighter.

Frequently Asked Questions

What Is Leche Flan Made Of?

Leche flan is made of eggs, condensed milk, evaporated milk, and sugar. It is a creamy dessert.

How Long Does Leche Flan Take To Cook?

Leche flan usually takes about 45 minutes to cook. The cooking time can vary slightly.

Can I Make Leche Flan Without An Oven?

Yes, you can steam leche flan instead of baking it. Use a steamer for this method.

How Do You Prevent Bubbles In Leche Flan?

To prevent bubbles, mix the ingredients gently. Strain the mixture before pouring it into the mold.

Conclusion

Leche Flan is a delightful dessert. It’s easy to make and delicious. Perfect for any occasion. Just follow the steps in our recipe. With simple ingredients, you can create a creamy, sweet treat. Your family and friends will love it.

Try making Leche Flan today. Enjoy the wonderful flavors. Share this recipe with others. Happy cooking!