Best Instant Pot Greek Yogurt Recipe: Creamy and Delicious

Making Greek yogurt at home has never been easier. With an Instant Pot, you can create creamy, delicious yogurt with minimal effort.

Greek yogurt is a staple in many kitchens for its rich texture and health benefits. Store-bought options often have added sugars or preservatives. Making it at home gives you control over the ingredients. An Instant Pot simplifies the process, providing consistent results.

This guide will walk you through the best recipe for Greek yogurt using your Instant Pot. You’ll find it easy to follow and perfect for beginners. Get ready to enjoy fresh, homemade yogurt that’s healthier and tastier than store-bought versions. Let’s dive into the world of homemade Greek yogurt with your Instant Pot!

Best Instant Pot Greek Yogurt Recipe: Creamy and Delicious

Credit: thisoldgal.com

Ingredients

Making Greek yogurt at home with an Instant Pot is simple and rewarding. The ingredients you use play a big role in the taste and texture of your yogurt. Below, we will break down the essential ingredients and some optional add-ins to elevate your Greek yogurt.

Essential Ingredients

To make creamy and delicious Greek yogurt, you need just a few basic ingredients:

  • Milk: Use whole milk for a rich and creamy texture. You can also use 2% or skim milk, but the yogurt will be less creamy.
  • Yogurt Starter: A small amount of plain yogurt with live cultures. This helps to kickstart the fermentation process.

Optional Add-ins

Customize your Greek yogurt with these optional add-ins:

  • Sweeteners: Honey, maple syrup, or agave can add sweetness.
  • Flavorings: Vanilla extract or fresh fruit for extra flavor.
  • Thickeners: Powdered milk or gelatin to achieve a thicker consistency.

These add-ins can help you create a yogurt that suits your taste preferences.

Best Instant Pot Greek Yogurt Recipe: Creamy and Delicious

Credit: dishingupthedirt.com

Equipment Needed

Making Greek yogurt at home can be simple and fun with the right tools. The Instant Pot is the star of the show, but you’ll need a few other items to ensure your yogurt turns out perfect. Let’s dive into the essential equipment required for your homemade yogurt adventure.

Instant Pot Features

The Instant Pot is a versatile kitchen appliance that makes cooking easier. For making Greek yogurt, you need an Instant Pot with a Yogurt function. This feature allows you to ferment the milk at the right temperature.

Ensure your Instant Pot has the following features:

  • Yogurt button: Essential for the fermentation process.
  • Stainless steel inner pot: Easy to clean and durable.
  • Sealing ring: Ensures the lid is properly sealed during the process.
  • Temperature control: Maintains the right temperature for culturing yogurt.

These features help you create creamy, delicious Greek yogurt with minimal effort.

Additional Tools

Besides the Instant Pot, a few other tools are necessary to make Greek yogurt at home. Here’s a list of additional equipment:

Tool Purpose
Thermometer To check the milk temperature.
Whisk For mixing starter culture into the milk.
Cheesecloth or Nut Milk Bag For straining the yogurt to achieve the desired thickness.
Strainer To hold the cheesecloth or nut milk bag while straining.
Mixing Bowl To hold the strained yogurt.

Using these tools ensures your yogurt-making process is smooth and successful. Remember, each item plays a crucial role in achieving that perfect, thick Greek yogurt texture.

Preparation Steps

Making Greek yogurt in an Instant Pot is simple and rewarding. Follow these preparation steps for the best results. The process is divided into two main parts: heating the milk and cooling the milk. Let’s get started!

Heating The Milk

First, pour half-gallon of milk into the Instant Pot. Press the “Yogurt” button and select the “Boil” option. The Instant Pot will heat the milk to 180°F to 200°F. This step ensures the milk is safe and ready for yogurt-making. Stir occasionally to prevent the milk from burning. The heating process takes about 30 minutes.

Cooling The Milk

Once the milk reaches the desired temperature, remove the inner pot. Allow the milk to cool to 110°F. This cooling period is crucial. Too hot, and it will kill the yogurt cultures. Use a thermometer for accuracy. You can place the pot in an ice bath to speed up the cooling. Stir the milk to distribute the temperature evenly.

Inoculating The Milk

Inoculating the milk is a crucial step in making Greek yogurt with your Instant Pot. This step ensures the milk turns into creamy, delicious yogurt. Read on to learn more about choosing and mixing the starter culture.

Choosing A Starter Culture

The starter culture is the key to your yogurt’s taste and texture. Choose a plain Greek yogurt with live cultures. It must be plain without any added flavors or sweeteners. Check the label for “live and active cultures.” This guarantees your yogurt will have the right bacteria.

Mixing The Culture

Once you have your starter culture, mix it with a small amount of warm milk. This helps to blend the cultures well. Use a whisk to combine the yogurt and milk smoothly. Then, add this mixture back into the rest of the milk. Stir gently but thoroughly to distribute the cultures evenly. Now, your milk is ready to incubate in the Instant Pot. This step is vital for achieving perfect Greek yogurt.

Incubation Process

The incubation process is a crucial step in making Greek yogurt with an Instant Pot. This step determines the yogurt’s texture and taste. A good incubation process results in thick, creamy, and tangy yogurt. Let’s explore the key aspects of the incubation process.

Setting The Instant Pot

First, ensure your Instant Pot is clean. This avoids contamination. Pour the milk into the Instant Pot. Use a yogurt setting if available. Otherwise, use the “Keep Warm” setting. The temperature should stay around 110°F. This is the ideal temperature for yogurt cultures to thrive.

Optimal Incubation Time

The incubation time affects the yogurt’s flavor and texture. For mild yogurt, incubate for 6-8 hours. For tangier yogurt, extend the time to 10-12 hours. Check the yogurt every few hours. The longer it incubates, the thicker and tangier it becomes. Adjust the time based on your preference. Once done, transfer the yogurt to the fridge. This stops the incubation and sets the yogurt.

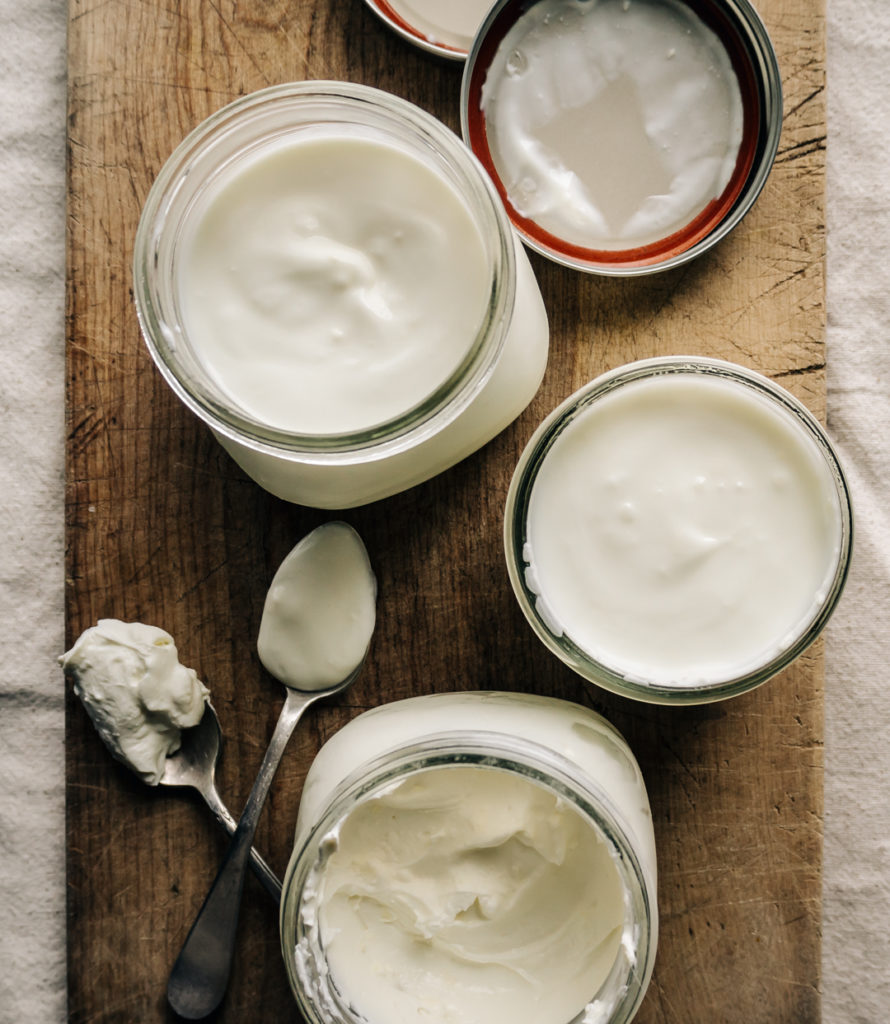
Straining The Yogurt

Creating thick and creamy Greek yogurt involves an important step: straining. This process removes the whey and leaves behind a deliciously rich texture. Straining might seem tricky, but with the right tools and technique, it is straightforward and rewarding.

Using A Strainer

First, you will need a fine-mesh strainer or cheesecloth. Place it over a large bowl to catch the whey. Pour the yogurt into the strainer carefully. Make sure it does not overflow.

For best results, use a large spoon or spatula to help the yogurt settle evenly. This ensures even straining. If you prefer, you can use a nut milk bag instead of a cheesecloth. Both work well.

Achieving Desired Thickness

The thickness of your Greek yogurt depends on how long you let it strain. For a thicker consistency, let it strain for at least 2 hours. If you like it extra thick, leave it overnight in the refrigerator.

Straining Time Thickness Level
2-4 hours Moderate
4-8 hours Thick
Overnight Extra Thick

Straining longer also intensifies the flavor. Taste it at intervals to find your perfect thickness. Once you achieve the desired consistency, transfer the yogurt to an airtight container and refrigerate.

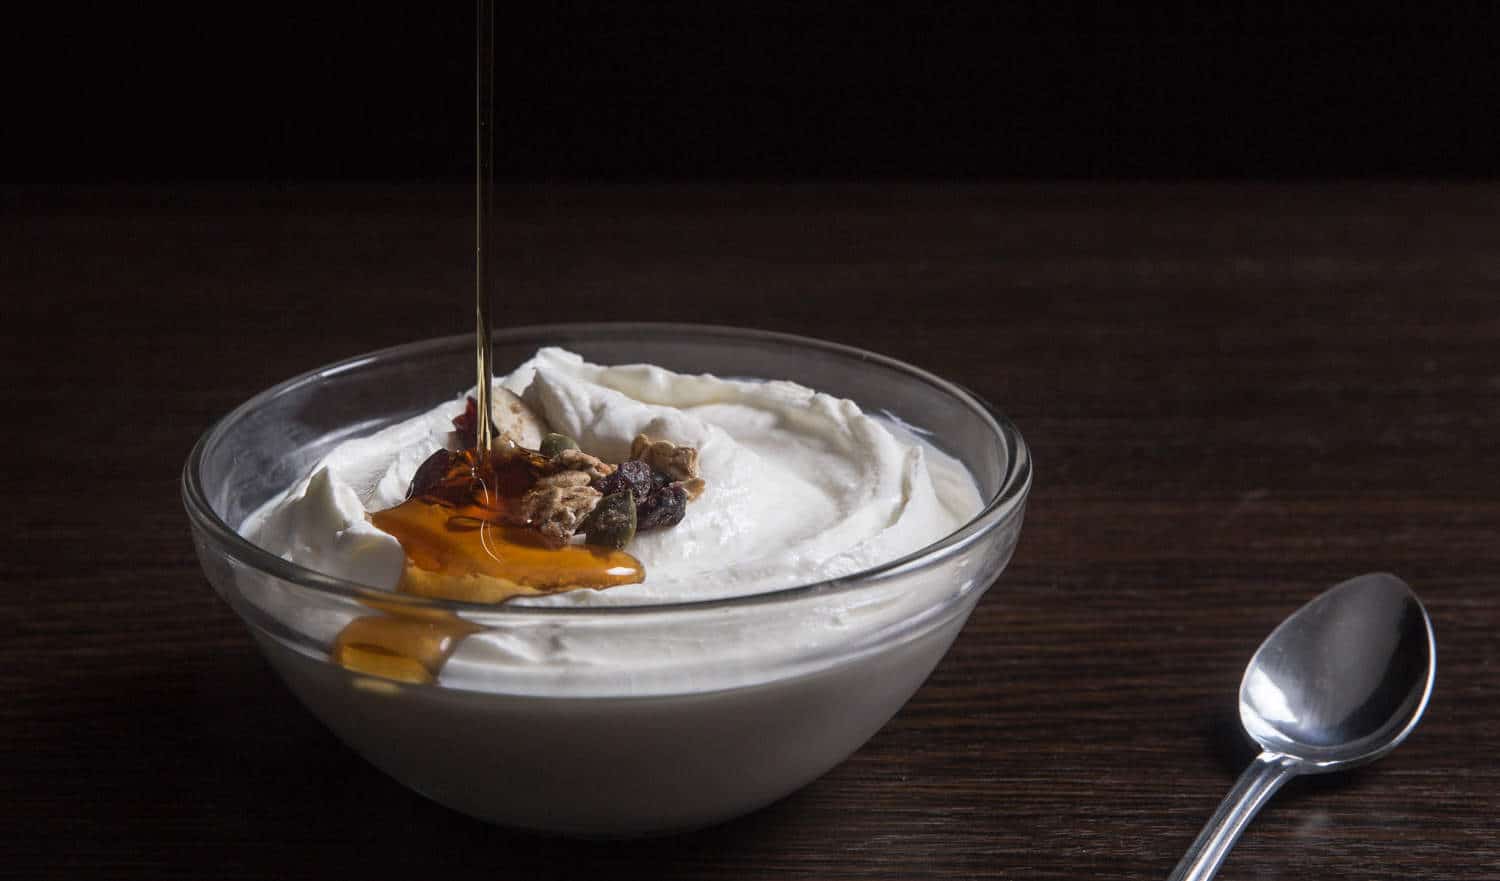
Remember, the whey you strain out can be used in smoothies or baking. Do not throw it away. Enjoy your homemade Greek yogurt with fruit, honey, or granola for a healthy treat.
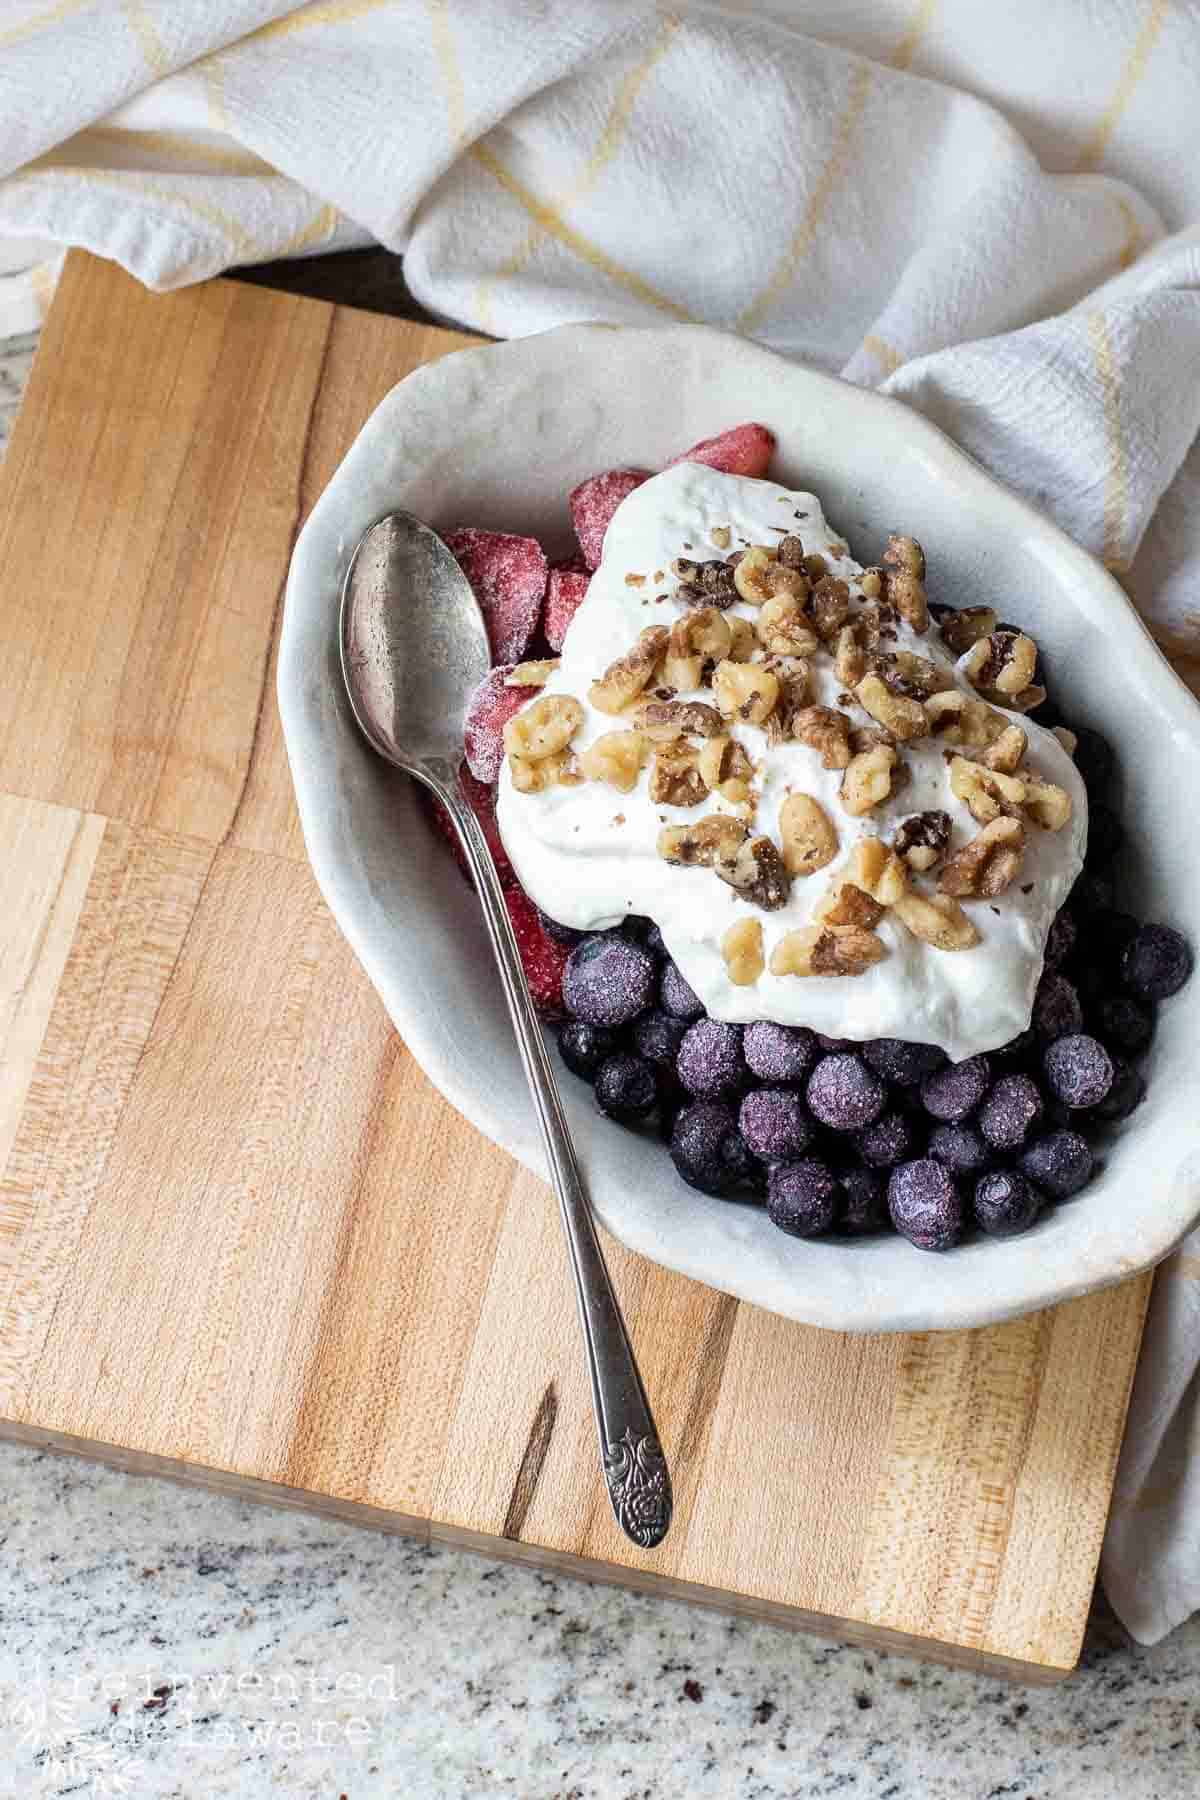
Serving Suggestions

The joy of making Instant Pot Greek Yogurt is not just the process but also the delightful ways to serve it. From topping ideas to storing it right, serving suggestions can enhance your yogurt experience.

Topping Ideas

Elevate your Greek yogurt with these delicious toppings:

  • Fresh Fruits: Add slices of strawberry, banana, or blueberries.
  • Honey: Drizzle a bit of honey for a touch of sweetness.
  • Nuts: Sprinkle almonds, walnuts, or pistachios for crunch.
  • Granola: Mix in some granola for extra texture.
  • Chia Seeds: A spoonful adds fiber and Omega-3s.
  • Cinnamon: A dash of cinnamon brings warmth and flavor.

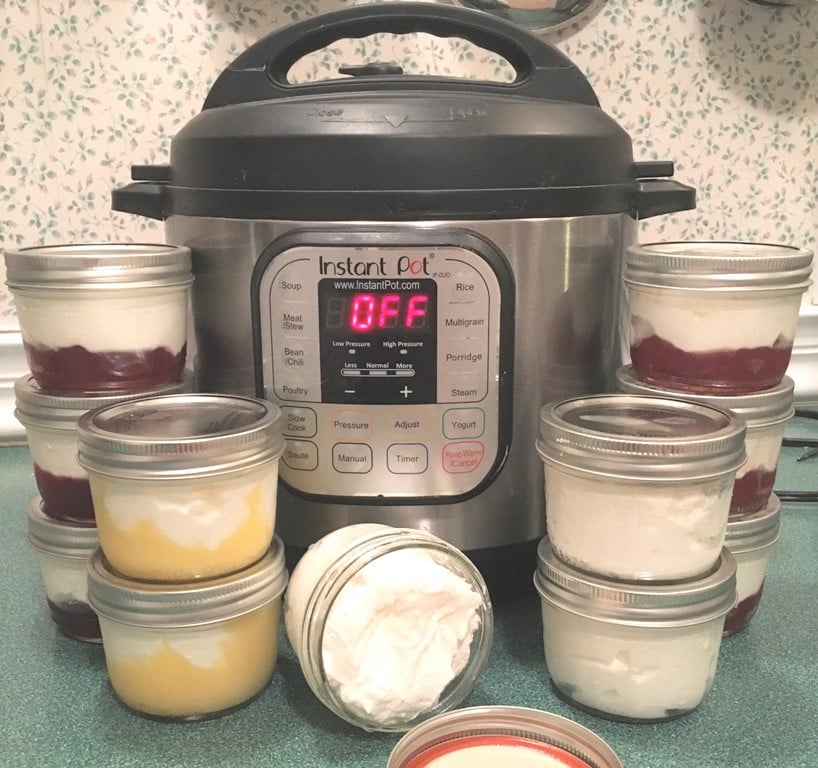
Storing Greek Yogurt

Proper storage keeps your homemade yogurt fresh and delicious.

  1. Refrigerate: Store in an airtight container in the fridge.
  2. Shelf Life: It stays fresh for up to 2 weeks.
  3. Freezing: Freeze in small portions for up to 2 months.
  4. Thawing: Thaw in the fridge overnight for best results.

Enjoy your Instant Pot Greek Yogurt with these serving suggestions and make each bite delightful!

Best Instant Pot Greek Yogurt Recipe: Creamy and Delicious

Credit: www.pressurecookrecipes.com

Troubleshooting Tips

Making Greek yogurt in an Instant Pot is simple. Yet, sometimes things don’t go as planned. This section covers common issues and their fixes. These tips will help you get perfect yogurt every time.

Common Issues

One common issue is yogurt not setting. This can be frustrating. Another problem is a runny texture. Sometimes, the yogurt can turn out too sour. Lastly, there may be a lumpy consistency.

Fixes And Adjustments

If your yogurt isn’t setting, check the starter culture. It must be fresh and active. Runny texture can be fixed by increasing incubation time. You can also try straining the yogurt longer.

For too sour yogurt, reduce the incubation time. Taste it periodically. If your yogurt is lumpy, whisk it well before chilling. This helps in achieving a smooth texture.

Frequently Asked Questions

How To Make Greek Yogurt In An Instant Pot?

Making Greek yogurt in an Instant Pot is simple. First, heat the milk. Then, add yogurt starter. Incubate until thickened. Finally, strain to desired consistency.

Can I Use Any Milk For Instant Pot Yogurt?

You can use any milk for Instant Pot yogurt. However, whole milk produces the creamiest texture. Skim milk results in a thinner yogurt.

How Long Does Instant Pot Yogurt Take?

Instant Pot yogurt typically takes around 8-10 hours. Heating and cooling add additional time. Plan for a full day process.

Do I Need Special Equipment For This Recipe?

No special equipment is needed for this recipe. You only need an Instant Pot, a thermometer, and a strainer for thickening.

Conclusion

Making Greek yogurt in an Instant Pot is simple and rewarding. The process is easy to follow. The result? Delicious, creamy yogurt every time. Perfect for breakfast or a snack. Plus, it’s healthier and fresher than store-bought. Give this recipe a try.

You’ll love the taste and texture. Share with friends and family. Enjoy your homemade Greek yogurt.

Almond Florentine Recipe: Irresistibly Crunchy & Delicious

Almond Florentines are a delightful treat. These thin, crispy cookies are perfect for any occasion.

Almond Florentines combine almonds, caramel, and chocolate to create a delicious snack. Originating from Europe, they have become popular worldwide. These cookies are not only tasty but also beautiful to look at. They are perfect for gift-giving or simply enjoying with a cup of coffee.

Making Almond Florentines at home is easier than you might think. With a few simple ingredients and some patience, you can create these elegant cookies in your kitchen. Whether you are an experienced baker or a beginner, this recipe will guide you through each step. Get ready to impress your family and friends with your homemade Almond Florentines!

Introduction To Almond Florentines

Almond Florentines are elegant, delightful cookies with a rich history. These thin, crispy treats are a perfect blend of nuts and caramel. They are often dipped in chocolate. These cookies are a favorite during the holidays but can be enjoyed all year round. Let’s dive deeper into the world of Almond Florentines.

History And Origin

The origin of Florentines is often linked to Italy, specifically the region of Florence. These cookies have been enjoyed for centuries. They are believed to have been created by Italian pastry chefs. Over time, Florentines have spread across Europe and the world. Each region adds its unique twist to the recipe.

What Makes Them Special

Almond Florentines stand out for their unique texture and taste. The combination of caramelized sugar and almonds creates a crispy, nutty delight. Dipping one side in chocolate adds a rich flavor contrast. This makes them a favorite for both kids and adults.

Here are some key features that make Almond Florentines special:

  • Texture: Crisp and slightly chewy.
  • Flavor: Nutty with a hint of caramel.
  • Appearance: Thin, lacy, and often chocolate-dipped.

These cookies are not only delicious but also visually appealing. They make a great addition to any dessert platter.

Feature Description
Texture Crisp and slightly chewy
Flavor Nutty with a hint of caramel
Appearance Thin, lacy, and often chocolate-dipped

To sum up, Almond Florentines are a delightful treat. Their rich history and unique features make them special. Whether you are baking for a special occasion or just a treat, these cookies are sure to impress.

Ingredients Needed

Creating a delicious batch of Almond Florentines requires the right ingredients. The blend of these items results in a crunchy, sweet treat. Let’s dive into the essential and optional ingredients needed for this recipe.

Key Ingredients

Almond Florentines need a few core ingredients. These form the base of your treat.

  • Almonds: Sliced or slivered, they provide the main crunch.
  • Sugar: Granulated sugar for sweetness.
  • Butter: Unsalted butter for richness.
  • Heavy cream: Adds a creamy texture.
  • Honey: Adds a floral sweetness.
  • Flour: A small amount to help bind the ingredients.

Optional Additions

These ingredients are not essential but can enhance your Almond Florentines.

  • Dark chocolate: Drizzle melted chocolate for extra flavor.
  • Orange zest: Adds a citrusy twist.
  • Vanilla extract: Enhances the overall taste.
  • Salt: A pinch to balance sweetness.

Equipment Required

Preparing Almond Florentines requires the right equipment. This ensures your cookies come out perfect every time. Let’s explore the essential tools and utensils needed to make these delicious treats.

Baking Tools

First, gather your baking tools. A baking sheet is vital for even cooking. Line it with parchment paper to prevent sticking. A mixing bowl is necessary for combining your ingredients. A whisk or hand mixer helps create a smooth batter. Measuring cups and spoons ensure accurate ingredient portions. Lastly, a spatula helps spread and handle the mix.

Special Utensils

Some special utensils make the process easier. A candy thermometer is helpful for checking the sugar syrup temperature. Use a silicone mat to provide a non-stick surface. A pastry brush can apply a thin layer of butter or oil, ensuring even baking. A cooling rack allows the Florentines to cool evenly. Lastly, a sharp knife or pizza cutter helps cut the Florentines into neat shapes.

Preparation Steps

Making Almond Florentine cookies is a delightful process. These cookies are crisp, nutty, and perfect for any occasion. Let’s walk through the preparation steps to ensure you get them just right.

Mixing Ingredients

First, gather your ingredients. You will need:

  • 100 grams of sliced almonds
  • 50 grams of sugar
  • 50 grams of butter
  • 50 grams of honey
  • 30 grams of flour
  • 1 tablespoon of heavy cream
  • 1 teaspoon of vanilla extract

In a medium saucepan, melt the butter over low heat. Add the sugar, honey, and heavy cream. Stir until the sugar dissolves completely. This mixture should be smooth and slightly thick.

Remove the saucepan from heat. Stir in the flour until fully combined. Then add the sliced almonds and vanilla extract. Mix well to ensure all almonds are coated.

Preparing The Baking Sheet

Preheat your oven to 350°F (175°C). Line a baking sheet with parchment paper. This will prevent the cookies from sticking and make cleanup easier.

Use a tablespoon to scoop the almond mixture onto the baking sheet. Space each scoop about 2 inches apart. This allows the cookies to spread while baking.

Flatten each scoop slightly with the back of the spoon. This ensures even baking and a nice, thin cookie.

Bake the cookies for 10-12 minutes or until they are golden brown. Watch them closely as they can burn quickly.

Once baked, let the cookies cool on the baking sheet for a few minutes. Transfer them to a wire rack to cool completely. Enjoy your delicious Almond Florentines!

Baking Process

The baking process is crucial for achieving perfect Almond Florentines. This step ensures they have a crispy texture and a golden-brown color. Careful attention to temperature and timing is essential. Follow these steps closely for the best results.

Temperature And Timing

Preheat your oven to 350°F (175°C). This temperature is ideal for baking Florentines. Bake the cookies for 10-12 minutes. Watch them closely as they bake. They should turn a light golden brown.

Check them at the 10-minute mark. If they are not golden, bake for another 1-2 minutes. Do not overbake them. They can burn quickly, so stay attentive.

Tips For Even Baking

Ensure your oven rack is in the middle position. This placement helps achieve even heat distribution. Use a baking sheet lined with parchment paper. It prevents sticking and makes cleanup easier.

Space the cookies evenly on the baking sheet. Leave enough room between each cookie. This prevents them from merging during baking. Rotate the baking sheet halfway through the baking time. It promotes even baking and prevents hot spots.

Use a cookie scoop for uniform size. Uniform cookies bake more evenly. Keep an eye on the edges. They should be slightly darker than the center.

Finishing Touches

The Finishing Touches are what make your Almond Florentine recipe truly special. After carefully baking each delicate cookie, adding the final details can elevate their appearance and flavor. Let’s explore how to add these delightful finishing touches.

Adding Chocolate

Chocolate adds a rich, decadent twist to Almond Florentines. Melt your favorite dark or milk chocolate in a double boiler. Once melted, dip the bottom of each cookie into the chocolate. Place them on a parchment-lined tray to cool.

For a more artistic touch, drizzle melted chocolate over the top of the cookies. Use a fork or a piping bag for a more controlled drizzle. This adds a beautiful contrast to the caramelized almonds.

Decorative Ideas

Adding decorative elements can make your Almond Florentines visually appealing. Here are some ideas:

  • Edible Gold Dust: Lightly brush edible gold dust on top for a luxurious touch.
  • Chopped Nuts: Sprinkle finely chopped pistachios or hazelnuts over the chocolate before it sets.
  • Sea Salt: A pinch of sea salt can balance the sweetness and add a gourmet flair.

Present your Almond Florentines on a beautiful platter. Arrange them in layers with parchment paper in between. These small details will make them the star of any dessert table.

Serving Suggestions

Almond Florentines are delightful, crispy cookies with a nutty, caramelized flavor. Serving these sweet treats can elevate any gathering. Here are some suggestions to enhance your presentation and pairings.

Pairing With Drinks

Almond Florentines pair wonderfully with a variety of drinks. Here are some suggestions:

  • Coffee: A strong espresso or creamy latte complements the sweet, nutty flavors.
  • Tea: Black tea or green tea provides a nice balance to the richness of the Florentines.
  • Wine: A glass of dessert wine, such as a Moscato, enhances the almond notes.
  • Milk: For a classic combination, serve with a cold glass of milk.

Presentation Tips

Presentation is key to making your Almond Florentines look as good as they taste. Consider these tips:

  • Platter: Arrange the cookies on a decorative platter for a visually appealing display.
  • Layers: Stack the cookies in layers with parchment paper in between. This keeps them from sticking together.
  • Garnish: Add a sprinkle of powdered sugar or a drizzle of chocolate on top. This adds an extra touch of elegance.
  • Accompaniments: Include small bowls of fresh berries or nuts on the side. This creates a more inviting and complete presentation.
Almond Florentine Recipe: Irresistibly Crunchy & Delicious

Credit: www.delscookingtwist.com

Storage And Shelf Life

Almond Florentines are a delightful treat with a delicate crunch. To enjoy their rich flavor and texture, proper storage is crucial. Knowing how to store them ensures they stay fresh and tasty for as long as possible.

Proper Storage Methods

Store Almond Florentines in an airtight container. This prevents them from becoming stale. Place a layer of parchment paper between each Florentine. This stops them from sticking together. Keep the container in a cool, dry place. Avoid storing them in the refrigerator. Moisture can make them soggy.

How Long They Last

Almond Florentines can last up to two weeks. They maintain their best quality when stored properly. For longer storage, you can freeze them. Wrap each Florentine in plastic wrap. Then place them in a freezer bag. They can last up to three months in the freezer. Thaw at room temperature before serving.

Variations And Alternatives

Almond Florentines are a delightful treat, but they can be customized. Below are some interesting variations and alternatives to make them even more special. Whether you need a gluten-free option or want to try different nuts, we’ve got you covered.

Different Nut Options

Not a fan of almonds? You can use other nuts too. Try these:

  • Hazelnuts: Add a rich, earthy flavor.
  • Walnuts: Offer a slightly bitter taste, perfect with chocolate.
  • Pistachios: Give a pop of color and a unique flavor.
  • Pecans: Add a buttery texture.

Mix and match different nuts for a unique flavor combination. Just keep the total amount the same.

Gluten-free Version

Need a gluten-free option? Substitute the flour with these alternatives:

Ingredient Gluten-Free Substitute
All-purpose flour Rice flour
Cornstarch Arrowroot powder

Use the same quantity as the original recipe. These substitutes work well to keep the crisp texture.

For those who are gluten-sensitive, this can make a huge difference. Enjoy your Almond Florentines without any worry!

Almond Florentine Recipe: Irresistibly Crunchy & Delicious

Credit: milkandcardamom.com

Almond Florentine Recipe: Irresistibly Crunchy & Delicious

Credit: annabanana.co

Frequently Asked Questions

What Ingredients Are Needed For Almond Florentine?

To make Almond Florentine, you will need almonds, sugar, butter, honey, and cream. Optionally, you can add chocolate for dipping.

How Long To Bake Almond Florentine?

Bake Almond Florentine for about 8-10 minutes. They should be golden brown and crisp.

Can I Use Other Nuts?

Yes, you can substitute almonds with other nuts. Pecans, hazelnuts, or walnuts work well.

How To Store Almond Florentine?

Store Almond Florentine in an airtight container. They stay fresh for up to a week.

Conclusion

Creating Almond Florentines at home is simple and rewarding. This recipe brings joy to any occasion. The crispy texture and sweet taste delight everyone. Enjoy these treats with friends and family. Experiment with toppings for a personal touch. Remember to store them in an airtight container.

They will stay fresh and delicious. Happy baking!

Tempeh Asian Recipe: Deliciously Easy Vegan Dinner Idea

Tempeh is a versatile, protein-rich food. Asian recipes with tempeh are flavorful and nutritious.

Are you looking to add a tasty twist to your meals? Tempeh Asian recipes are the perfect way to do it! This fermented soybean product is popular in Asian cuisine and can be used in many dishes. Its firm texture and nutty flavor make it a fantastic meat alternative.

Plus, it absorbs marinades and sauces well, making it a favorite in stir-fries, curries, and salads. In this blog post, we will explore some delightful tempeh Asian recipes that are easy to prepare. Ready to spice up your kitchen with some delicious and healthy options? Let’s dive into the world of tempeh and discover its culinary magic!

Tempeh Asian Recipe: Deliciously Easy Vegan Dinner Idea

Credit: goodoldvegan.com

Introduction To Tempeh

Tempeh is a versatile and nutritious food that’s gaining popularity. Originating from Indonesia, it has a rich, nutty flavor and a firm texture. Tempeh is made from fermented soybeans, offering a unique taste and a variety of health benefits. This blog post will introduce you to tempeh, its nutritional benefits, and a delicious Asian recipe.

What Is Tempeh?

Tempeh is a traditional Indonesian soy product. It is made by fermenting cooked soybeans with a specific type of mold. This fermentation process binds the soybeans into a cake-like form. Unlike tofu, tempeh has a dense and chewy texture. It can be sliced, cubed, or crumbled for various recipes. Tempeh absorbs flavors well, making it perfect for many dishes.

Nutritional Benefits

Tempeh is packed with nutrients. It is high in protein, making it a great meat substitute. Each serving provides essential amino acids. Tempeh is also rich in vitamins and minerals. It contains iron, calcium, and magnesium. Additionally, tempeh is a good source of dietary fiber. This helps with digestion and keeps you feeling full longer.

Tempeh also contains probiotics. These are beneficial bacteria that support gut health. Fermented foods like tempeh can improve your immune system. They can also aid in nutrient absorption.

In summary, tempeh is a nutritious and versatile ingredient. It is perfect for anyone looking to add more plant-based protein to their diet.

Tempeh Asian Recipe: Deliciously Easy Vegan Dinner Idea

Credit: minimalistbaker.com

Essential Ingredients

Essential Ingredients are the backbone of any delicious Tempeh Asian Recipe. Using the right ingredients ensures that your dish is flavorful and authentic. In this section, we’ll explore the key components you need to create a mouth-watering tempeh dish, including different types of tempeh and common Asian flavors.

Tempeh Varieties

Tempeh is a fermented soybean product that comes in various types. Understanding the different varieties can help you choose the best one for your recipe.

  • Soy Tempeh: The most common variety, made entirely from soybeans.
  • Mixed Grain Tempeh: Contains a mix of soybeans and grains like barley or brown rice.
  • Chickpea Tempeh: Made from chickpeas, offering a different flavor and texture.

Common Asian Flavors

Asian cuisine is known for its rich and diverse flavors. Incorporating these flavors will elevate your tempeh dish.

Flavor Ingredient
Umami Soy Sauce, Miso
Sour Rice Vinegar, Lime Juice
Spicy Sriracha, Fresh Chili
Sweet Hoisin Sauce, Brown Sugar
Salty Fish Sauce, Salt

Combining these flavors with the right variety of tempeh will create a balanced and delicious dish. Experiment with different combinations to find your favorite blend.

Preparation Tips

Preparing tempeh for an Asian recipe can be fun and easy. With a few simple tips, you can make sure your dish is delicious and full of flavor. Let’s look at some essential preparation techniques.

Marinating Tempeh

Marinating tempeh enhances its flavor. Start by cutting the tempeh into thin slices or cubes. This allows the marinade to penetrate more deeply. Use a mix of soy sauce, ginger, garlic, and a touch of sesame oil. Let it sit for at least 30 minutes. For a richer taste, marinate overnight in the fridge.

Cutting Techniques

Cutting tempeh correctly affects its texture and how it absorbs flavors. For stir-fries, cut tempeh into thin strips. For stews or curries, cubes work best. Use a sharp knife to make clean cuts. This prevents the tempeh from crumbling. If you prefer a crispy texture, cut the tempeh into thinner slices. This helps achieve a nice, golden crust when frying.

Cooking Methods

Tempeh, a versatile and nutritious ingredient, can be cooked in several ways. Two popular methods are stir-frying and baking. These methods bring out the best flavors in tempeh. Let’s explore each technique.

Stir-frying

Stir-frying tempeh is quick and easy. Cut the tempeh into small cubes or thin strips. Heat a bit of oil in a pan over medium-high heat. Add the tempeh and cook until it turns golden brown. This usually takes about 5-7 minutes. Stir continuously to avoid burning. Once done, remove from the pan and set aside. You can use the same pan to stir-fry vegetables. Combine the cooked tempeh with the vegetables. Add soy sauce or your favorite stir-fry sauce. Serve hot with rice or noodles.

Baking

Baking tempeh is a hands-off method. Preheat your oven to 375°F (190°C). Slice the tempeh into thin slices or cubes. Marinate the tempeh in your favorite sauce for at least 30 minutes. Line a baking sheet with parchment paper. Spread the marinated tempeh pieces on the sheet. Bake for 20-25 minutes, flipping halfway through. The tempeh should be crispy on the outside. Serve as a main dish or add to salads.

Tempeh Asian Recipe

Tempeh is a protein-rich, fermented soybean product, popular in many Asian dishes. Its firm texture and nutty flavor make it perfect for various recipes. This Tempeh Asian Recipe is simple, delicious, and packed with nutrients. Let’s dive into the details.

Ingredients List

  • 200g tempeh, sliced
  • 2 tbsp soy sauce
  • 1 tbsp hoisin sauce
  • 1 tbsp sesame oil
  • 2 cloves garlic, minced
  • 1-inch ginger, grated
  • 1 red bell pepper, sliced
  • 1 cup broccoli florets
  • 2 tbsp vegetable oil
  • 1 tbsp sesame seeds
  • Salt and pepper to taste

Step-by-step Instructions

  1. Prepare the marinade: In a bowl, mix the soy sauce, hoisin sauce, and sesame oil.
  2. Marinate the tempeh: Add the sliced tempeh and coat it well. Let it sit for 15 minutes.
  3. Heat the oil: In a large pan, heat the vegetable oil over medium heat.
  4. Cook the tempeh: Add the marinated tempeh to the pan. Cook for 5-7 minutes until golden brown. Remove from the pan.
  5. Stir-fry the vegetables: In the same pan, add garlic and ginger. Cook for 1 minute.
  6. Add the red bell pepper and broccoli. Stir-fry for 5 minutes.
  7. Combine and season: Add the cooked tempeh back to the pan. Mix everything well. Season with salt and pepper.
  8. Sprinkle sesame seeds on top before serving. Enjoy your delicious Tempeh Asian dish!
Tempeh Asian Recipe: Deliciously Easy Vegan Dinner Idea

Credit: www.lazycatkitchen.com

Serving Suggestions

Serving Tempeh Asian Recipe can be an exciting culinary experience. You can enhance its flavors with thoughtful garnishing and complementary side dishes. Let’s explore some ideas to elevate your meal.

Garnishing Ideas

Garnish your Tempeh Asian Recipe with fresh herbs. Chopped cilantro or mint adds a refreshing touch. Sprinkle sesame seeds for a subtle crunch. Sliced green onions provide a mild, zesty flavor. A squeeze of lime juice can brighten up the dish.

Side Dishes

Pair your Tempeh Asian Recipe with steamed jasmine rice. It soaks up the savory sauce perfectly. Serve with stir-fried vegetables like broccoli, bell peppers, and carrots. These add color and nutrients to your meal. A light cucumber salad can also complement the dish well. Its cool, crisp texture balances the tempeh’s richness.

Health Benefits

Tempeh, a traditional Asian food, offers a variety of health benefits. Made from fermented soybeans, it is rich in nutrients. Below are some key health benefits of including tempeh in your diet.

Protein Content

Tempeh is an excellent source of plant-based protein. One cup of tempeh provides about 31 grams of protein. This high protein content helps build muscles and repair tissues. It also keeps you feeling full longer, which can help with weight management.

Here’s a quick comparison of protein content in common foods:

Food Protein Content (per cup)
Tempeh 31 grams
Chicken Breast 27 grams
Tofu 20 grams

Digestive Health

Tempeh is rich in probiotics due to its fermentation process. Probiotics are beneficial bacteria that improve gut health. They help in digestion and can reduce bloating and gas.

Including tempeh in your diet can promote a healthy balance of gut bacteria. This can lead to better digestion and improved overall health. Here are some benefits of probiotics:

  • Improved digestion
  • Reduced bloating
  • Better nutrient absorption

Tempeh also contains dietary fiber, which aids in digestion. Fiber helps regulate bowel movements and prevents constipation. A diet high in fiber is essential for a healthy digestive system.

Tips For Beginners

Cooking with tempeh can be a delightful experience. It’s a versatile ingredient packed with protein. For beginners, understanding the basics can make the process easier. Here are some essential tips to get you started on your journey to making delicious tempeh Asian recipes.

Common Mistakes

Many beginners make common mistakes when cooking tempeh. Here are a few to avoid:

  • Skipping the steaming step: Always steam tempeh before cooking. It removes its bitterness.
  • Not marinating: Tempeh needs to soak up flavors. Marinate it for at least 30 minutes.
  • Overcooking: Tempeh can become dry if cooked too long. Watch your cooking time.

Time-saving Hacks

Busy schedules can make cooking a challenge. These hacks can help you save time:

  1. Pre-steam and freeze: Steam a large batch of tempeh. Freeze in portions for quick use.
  2. Use a food processor: Chop tempeh quickly for stir-fries or salads.
  3. Pre-marinate: Marinate tempeh overnight. It’s ready to cook the next day.
Step Description
1. Steam Steam tempeh for 10 minutes to reduce bitterness.
2. Marinate Soak in marinade for at least 30 minutes.
3. Cook Cook using your preferred method. Avoid overcooking.

Frequently Asked Questions

What Is Tempeh?

Tempeh is a fermented soy product originating from Indonesia. It’s rich in protein and nutrients. It has a firm texture and nutty flavor, making it a versatile meat substitute.

How Do You Cook Tempeh?

To cook tempeh, slice or cube it. You can steam, bake, or stir-fry it. Marinating tempeh enhances its flavor. It pairs well with various sauces and spices.

Is Tempeh Healthy?

Yes, tempeh is very healthy. It is high in protein, fiber, and probiotics. It is also low in saturated fat. Tempeh is a great option for vegans and vegetarians.

Can You Use Tempeh In Asian Recipes?

Yes, tempeh is perfect for Asian recipes. It absorbs flavors well and complements various sauces. It can be used in stir-fries, curries, and salads.

Conclusion

Tempeh Asian recipes are easy and delicious. They bring vibrant flavors to your table. Perfect for any meal, they offer healthy and tasty options. Enjoy cooking and sharing these dishes with friends and family. Experiment with different ingredients to find your favorite combinations.

Tempeh adds a unique twist to traditional Asian cuisine. Happy cooking!

Traditional Greek Gyro Recipe: Authentic and Delicious Guide

Imagine biting into a warm, tender pita filled with seasoned meat, fresh veggies, and tangy tzatziki sauce. A traditional Greek gyro offers just that.

It’s a delicious, convenient meal loved by many around the world. Gyros are a staple of Greek street food. They combine savory flavors with a satisfying texture. The meat, usually pork or chicken, is marinated with herbs and spices. It’s then cooked on a vertical rotisserie, ensuring a juicy and flavorful bite every time.

Fresh vegetables like tomatoes, onions, and cucumbers add crunch and freshness. Tzatziki sauce, made from yogurt, garlic, and cucumber, ties everything together with its creamy tang. In this blog post, you will learn how to make this beloved dish right in your own kitchen. So, get ready to bring a taste of Greece to your table!

Traditional Greek Gyro Recipe: Authentic and Delicious Guide

Credit: www.greekboston.com

Introduction To Greek Gyro

Greek Gyro is a beloved dish that brings together flavors and textures. This dish is perfect for any meal. It offers a taste of Greece in every bite. The combination of tender meat, fresh vegetables, and tangy sauce makes it a favorite worldwide.

History Of Gyro

The origins of the gyro date back to ancient times. The word “gyro” means “turn” in Greek. This refers to the way the meat is cooked on a vertical rotisserie. Traditionally, it consists of lamb, beef, or chicken. The meat is seasoned with spices and herbs, giving it a unique flavor. Over time, it became a popular street food in Greece. It spread to other countries, gaining international fame.

Popularity In Modern Cuisine

Today, Greek Gyro is enjoyed by people all over the world. Its popularity in modern cuisine is undeniable. Many restaurants offer their own versions of the dish. Some use different types of meat or add new ingredients. Despite these variations, the essence of the gyro remains the same. It is a dish that continues to delight and satisfy.

Here are some key elements that make a traditional Greek Gyro:

  • Meat: Typically lamb, beef, or chicken.
  • Pita Bread: Soft and warm, perfect for wrapping.
  • Tzatziki Sauce: A tangy yogurt-based sauce with cucumber and garlic.
  • Vegetables: Fresh tomatoes, onions, and sometimes lettuce.
  • Seasonings: A blend of herbs and spices for flavor.

Each element works together to create a delicious and satisfying meal. Whether you are a fan of traditional recipes or enjoy modern twists, the Greek Gyro has something for everyone. It is a dish that stands the test of time.

Essential Ingredients

Creating a traditional Greek gyro at home requires the right ingredients. Each component adds its own unique flavor and texture. To get started, you need to focus on three main areas: the meat selection, the spices and seasonings, and the fresh produce. These essential ingredients will ensure your gyro tastes authentic and delicious.

Meat Selection

The most common meat for gyros is pork or chicken. Pork shoulder is tender and flavorful. Chicken thighs are juicy and rich. Both options work well, but lamb is also a great choice. It’s more expensive, but its unique taste is worth it. Choose fresh, high-quality meat for the best results.

Spices And Seasonings

Spices and seasonings are key to a good gyro. You need garlic, oregano, thyme, and rosemary. These herbs bring out the meat’s natural flavors. Salt and pepper are essential. A bit of lemon juice adds a fresh, tangy note. Marinate the meat for at least two hours for deeper flavor.

Fresh Produce

Fresh produce enhances the gyro’s taste and texture. Tomatoes add a juicy, sweet element. Red onions provide a sharp, crisp contrast. Cucumber slices bring a refreshing crunch. Don’t forget the fresh dill for the tzatziki sauce. These vegetables should be fresh and ripe. They balance the rich flavors of the meat and spices.

Preparing The Meat

Preparing the meat is the most important step in making a traditional Greek gyro. The process involves marinating the meat and then cooking it to perfection. Each step requires attention to detail to achieve the authentic taste and texture of a Greek gyro.

Marinating Process

The marinating process is crucial. It infuses the meat with rich flavors. Start with a mix of olive oil, lemon juice, garlic, and oregano. Add salt, pepper, and a touch of paprika. Cut the meat into thin slices. Use pork, chicken, or lamb for the best results. Coat the meat evenly with the marinade. Cover and refrigerate it for at least two hours. For deeper flavor, let it marinate overnight.

Cooking Techniques

Cooking the meat properly is essential. Traditionally, gyros are cooked on a vertical rotisserie. At home, you can use a grill or oven. Preheat your grill to medium-high heat. If using an oven, set it to 375°F (190°C). Place the marinated meat on skewers if grilling. Cook for 15-20 minutes, turning occasionally. In the oven, spread the meat on a baking tray. Cook for 25-30 minutes, flipping halfway through. Ensure the meat is well-cooked and slightly crispy. The goal is to achieve a golden-brown exterior. This gives the gyro its distinctive texture and flavor.

Making Tzatziki Sauce

Creating the perfect Tzatziki Sauce is a key step in preparing a traditional Greek Gyro. This cool, creamy sauce balances the rich flavors of the meat, adding a refreshing touch. It’s simple to make with fresh ingredients, and the result is a delicious accompaniment that enhances the overall gyro experience.

Ingredients Needed

  • 1 cup Greek yogurt
  • 1 cucumber, grated
  • 2 cloves garlic, minced
  • 1 tablespoon olive oil
  • 1 tablespoon lemon juice
  • 1 tablespoon fresh dill, chopped
  • Salt and pepper to taste

Step-by-step Preparation

  1. Prepare the cucumber: Peel and grate the cucumber. Place the grated cucumber in a clean cloth and squeeze out the excess water.
  2. Mix the yogurt: In a medium bowl, add the Greek yogurt. Stir until smooth.
  3. Add the cucumber: Mix the grated cucumber into the yogurt.
  4. Incorporate garlic and oil: Add the minced garlic and olive oil. Mix well.
  5. Flavor with lemon and dill: Stir in the lemon juice and fresh dill. Combine thoroughly.
  6. Season to taste: Add salt and pepper as desired. Adjust to your taste.
  7. Chill before serving: Cover the bowl and refrigerate for at least 30 minutes. This allows the flavors to blend.

Your Tzatziki Sauce is ready! Serve it with your gyro, and enjoy the authentic Greek flavors.

Assembling The Gyro

Assembling the gyro is a crucial step to enjoy this Greek delight. The right combination of ingredients makes all the difference. Follow these simple steps to create a perfect gyro.

Pita Bread Selection

Choose soft, fluffy pita bread. It should be fresh and pliable. Greek-style pita works best. It holds the filling well and adds to the taste. Warm the pita slightly before use. This makes it easier to fold and enhances the flavor.

Layering Ingredients

Begin with a generous spread of tzatziki sauce. Place it in the center of the pita. Add a layer of seasoned meat slices. Chicken, lamb, or pork are traditional choices. Next, add fresh vegetables. Common options include sliced tomatoes, onions, and lettuce. Sprinkle some feta cheese for extra flavor. Finally, add a few french fries for a unique twist. Fold the pita carefully and wrap it in parchment paper to hold everything together.

Traditional Greek Gyro Recipe: Authentic and Delicious Guide

Credit: thegreekfoodie.com

Serving Suggestions

Serving a traditional Greek gyro can be a delightful experience. Choosing the right accompaniments can elevate the flavors and make the meal more enjoyable. Here are some serving suggestions to consider.

Side Dishes

Pair your gyro with a fresh Greek salad. The combination of cucumbers, tomatoes, olives, and feta cheese adds a refreshing crunch. Tzatziki sauce is a must. Its creamy texture and tangy taste complement the gyro’s flavors perfectly.

Another great option is roasted potatoes. Season them with olive oil, lemon juice, and oregano. These flavors blend well with the spices in the gyro meat. For a lighter option, try a side of grilled vegetables. Zucchini, bell peppers, and eggplant work well.

Beverage Pairings

Choosing the right drink can enhance your gyro experience. A glass of chilled white wine pairs beautifully. Opt for a Greek wine like Assyrtiko. Its crisp and citrusy notes balance the rich gyro flavors.

If you prefer non-alcoholic options, try a refreshing glass of iced tea. Mint and lemon iced tea complement the gyro’s spices well. Another excellent choice is sparkling water with a splash of lemon juice. It cleanses the palate and enhances the meal.

Tips And Tricks

Making a traditional Greek gyro at home can be an enjoyable experience. To achieve the perfect taste, there are some essential tips and tricks you should follow. These suggestions will help you master the art of creating an authentic and delicious gyro.

Achieving Authentic Flavor

To capture the true essence of a Greek gyro, focus on the ingredients and preparation methods:

  • Marinate the meat properly. Use a mixture of olive oil, lemon juice, garlic, and herbs like oregano and thyme.
  • Slow cook the meat on a rotisserie or grill for the best texture.
  • Use fresh pita bread. Warm it slightly before serving for a soft and pliable texture.
  • Prepare a homemade Tzatziki sauce using Greek yogurt, cucumber, garlic, and dill.
  • Include traditional toppings like tomatoes, onions, and lettuce.

Common Mistakes To Avoid

Avoiding certain pitfalls can make a big difference in your gyro’s quality:

  1. Do not overcook the meat. Overcooked meat becomes dry and tough. Aim for a juicy, tender finish.
  2. Avoid using store-bought Tzatziki sauce if possible. Homemade sauce has a fresher taste.
  3. Do not skip the marination step. This is crucial for infusing the meat with flavor.
  4. Use high-quality ingredients. Fresh vegetables and good quality meat make a significant difference.
  5. Avoid thick pita bread. Opt for thin and soft pita to wrap the gyro easily.

Following these tips and tricks will help you create a gyro that tastes like it came straight from Greece. Enjoy the process and savor the delicious results!

Variations Of Gyro

Gyros are a popular Greek dish, enjoyed by many around the world. Traditionally made with pork or lamb, gyros have evolved to include a variety of ingredients. Let’s explore some exciting variations.

Chicken Gyro

Chicken gyros are a lighter alternative to the traditional pork or lamb version. They are equally delicious and easy to make. The chicken is marinated in a blend of Greek yogurt, lemon juice, garlic, and herbs like oregano and thyme. This marinade ensures the chicken stays juicy and flavorful. After marinating, the chicken is grilled until perfectly cooked.

Once the chicken is ready, it is thinly sliced and served in warm pita bread. Traditional toppings include tomatoes, onions, and tzatziki sauce. You can also add lettuce or cucumbers for extra crunch. Chicken gyros are a healthier option without sacrificing taste.

Vegetarian Options

Vegetarian gyros are a great choice for those who prefer plant-based meals. One popular option is to use grilled vegetables. Zucchini, bell peppers, eggplant, and mushrooms work well. Marinate the vegetables in olive oil, lemon juice, and herbs before grilling them to enhance their flavor.

Another delicious alternative is falafel gyros. Falafel, made from ground chickpeas and spices, is crispy on the outside and tender inside. They make an excellent meat substitute. Serve the falafel in pita bread with traditional toppings and tzatziki or hummus for added flavor.

Vegetarian Gyro Options Main Ingredients
Grilled Vegetable Gyro Zucchini, bell peppers, eggplant, mushrooms
Falafel Gyro Chickpeas, herbs, spices

These vegetarian options are satisfying and full of flavor. They provide a delightful twist to the traditional gyro.

Traditional Greek Gyro Recipe: Authentic and Delicious Guide

Credit: www.halfbakedharvest.com

Frequently Asked Questions

What Ingredients Are In A Traditional Greek Gyro?

A traditional Greek gyro typically includes pork or chicken, tomatoes, onions, tzatziki sauce, and pita bread. It’s seasoned with herbs and spices.

How Do You Make Authentic Tzatziki Sauce?

To make authentic tzatziki sauce, mix Greek yogurt, grated cucumber, garlic, lemon juice, olive oil, and dill. It’s refreshing and creamy.

What Meat Is Used In A Greek Gyro?

In a Greek gyro, the most common meats used are pork or chicken. Sometimes lamb or beef is used too.

How Do You Assemble A Greek Gyro?

To assemble a Greek gyro, layer the pita bread with meat, tomatoes, onions, and tzatziki sauce. Roll it up tightly.

Conclusion

This traditional Greek gyro recipe brings a taste of Greece to your kitchen. Easy to prepare and delicious, it’s perfect for any meal. Fresh ingredients make all the difference. Try this recipe for a quick, flavorful dish. Family and friends will love it.

Enjoy the rich flavors and simple preparation. Make it a regular in your meal rotation. Cooking at home can be fun and rewarding. Happy cooking!

Cricket Powder Recipes: Delicious and Nutritious Ideas

Cricket powder is an emerging superfood. It’s packed with protein and nutrients.

Curious about how to incorporate cricket powder into your meals? You’re in the right place! Cricket powder, made from ground crickets, is a sustainable protein source. It’s not just for the adventurous eaters but for anyone looking to boost nutrition.

Whether you’re making smoothies, baking, or cooking, cricket powder blends seamlessly. It adds a mild, nutty flavor without overpowering dishes. It’s also gluten-free and low in carbs. This makes it perfect for various dietary needs. Ready to explore some delicious recipes? Let’s dive into the world of cricket powder cooking!

Introduction To Cricket Powder

Cricket powder is gaining popularity in the world of healthy eating. It’s a versatile ingredient that can be used in many recipes. From smoothies to baked goods, cricket powder adds a nutritious boost to your meals.

What Is Cricket Powder?

Cricket powder is made from dried and ground crickets. It’s a sustainable source of protein and nutrients. The process involves cleaning, roasting, and grinding the crickets into a fine powder. This powder can be mixed into various foods without changing their taste much.

Nutritional Benefits

Cricket powder is rich in protein. It contains all nine essential amino acids. It’s also high in vitamins like B12 and minerals such as iron and calcium. This makes it a great addition to your diet. Cricket powder is also low in fat and carbs, making it suitable for many diet plans.

Another benefit is its high fiber content. Fiber helps in digestion and keeps you full longer. This can aid in weight management. With cricket powder, you get a nutritious boost without added calories.

Why Use Cricket Powder In Cooking

Cricket powder is gaining popularity in the culinary world. Its unique benefits make it a great addition to various recipes. Let’s explore why using cricket powder in cooking can be a smart choice for both your health and the planet.

Sustainability

Cricket powder is a sustainable protein source. Crickets need less land, water, and food compared to traditional livestock. They produce fewer greenhouse gases. This makes them an eco-friendly choice. By using cricket powder, you can help reduce your carbon footprint.

Here is a comparison:

Resource Crickets Cattle
Water (per kg of protein) 1 liter 22,000 liters
Feed (per kg of protein) 1.7 kg 8 kg
Land (per kg of protein) 15 sq. meters 200 sq. meters

Health Advantages

Cricket powder is packed with nutrients. It is rich in protein, iron, and vitamin B12. These nutrients support muscle growth, boost energy, and improve overall health.

Here are some health benefits:

  • High Protein: Cricket powder contains up to 70% protein.
  • Rich in Iron: It has more iron than spinach.
  • Vitamin B12: Helps in energy production and brain function.

Cricket powder is also low in fat and carbohydrates. This makes it a great option for those watching their weight. Its high fiber content aids digestion and promotes gut health.

Breakfast Recipes With Cricket Powder

Start your day with a boost of protein and nutrition. Cricket powder is a versatile ingredient. It blends well with many breakfast recipes. Below, find some easy and delicious ideas to incorporate cricket powder into your morning meal.

Cricket Powder Smoothie

Smoothies are a quick and healthy option. Adding cricket powder can make them even better. Here is a simple recipe:

  • 1 banana
  • 1 cup of spinach
  • 1 tablespoon of cricket powder
  • 1 cup of almond milk
  • 1 teaspoon of honey

Blend all ingredients until smooth. Enjoy your protein-packed smoothie!

Protein-packed Pancakes

Pancakes are a breakfast favorite. Adding cricket powder makes them healthier. Follow this easy recipe:

  • 1 cup of flour
  • 1 tablespoon of cricket powder
  • 1 teaspoon of baking powder
  • 1 egg
  • 1 cup of milk
  • 2 tablespoons of sugar
  • 1 teaspoon of vanilla extract
  1. Mix all dry ingredients in a bowl.
  2. In another bowl, beat the egg and add milk and vanilla.
  3. Combine wet and dry ingredients. Stir until smooth.
  4. Heat a pan and pour the batter to form pancakes.
  5. Cook until bubbles form, then flip and cook the other side.

Serve with your favorite toppings. Enjoy your protein-packed pancakes!

Cricket Powder Recipes: Delicious and Nutritious Ideas

Credit: ediblemichiana.ediblecommunities.com

Snack Ideas With Cricket Powder

Cricket powder is a nutritious and versatile ingredient. It adds protein and a nutty flavor to your snacks. Here are some easy and tasty snack ideas to try with cricket powder.

Energy Bars

Energy bars made with cricket powder are a great snack. They are high in protein and easy to make at home. Below is a simple recipe for cricket powder energy bars.

  • Ingredients:
  • 1 cup oats
  • 1/2 cup cricket powder
  • 1/2 cup peanut butter
  • 1/4 cup honey
  • 1/4 cup dried fruit (raisins, cranberries, or apricots)
  • 1/4 cup nuts (almonds, walnuts, or peanuts)
  1. Mix the oats and cricket powder in a bowl.
  2. Warm the peanut butter and honey in a small saucepan.
  3. Pour the mixture into the bowl with oats and cricket powder.
  4. Stir in the dried fruit and nuts.
  5. Press the mixture into a lined baking dish.
  6. Refrigerate for at least 1 hour.
  7. Cut into bars and enjoy!

Cricket Powder Granola

Granola with cricket powder is a crunchy and healthy snack. It can be enjoyed on its own or with yogurt. Here’s how to make cricket powder granola.

  • Ingredients:
  • 2 cups rolled oats
  • 1/2 cup cricket powder
  • 1/2 cup nuts (chopped almonds, pecans, or cashews)
  • 1/4 cup seeds (sunflower, chia, or flax)
  • 1/4 cup honey or maple syrup
  • 1/4 cup coconut oil (melted)
  • 1 tsp vanilla extract
  • 1/2 tsp cinnamon
  • 1/4 tsp salt
  1. Preheat your oven to 300°F (150°C).
  2. In a large bowl, combine the oats, cricket powder, nuts, and seeds.
  3. In a separate bowl, mix the honey, coconut oil, vanilla, cinnamon, and salt.
  4. Pour the wet ingredients over the dry ingredients and stir well.
  5. Spread the mixture evenly on a baking sheet lined with parchment paper.
  6. Bake for 25-30 minutes, stirring halfway through.
  7. Let it cool completely before storing it in an airtight container.

Main Course Recipes With Cricket Powder

Are you curious about incorporating cricket powder into your main course meals? Cricket powder is a sustainable and nutritious ingredient that adds a unique flavor to your dishes. Here are some delicious main course recipes to try using cricket powder.

Cricket Powder Pasta

Making pasta with cricket powder is a fun and healthy twist on a classic dish. Here’s how you can make it:

  • Ingredients:
  • 2 cups flour
  • 1/4 cup cricket powder
  • 3 large eggs
  • 1 tsp salt
  • 1 tbsp olive oil

Instructions:

  1. Combine flour, cricket powder, and salt in a bowl.
  2. Create a well in the center and add eggs and olive oil.
  3. Mix until a dough forms. Knead for 10 minutes.
  4. Wrap the dough in plastic wrap and let it rest for 30 minutes.
  5. Roll out the dough and cut into desired pasta shapes.
  6. Cook pasta in boiling water for 3-4 minutes or until al dente.

Cricket-enriched Stir-fry

This stir-fry is packed with veggies and the added protein from cricket powder. It’s a quick and easy meal.

  • Ingredients:
  • 2 tbsp cricket powder
  • 2 cups mixed vegetables (bell peppers, broccoli, carrots)
  • 1 cup cooked chicken or tofu
  • 2 tbsp soy sauce
  • 1 tbsp sesame oil
  • 1 clove garlic, minced
  • 1 tsp ginger, grated

Instructions:

  1. Heat sesame oil in a large pan over medium heat.
  2. Add garlic and ginger, sauté for 1 minute.
  3. Add vegetables and cook for 5-7 minutes until tender.
  4. Add chicken or tofu and cricket powder, stir well.
  5. Pour soy sauce over the mixture and cook for another 2 minutes.
  6. Serve hot with rice or noodles.
Cricket Powder Recipes: Delicious and Nutritious Ideas

Credit: eatbeautiful.net

Dessert Recipes With Cricket Powder

Cricket powder is not just for savory dishes. It’s also a great addition to desserts. It adds a unique flavor and boosts protein content. If you’re curious about trying cricket powder, start with these dessert recipes. They are simple and delicious.

Cricket Brownies

Cricket brownies are a tasty treat. They are rich and fudgy. The cricket powder blends well with chocolate. You won’t even notice it’s there. To make these brownies, follow your favorite recipe. Just replace some flour with cricket powder. Usually, 1/4 cup is enough. Bake as usual. Enjoy your protein-packed dessert!

Protein-rich Cookies

Protein-rich cookies are perfect for a quick snack. They are easy to make and full of flavor. Cricket powder adds a nutty taste. It also increases the protein content. Use your favorite cookie recipe. Substitute 1/4 cup of flour with cricket powder. Mix well and bake as directed. These cookies are great for kids and adults alike.

Tips For Cooking With Cricket Powder

Cooking with cricket powder can be an exciting culinary adventure. It’s a nutritious and sustainable protein source. Here are some tips to help you get started.

Proper Measurements

Using the right amount of cricket powder is important. Too much can overpower your dish, while too little won’t provide the desired benefits. Generally, 1-2 tablespoons per serving is a good starting point.

For baked goods, replace 10-15% of the flour with cricket powder. This ensures a balanced flavor and texture.

Recipe Flour Amount Cricket Powder
Muffins 1 cup 2 tbsp
Pancakes 1 cup 1.5 tbsp
Cookies 2 cups 3 tbsp

Enhancing Flavors

Cricket powder has a mild, nutty flavor. Pair it with ingredients that complement this taste.

  • Spices: Cinnamon, nutmeg, and allspice work well.
  • Sweeteners: Honey, maple syrup, and brown sugar enhance its natural sweetness.
  • Fruits: Bananas, apples, and berries are great choices.

Experiment with different combinations to find your favorite. Remember, balance is key. Too many strong flavors can overwhelm the dish.

Cricket Powder Recipes: Delicious and Nutritious Ideas

Credit: www.naak.com

Where To Buy Cricket Powder

Finding cricket powder can seem challenging. But with the right information, it becomes easy. There are two main places to buy cricket powder: online stores and local markets.

Online Stores

Many online stores offer cricket powder. Websites like Amazon and eBay have various brands. You can read reviews to choose the best one. Bulk orders often come with discounts. Online stores make it easy to compare prices and brands. Delivery is also very convenient. You can shop from the comfort of your home.

Local Markets

Local markets are another option. Health food stores often carry cricket powder. Some organic markets sell it too. You can ask store employees if they stock it. Farmers’ markets may have it. You support local businesses by buying there. You can also check the product’s quality in person.

Frequently Asked Questions

What Is Cricket Powder?

Cricket powder is made from milled, dried crickets. It’s high in protein and nutrients. It can be used in various recipes.

How To Use Cricket Powder In Recipes?

You can add cricket powder to smoothies, pancakes, and baked goods. It enhances the protein content without altering the taste significantly.

Is Cricket Powder Healthy?

Yes, cricket powder is highly nutritious. It contains protein, vitamins, and minerals. It’s also a sustainable source of nutrition.

Can Cricket Powder Be Used In Baking?

Yes, cricket powder can be used in baking. Replace a portion of the flour with cricket powder to boost protein content.

Conclusion

Cricket powder offers a nutritious boost to your meals. These recipes are easy and tasty. Try incorporating cricket powder into your favorite dishes. It’s a sustainable protein source. Experiment with different recipes to find what you love. Enjoy a healthier, eco-friendly diet with cricket powder.

Make it a part of your cooking routine. Your taste buds and the planet will thank you. Happy cooking!

Colorful Cauliflower Recipes: Delicious and Nutritious Ideas

Cauliflower isn’t just white anymore. It comes in vibrant colors too.

Colorful cauliflower recipes are a feast for the eyes and the taste buds. Bright purple, orange, and green varieties add a pop to any dish. These colorful versions are not only pretty but also packed with nutrients. They offer a fun twist on traditional cauliflower dishes.

Whether you’re roasting, steaming, or grilling, colorful cauliflower can transform your meals. It’s perfect for impressing guests or simply adding excitement to your dinner plate. Dive into this guide to discover creative and delicious ways to cook with colorful cauliflower. Your kitchen will never be the same!

Colorful Cauliflower Recipes: Delicious and Nutritious Ideas

Credit: www.hotforfoodblog.com

Introduction To Colorful Cauliflower

Cauliflower is not just white anymore. It now comes in a variety of bright colors. These colorful cauliflowers are not only attractive but also packed with nutrients. Their vibrant hues make them a great addition to any meal. Let’s explore the health benefits and varieties of colorful cauliflower.

Health Benefits

Colorful cauliflower is rich in vitamins and minerals. They are excellent sources of vitamin C, vitamin K, and folate. These nutrients are essential for overall health. Eating colorful cauliflower can help boost your immune system. It can also support bone health and reduce the risk of chronic diseases.

Cauliflower is also high in fiber. This helps with digestion and keeps you feeling full longer. It is low in calories, making it perfect for weight management. The antioxidants found in colorful cauliflowers help fight inflammation. They also protect your body from free radicals.

Varieties Of Cauliflower

There are several types of colorful cauliflower. Each type has its unique taste and nutritional profile.

Variety Color Flavor
Orange Cauliflower Orange Mild and Sweet
Purple Cauliflower Purple Nutty and Sweet
Green Cauliflower Green Mild and Nutty

Orange cauliflower gets its color from beta-carotene. This is the same nutrient that gives carrots their color. Orange cauliflower has a mild, sweet flavor. It is great for roasting or adding to salads.

Purple cauliflower contains anthocyanins. These are antioxidants that give the cauliflower its purple hue. Purple cauliflower has a nutty, sweet taste. It is perfect for grilling or steaming.

Green cauliflower is also known as broccoflower. It has a mild, nutty flavor. Green cauliflower can be used in a variety of dishes. It is delicious when roasted or sautéed.

Colorful cauliflower is a versatile and nutritious vegetable. Its vibrant colors and unique flavors make it a great addition to any meal. With its numerous health benefits, it is worth adding to your diet. Explore these colorful varieties and enjoy the benefits they offer.

Roasted Cauliflower Dishes

Roasted cauliflower dishes bring out the vegetable’s natural sweetness and nutty flavor. The roasting process enhances the texture, making it crispy on the outside and tender on the inside. This versatile cooking method allows you to create a variety of delicious and healthy dishes. Here are two must-try roasted cauliflower recipes.

Spicy Roasted Cauliflower

If you love a bit of heat, spicy roasted cauliflower is perfect for you. This dish is easy to make and packed with flavor.

  • Ingredients:
  • 1 head of cauliflower, cut into florets
  • 2 tablespoons olive oil
  • 1 teaspoon smoked paprika
  • 1/2 teaspoon cayenne pepper
  • Salt and pepper to taste
  1. Preheat your oven to 425°F (220°C).
  2. Toss cauliflower florets with olive oil and spices.
  3. Spread on a baking sheet in a single layer.
  4. Roast for 25-30 minutes, stirring halfway.

Enjoy your spicy roasted cauliflower as a side dish or snack!

Garlic Parmesan Cauliflower

Garlic Parmesan cauliflower combines the rich flavors of garlic and Parmesan cheese. This dish is both savory and satisfying.

  • Ingredients:
  • 1 head of cauliflower, cut into florets
  • 3 tablespoons olive oil
  • 4 cloves garlic, minced
  • 1/2 cup grated Parmesan cheese
  • Salt and pepper to taste
  • Chopped parsley for garnish
  1. Preheat your oven to 400°F (200°C).
  2. Toss cauliflower florets with olive oil and garlic.
  3. Spread on a baking sheet in a single layer.
  4. Roast for 20 minutes, stirring halfway.
  5. Sprinkle with Parmesan cheese and roast for another 5 minutes.
  6. Garnish with chopped parsley before serving.

This garlic Parmesan cauliflower is a hit at family dinners.

Cauliflower Rice Recipes

Cauliflower rice is a versatile and healthy alternative to regular rice. It is low in carbs, high in nutrients, and easy to cook. You can use it in many recipes, from simple side dishes to main courses. Below, we explore two delicious cauliflower rice recipes: Cauliflower Fried Rice and Herbed Cauliflower Rice. These recipes are flavorful, easy to make, and perfect for any meal.

Cauliflower Fried Rice

Cauliflower Fried Rice is a great way to enjoy the flavors of traditional fried rice without the extra carbs. This dish is packed with vegetables and proteins, making it a nutritious and satisfying meal.

Ingredients Quantity
Cauliflower rice 2 cups
Frozen peas and carrots 1 cup
Chopped onions 1/2 cup
Minced garlic 2 cloves
Eggs 2
Soy sauce 2 tbsp
Sliced green onions 1/4 cup
  1. Heat a large pan over medium heat.
  2. Add a little oil and sauté the onions and garlic.
  3. Add frozen peas and carrots and cook until soft.
  4. Push the vegetables to one side and scramble the eggs on the other side.
  5. Add the cauliflower rice and soy sauce, then mix everything together.
  6. Cook for a few more minutes until the cauliflower is tender.
  7. Garnish with sliced green onions and serve hot.

Herbed Cauliflower Rice

Herbed Cauliflower Rice is light, flavorful, and pairs well with many dishes. Fresh herbs add a burst of flavor, making this a refreshing side dish.

Ingredients Quantity
Cauliflower rice 2 cups
Chopped parsley 1/4 cup
Chopped cilantro 1/4 cup
Chopped mint 2 tbsp
Lemon juice 1 tbsp
Olive oil 1 tbsp
Salt and pepper To taste
  1. Heat olive oil in a pan over medium heat.
  2. Add the cauliflower rice and cook until soft.
  3. Stir in the chopped herbs and lemon juice.
  4. Season with salt and pepper.
  5. Cook for another minute to blend flavors.
  6. Serve warm as a side dish.

Cauliflower In Salads

Colorful cauliflower recipes add a vibrant touch to salads. These dishes offer a healthy and delicious twist. Perfect for any meal.

Cauliflower brings a unique crunch to salads. It adds texture and flavor. Its mild taste pairs well with many ingredients. Here are two delightful cauliflower salad recipes you will love.

Mediterranean Cauliflower Salad

This salad bursts with vibrant flavors. Start with chopped cauliflower florets. Add cherry tomatoes and cucumbers. Toss in Kalamata olives and red onions. Mix in some crumbled feta cheese. For dressing, use olive oil, lemon juice, and dried oregano. This salad is fresh and zesty. Perfect for a light lunch or side dish.

Cauliflower And Kale Salad

Combine chopped cauliflower and kale for a nutrient-packed salad. Massage the kale with a bit of olive oil. This softens the leaves. Add shredded carrots and sliced almonds. Sprinkle in dried cranberries for sweetness. Dress with a simple vinaigrette. Use apple cider vinegar, Dijon mustard, and honey. This salad is hearty and satisfying. Great for boosting your veggie intake. “`

Cauliflower Soups

Cauliflower soups are a delightful way to enjoy this versatile vegetable. They can be creamy, spicy, or mild. These soups are perfect for any season. Here, we explore two delicious cauliflower soup recipes.

Creamy Cauliflower Soup

This creamy cauliflower soup is rich and velvety. It’s perfect for a cozy night. Here’s a simple recipe to try.

  • Ingredients:
  • 1 large cauliflower
  • 1 onion, chopped
  • 2 cloves garlic, minced
  • 4 cups vegetable broth
  • 1 cup heavy cream
  • Salt and pepper to taste
  1. Chop the cauliflower into small florets.
  2. Sauté the onion and garlic in a pot until soft.
  3. Add the cauliflower and vegetable broth. Bring to a boil.
  4. Reduce heat and simmer for 20 minutes.
  5. Blend the soup until smooth.
  6. Stir in the heavy cream. Season with salt and pepper.
Serving Size Calories Prep Time
1 bowl 200 30 mins

Curried Cauliflower Soup

This curried cauliflower soup has a bold flavor. The spices add warmth and depth. It’s a unique twist on traditional cauliflower soup.

  • Ingredients:
  • 1 large cauliflower
  • 1 onion, chopped
  • 2 cloves garlic, minced
  • 1 tbsp curry powder
  • 4 cups vegetable broth
  • 1 cup coconut milk
  • Salt and pepper to taste
  1. Chop the cauliflower into small florets.
  2. Sauté the onion and garlic in a pot until soft.
  3. Add the curry powder and cook for 1 minute.
  4. Add the cauliflower and vegetable broth. Bring to a boil.
  5. Reduce heat and simmer for 20 minutes.
  6. Blend the soup until smooth.
  7. Stir in the coconut milk. Season with salt and pepper.
Serving Size Calories Prep Time
1 bowl 220 30 mins
Colorful Cauliflower Recipes: Delicious and Nutritious Ideas

Credit: www.feastingathome.com

Cauliflower As A Meat Substitute

Cauliflower has become a popular meat substitute. Its versatility and texture make it a favorite in many kitchens. This cruciferous vegetable can mimic the heartiness of meat while offering various health benefits. It’s low in calories and high in fiber, making it a great option for those seeking healthier meals.

Cauliflower Steaks

Cauliflower steaks are thick slices of cauliflower, seasoned, and cooked to perfection. They can be grilled, roasted, or even pan-seared. These steaks offer a satisfying bite and can be paired with various sauces or toppings. They provide a meat-like texture, making them a great main dish. Serve with your favorite side dishes for a complete meal.

Buffalo Cauliflower Bites

Buffalo cauliflower bites are a tasty alternative to chicken wings. They are coated in a spicy buffalo sauce and baked until crispy. These bites are perfect for parties or as a snack. Serve with celery sticks and a side of ranch dressing for a classic touch. They offer the same kick as buffalo wings but with fewer calories.

Baked Cauliflower Dishes

Baked cauliflower dishes are a delicious and healthy alternative to traditional baked meals. These recipes are perfect for those who want to enjoy comfort food without the guilt. Let’s explore some mouth-watering baked cauliflower dishes that will delight your taste buds.

Cauliflower Mac And Cheese

Cauliflower Mac and Cheese is a creamy, cheesy delight. This dish combines the rich taste of cheese with the health benefits of cauliflower. It’s perfect for a family dinner or a quick lunch.

  • Ingredients:
    • 1 large cauliflower head, chopped
    • 2 cups shredded cheddar cheese
    • 1 cup milk
    • 2 tablespoons butter
    • 1 tablespoon flour
    • Salt and pepper to taste

Instructions:

  1. Preheat your oven to 375°F (190°C).
  2. Steam the cauliflower until tender.
  3. In a saucepan, melt butter and stir in flour to make a roux.
  4. Gradually add milk, stirring until thickened.
  5. Stir in the cheese until melted and smooth.
  6. Mix the cheese sauce with the steamed cauliflower.
  7. Pour into a baking dish and bake for 20 minutes.

Cauliflower Casserole

A Cauliflower Casserole is a hearty dish perfect for any occasion. This recipe is easy to prepare and full of flavor. It’s a great way to incorporate more vegetables into your diet.

  • Ingredients:
    • 1 large cauliflower head, chopped
    • 1 cup sour cream
    • 1 cup shredded cheddar cheese
    • 1/2 cup grated Parmesan cheese
    • 2 cloves garlic, minced
    • Salt and pepper to taste

Instructions:

  1. Preheat your oven to 350°F (175°C).
  2. Steam the cauliflower until tender.
  3. In a large bowl, combine sour cream, cheddar cheese, Parmesan cheese, and garlic.
  4. Mix in the steamed cauliflower and season with salt and pepper.
  5. Transfer to a baking dish and bake for 25 minutes.

These baked cauliflower dishes are sure to become favorites. They are easy to make, nutritious, and packed with flavor.

Colorful Cauliflower Recipes: Delicious and Nutritious Ideas

Credit: www.lastingredient.com

Tips For Cooking Cauliflower

Cauliflower has become a popular vegetable in many kitchens. Its versatility and nutritional benefits make it a favorite. Learn how to cook cauliflower perfectly with these tips.

Choosing Fresh Cauliflower

Selecting the right cauliflower is crucial. Look for a firm, white head. It should have tightly packed florets. Avoid any brown spots or blemishes. The leaves should be vibrant and green. Fresh cauliflower smells mild and sweet.

Proper Storage Techniques

Store cauliflower properly to maintain freshness. Keep it in the refrigerator. Place it in a perforated plastic bag. This allows air circulation. Avoid storing cauliflower near ethylene-producing fruits. These include apples and bananas. Ethylene gas speeds up spoilage.

Frequently Asked Questions

What Are The Benefits Of Eating Colorful Cauliflower?

Colorful cauliflower is rich in vitamins, antioxidants, and fiber. It helps in boosting immunity, improving digestion, and reducing inflammation.

How To Cook Colorful Cauliflower?

You can steam, roast, or sauté colorful cauliflower. Each method brings out different flavors and textures, making it versatile.

Can I Use Colorful Cauliflower In Salads?

Yes, colorful cauliflower adds a vibrant touch to salads. It provides a crunchy texture and enhances nutritional value.

Is Colorful Cauliflower Naturally Colored?

Yes, colorful cauliflower gets its hues from natural pigments. These pigments are rich in antioxidants, making them healthier.

Conclusion

Colorful cauliflower recipes bring joy to any meal. They are easy to cook. Tasty too. Perfect for family dinners or quick snacks. These recipes add variety to your diet. They are also nutritious. Try different colors and flavors. Experimenting can be fun.

Keep your meals exciting with colorful cauliflower. Healthy, simple, and delicious. Enjoy making these recipes at home. Share them with friends and loved ones. Happy cooking!

Lemonade Iced Tea Recipe: Refreshing Summer Drink Ideas

Lemonade Iced Tea is a refreshing drink that combines two favorites. Perfect for hot days or any time you need a cool beverage.

Imagine sipping a drink that balances the tartness of lemonade with the robust flavor of iced tea. This combination is not only delicious but also easy to make at home. Whether you’re hosting a summer party or just relaxing in the backyard, Lemonade Iced Tea offers a delightful way to stay refreshed.

This recipe brings together the best of both worlds, creating a drink that quenches your thirst and pleases your taste buds. Ready to discover how to mix up this tasty treat? Read on for a simple and satisfying recipe that will become your go-to refreshment.

Lemonade Iced Tea Recipe: Refreshing Summer Drink Ideas

Credit: feastandwest.com

Introduction To Lemonade Iced Tea

Lemonade iced tea is a refreshing, popular drink. It combines the tangy taste of lemonade with the smooth flavor of iced tea. This delightful beverage is perfect for warm weather. It’s easy to make at home with just a few ingredients.

Perfect Summer Beverage

Lemonade iced tea is ideal for hot summer days. Its sweet and tangy flavors quench your thirst. Serve it ice-cold for maximum refreshment. It works well for picnics, barbecues, and outdoor gatherings.

Make a large batch for parties or enjoy a glass anytime. Kids and adults alike love this tasty drink. It’s a versatile option for any summer event.

Health Benefits

Lemonade iced tea offers several health benefits. Lemon juice provides vitamin C, which boosts the immune system. Tea contains antioxidants that help fight free radicals. These properties support overall wellness.

This drink can also be hydrating. Staying hydrated is important, especially in hot weather. By choosing lemonade iced tea, you can enjoy a delicious and healthy beverage.

Essential Ingredients

Creating a refreshing Lemonade Iced Tea starts with the right ingredients. Each element plays a crucial role in delivering that perfect balance of tart and sweet flavors. Let’s explore the essential ingredients needed for this delightful drink.

Lemons And Tea

Lemons are the heart of lemonade iced tea. They provide a fresh, tangy flavor. Use fresh lemons for the best taste. Squeeze the juice and remove the seeds. The zest can add extra lemony flavor.

Tea is equally important. Choose black tea for a classic taste. Green tea offers a lighter, more delicate flavor. Brew the tea strong, as it will be diluted by the ice and lemon juice.

Sweeteners And Garnishes

Sweeteners balance the tartness of the lemons. Sugar is a common choice. Dissolve it in warm tea for even sweetness. Honey or agave syrup can add a unique twist.

Garnishes make the drink look and taste better. Add lemon slices or mint leaves for a fresh touch. A few berries or a sprig of rosemary can also enhance the presentation.

Choosing The Right Tea

Choosing the right tea for your Lemonade Iced Tea can make all the difference. The type of tea you select will influence the flavor profile and overall enjoyment of your drink. Here’s a guide to help you make the best choice.

Black Tea Options

Black tea is a popular choice for iced tea. It has a bold flavor that pairs well with the tartness of lemonade. You can choose from several varieties:

  • Assam – Known for its malty taste and rich color.
  • Darjeeling – Offers a lighter, more floral flavor.
  • Earl Grey – Infused with bergamot oil, giving it a unique citrus note.

Each of these black teas brings a distinct taste to your Lemonade Iced Tea, allowing you to customize your drink to your liking.

Herbal And Green Teas

Herbal and green teas are excellent for those seeking a lighter, more refreshing flavor. These teas often have delicate and nuanced tastes:

  • Chamomile – Offers a soothing, floral flavor.
  • Mint – Adds a refreshing, cooling effect.
  • Green tea – Provides a slightly grassy and fresh flavor.

Herbal and green teas are perfect for a different twist on the classic Lemonade Iced Tea. They bring a unique touch and can be a healthier alternative with their various health benefits.

Preparing Lemonade Base

Creating the perfect lemonade iced tea begins with a solid base. This involves preparing a refreshing lemonade that forms the core of this thirst-quenching drink. Follow these steps to make a zesty and sweet lemonade base.

Juicing Lemons

Fresh lemon juice is essential. It gives the lemonade a vibrant flavor. Here’s a simple way to get the most out of your lemons:

  • Start with 4-6 large lemons.
  • Roll the lemons on a countertop. This helps release more juice.
  • Cut the lemons in half.
  • Use a juicer or your hand to extract the juice.
  • Strain the juice to remove seeds and pulp.

Now you have fresh, tangy lemon juice ready for the next step.

Making Simple Syrup

Simple syrup balances the tartness of the lemon juice. It also blends well with the tea. Here’s how to make it:

  1. Combine 1 cup sugar and 1 cup water in a small saucepan.
  2. Heat the mixture over medium heat.
  3. Stir constantly until the sugar dissolves completely.
  4. Once dissolved, remove from heat and let it cool.

This sweet syrup is key for a smooth and delicious lemonade.

With fresh lemon juice and simple syrup ready, you have your lemonade base. This base is ready to be mixed with brewed tea for a delightful lemonade iced tea.

Brewing The Tea

Brewing the tea is the first step to making a perfect Lemonade Iced Tea. The tea sets the foundation for the entire drink. You can choose between two methods to brew your tea: hot brew and cold brew. Each method has its own benefits and offers a unique flavor profile.

Hot Brew Method

To use the hot brew method, start with fresh water. Bring it to a boil. Once the water is boiling, pour it over your tea bags or loose tea leaves. Let the tea steep for about 5 minutes. This allows the flavors to fully develop. After steeping, remove the tea bags or strain the loose leaves. Let the tea cool to room temperature. Then, place it in the fridge to chill. The hot brew method offers a strong, robust flavor.

Cold Brew Method

The cold brew method takes a bit longer but results in a smoother taste. Place your tea bags or loose tea in cold water. Let it steep in the fridge for 8-12 hours. This slow process extracts the flavors gently. After steeping, remove the tea bags or strain the loose leaves. The cold brew method is less bitter and very refreshing.

Combining Lemonade And Tea

Combining lemonade and tea creates a refreshing drink. It’s perfect for hot days. This blend gives you the best of both worlds. The sweet and tangy taste of lemonade meets the rich flavor of tea. It’s easy to make at home. Let’s explore the mixing ratios and flavor adjustments.

Mixing Ratios

The ratio matters for the perfect balance. Start with equal parts of lemonade and tea. This gives a balanced taste. You can adjust based on your preference. If you like it sweeter, add more lemonade. If you prefer a stronger tea flavor, increase the tea. Always taste as you mix. This ensures you get the right balance.

Flavor Adjustments

Flavor adjustments can make your drink unique. Add fresh mint leaves for a cool twist. A few slices of cucumber add freshness. You can also use honey instead of sugar. This gives a natural sweetness. For a fruity touch, add a splash of orange juice. Experiment with different teas. Green tea gives a lighter taste. Black tea offers a stronger flavor. Try different combinations to find your favorite.

Serving Suggestions

Serving suggestions can elevate your lemonade iced tea. They add a special touch to your presentation. Here are some creative ideas to inspire you.

Iced Tea Pitcher Ideas

A clear glass pitcher works best. It lets guests see the beautiful mix of tea and lemonade. Add lemon slices and mint leaves for a fresh look. These small details make a big difference. Use a wooden spoon for stirring. It keeps the flavors well-mixed.

For a fun twist, use a mason jar with a spout. It’s easy to pour and looks charming. Fill the jar with ice before adding the tea. This keeps your drink cold longer. You can also tie a ribbon around the jar. Pick a color that matches your event theme.

Individual Glass Presentation

Serve your lemonade iced tea in tall, clear glasses. They showcase the drink’s colors. Add a lemon wedge to the rim for a nice touch. It’s simple but effective. Use paper straws for a pop of color. They are eco-friendly and stylish.

For a gourmet feel, freeze lemon slices in ice cubes. Add these to the glasses before serving. They keep the drink cold without watering it down. Use a small mint sprig as a garnish. It adds a fresh scent and a burst of color.

If you have mason jars, use them for serving. They give a rustic look. Add a twine bow around the top for extra charm. Your guests will love it.

Lemonade Iced Tea Recipe: Refreshing Summer Drink Ideas

Credit: www.pookspantry.com

Creative Variations

Experimenting with your lemonade iced tea can be a lot of fun. There are many ways to add new flavors and make your drink unique. Let’s explore some creative variations that will make your lemonade iced tea more exciting.

Fruit Infusions

Adding fresh fruits can give your lemonade iced tea a refreshing twist. Here are some ideas:

  • Strawberries: Slice a few and add to your tea. It adds a sweet touch.
  • Blueberries: These tiny fruits burst with flavor. They also add a nice color.
  • Pineapple: Fresh pineapple chunks can make your drink tropical.

For an even bolder taste, try mixing several fruits together. The combinations are endless!

Herb Enhancements

Herbs can bring a new dimension to your lemonade iced tea. Consider these options:

  • Mint: This herb is a classic. It adds a cool, refreshing flavor.
  • Basil: Fresh basil leaves give your tea an aromatic touch.
  • Rosemary: A few sprigs of rosemary can add a unique, earthy taste.

Try crushing the herbs a bit to release their flavors before adding them to your tea.

With these creative variations, your lemonade iced tea will never be boring. Mix and match fruits and herbs to find your favorite combination. Enjoy your refreshing drink!

Storage Tips

Storing your homemade lemonade iced tea correctly ensures it stays fresh and tasty. Proper storage techniques can maintain its flavor and extend its shelf life. Let’s dive into some essential storage tips to keep your drink delightful.

Refrigeration Guidelines

Always store lemonade iced tea in the refrigerator. Use a glass pitcher with a tight lid. This prevents the absorption of other food odors. Keep the drink at a consistent temperature. Avoid frequent opening of the fridge.

Shelf Life Considerations

Homemade lemonade iced tea lasts 3-5 days in the refrigerator. For optimal taste, consume it within the first 48 hours. If you notice any changes in smell or appearance, discard it immediately. Fresh ingredients can sometimes shorten shelf life, so always use clean utensils.

Lemonade Iced Tea Recipe: Refreshing Summer Drink Ideas

Credit: jamjarkitchen.com

Frequently Asked Questions

What Are The Ingredients For Lemonade Iced Tea?

To make lemonade iced tea, you’ll need lemons, tea bags, sugar, and water. Fresh mint is optional.

How Do You Make Lemonade Iced Tea?

Brew tea bags in boiling water. Mix with lemon juice and sugar. Chill and serve over ice.

Can You Use Green Tea For Lemonade Iced Tea?

Yes, green tea can be used. It adds a unique flavor to the lemonade iced tea.

How Long Does Lemonade Iced Tea Last?

Lemonade iced tea lasts up to five days in the refrigerator when stored in an airtight container.

Conclusion

Enjoy making this lemonade iced tea at home. Refreshing, simple, and delicious. Perfect for hot summer days. Impress your friends and family with this easy recipe. It’s a delightful blend of sweet and tangy flavors. Customize it to suit your taste.

Add some mint or lemon slices for extra flair. You’ll love sipping on this refreshing drink. Try it today and savor the taste of summer. Happy sipping!

Spicy Ranch Snack Mix Recipe: Irresistibly Zesty and Crunchy

Snack time just got a whole lot tastier. This Spicy Ranch Snack Mix Recipe is perfect for any occasion.

Craving a mix of bold flavors and a bit of heat? This snack mix combines the zesty taste of ranch with a spicy kick that will keep you reaching for more. Perfect for parties, road trips, or just a midday treat, it’s easy to prepare and even easier to enjoy.

With a few simple ingredients, you can whip up a batch that will satisfy your snack cravings and impress your friends. Ready to add some excitement to your snack game? Dive into this recipe and discover your new favorite munchie.

Spicy Ranch Snack Mix Recipe: Irresistibly Zesty and Crunchy

Credit: sundaytable.co

Ingredients

Creating a delicious Spicy Ranch Snack Mix requires the right ingredients. This section will break down the essential components and optional add-ins for your mix. Let’s dive into what you need to get started!

Essential Components

  • Chex Cereal: Use a mix of rice and corn Chex.
  • Pretzels: Small pretzel twists work best.
  • Cheese Crackers: Add some cheesy goodness with cheddar-flavored crackers.
  • Peanuts: Roasted and salted peanuts add crunch and flavor.
  • Butter: Melted butter helps to coat the ingredients.
  • Ranch Seasoning: The key ingredient for that ranch flavor.
  • Hot Sauce: Adds the spicy kick.
  • Garlic Powder: Enhances the overall taste.

Optional Add-ins

  • Almonds: For an extra nutty crunch.
  • Cheese Balls: Adds a fun, cheesy flavor.
  • Pita Chips: Perfect for added texture.
  • Popcorn: Light and airy addition.
  • Sunflower Seeds: Tiny but packed with flavor.

By choosing from these essential components and optional add-ins, you can create a snack mix that is both tasty and unique. Customize it to your liking and enjoy!

Spicy Ranch Snack Mix Recipe: Irresistibly Zesty and Crunchy

Credit: extrablackolives.com

Preparation

Preparing a Spicy Ranch Snack Mix is simple and fun. Follow these steps to create a delicious treat that everyone will love. Let’s start with the initial steps and then move on to mixing the ingredients.

Initial Steps

First, gather all your ingredients. You will need pretzels, cheese crackers, corn chips, and nuts. Make sure you have a large mixing bowl ready. Preheat your oven to 250°F. This ensures the mix will bake evenly.

Mixing Ingredients

In the large mixing bowl, combine the pretzels, cheese crackers, corn chips, and nuts. Use a spoon to mix them well. In a separate bowl, mix ranch seasoning with some melted butter. Pour this mixture over the snack mix. Stir until everything is coated evenly.

Spread the mix on a baking sheet. Bake for 45 minutes, stirring every 15 minutes. Let it cool before serving. Enjoy your Spicy Ranch Snack Mix!

Seasoning

Seasoning plays a crucial role in making a Spicy Ranch Snack Mix irresistible. It brings out the flavors and adds that perfect kick. The right blend of spices can elevate a simple snack to something extraordinary.

Creating The Spice Blend

Start with a base of paprika. It adds a rich color and mild heat. Add garlic powder for depth and onion powder for a savory touch. Mix in a bit of cayenne pepper for that spicy kick. Adjust the amount based on your heat preference. Lastly, don’t forget the salt. It balances all the flavors and enhances the overall taste.

Combining With Ranch

Once your spice blend is ready, it’s time to combine it with the ranch. Use a dry ranch seasoning mix for convenience. The tangy flavor of ranch pairs perfectly with the spice blend. Mix them thoroughly in a large bowl. This ensures every piece of snack mix is evenly coated. The result is a delicious, spicy, and tangy treat.

Baking

Baking your Spicy Ranch Snack Mix is a crucial step. This process ensures the flavors meld together perfectly. It also gives the mix that desirable crunch.

Preheating The Oven

Start by preheating your oven to 250 degrees Fahrenheit. This low temperature is key. It helps to slowly bake the snack mix without burning.

Baking Instructions

Spread your prepared snack mix evenly on a baking sheet. Make sure it’s in a single layer. This ensures even baking. Place the baking sheet in the oven.

Bake for one hour. Stir the mix every 15 minutes. This prevents any pieces from sticking or burning. After an hour, remove the baking sheet. Let the mix cool completely before serving.

Cooling

After preparing your Spicy Ranch Snack Mix, cooling is a crucial step. Proper cooling ensures the snack mix is crisp and delicious. This section will guide you through the optimal cooling time and how to avoid sogginess.

Optimal Cooling Time

To achieve the best texture, allow the snack mix to cool for at least 30 minutes. Spread the mix evenly on a large baking sheet. Ensure all pieces are in a single layer. This helps air circulate around each piece.

For larger batches, divide the mix into two or more sheets. Use a wire rack under the sheets for better air flow. This speeds up cooling and maintains crunchiness.

Avoiding Sogginess

Sogginess can ruin the texture of your snack mix. Follow these tips to keep it crispy:

  • Spread thin layers: Avoid piling the mix too high. Thin layers cool faster.
  • Use a fan: Place a small fan near the cooling area. This helps dry the mix evenly.
  • Stir occasionally: Stir the mix every 5-10 minutes during cooling. This prevents moisture buildup.

Store your cooled snack mix in an airtight container. This keeps it fresh and crunchy for days.

Storage

Proper storage is crucial for maintaining the flavor and crunch of your Spicy Ranch Snack Mix. Follow these tips to ensure your snack mix stays fresh and delicious for as long as possible.

Best Containers

Choosing the right container is key to keeping your snack mix fresh. Use airtight containers to prevent moisture and air from spoiling the mix.

  • Glass jars with tight-fitting lids
  • Plastic containers with secure seals
  • Resealable plastic bags with a zipper lock

Airtight containers protect your snack mix from humidity and pests. Glass jars are ideal for their non-porous nature, while plastic containers are lightweight and convenient.

Shelf Life

The shelf life of your Spicy Ranch Snack Mix depends on how well you store it. Under optimal conditions:

  • At room temperature: 2-3 weeks
  • In the refrigerator: 4-6 weeks
  • In the freezer: up to 3 months

Keep the snack mix in a cool, dark place to maximize its shelf life. Avoid exposing it to direct sunlight or heat sources.

Regularly check for any signs of spoilage, such as changes in smell or texture. If the mix develops an off odor or tastes stale, it is best to discard it.

Serving Suggestions

Discover the delightful Serving Suggestions for your Spicy Ranch Snack Mix Recipe. These tips will help you enjoy your snack mix in the best way possible. Whether you’re hosting a party or relaxing at home, these ideas will enhance your snacking experience.

Perfect Occasions

The Spicy Ranch Snack Mix is perfect for various occasions. Here are some ideas:

  • Game Nights: Serve this snack mix during your next game night. It’s crunchy and flavorful.
  • Movie Marathons: Enjoy this mix while watching your favorite movies. It’s a great alternative to popcorn.
  • Picnics: Pack the mix for your next outdoor picnic. It’s easy to transport and share.
  • Holiday Parties: Add this snack mix to your holiday party menu. It’s a crowd-pleaser.

Pairing With Beverages

Pairing your Spicy Ranch Snack Mix with the right beverages can enhance the flavors. Consider these options:

Beverage Why It Works
Cold Beer The coolness of beer balances the spice.
Lemonade The tangy flavor complements the ranch seasoning.
Iced Tea The refreshing taste pairs well with the crunchy mix.
Soda The sweetness of soda contrasts with the spicy mix.

These pairing suggestions will make your snack time even more enjoyable. Experiment with different drinks to find your favorite combination.

Variations

The beauty of the Spicy Ranch Snack Mix recipe is its flexibility. You can easily tweak the ingredients to suit your taste buds. Whether you prefer a mild kick or a fiery crunch, there are endless ways to customize this mix.

Different Spice Levels

Not everyone enjoys the same level of heat. Here are some ways to adjust the spice:

  • Mild: Use half the amount of cayenne pepper. Add extra ranch seasoning for flavor.
  • Medium: Stick to the recipe as is. This gives a balanced kick.
  • Hot: Double the cayenne pepper. Add a pinch of red pepper flakes.
  • Extra Hot: Add diced jalapeños. Use hot sauce in place of some of the oil.

Alternative Ingredients

Feel free to get creative with the ingredients. Here are some ideas:

Original Ingredient Alternative
Pretzels Mini breadsticks
Chex cereal Popcorn
Cashews Pecans
Ranch seasoning Taco seasoning

Swap out ingredients based on your preferences or what you have on hand. The goal is to create a snack mix that you and your family will love.

Spicy Ranch Snack Mix Recipe: Irresistibly Zesty and Crunchy

Credit: www.halfbakedharvest.com

Frequently Asked Questions

How To Make Spicy Ranch Snack Mix?

To make Spicy Ranch Snack Mix, combine cereals, pretzels, nuts, and a spicy ranch seasoning. Bake until crispy.

What Ingredients Are Needed For Spicy Ranch Snack Mix?

You need cereals, pretzels, mixed nuts, ranch seasoning, and spices. Mix them well and bake.

Can I Use Different Cereals In The Mix?

Yes, you can customize the mix with your favorite cereals. Choose ones that hold up well when baked.

How Long Does Spicy Ranch Snack Mix Last?

Store the snack mix in an airtight container. It typically lasts up to two weeks if kept in a cool, dry place.

Conclusion

Enjoy making this spicy ranch snack mix at home. It’s perfect for parties and gatherings. Customize it with your favorite ingredients. The bold flavors will impress your guests. Plus, it’s easy to prepare. Try it today and elevate your snack game.

Your friends and family will love it. Happy snacking!

Gluten Free Ponzu Sauce Recipe: Delicious & Easy to Make

Ponzu sauce is a delightful addition to many dishes. But what if you need a gluten-free version?

This gluten-free ponzu sauce recipe is here to help. Ponzu sauce is a tangy, citrus-based condiment from Japan. It adds a burst of flavor to sushi, salads, and grilled meats. Traditional ponzu contains soy sauce, which has gluten. But with a few tweaks, you can enjoy a gluten-free version that tastes just as good.

Whether you have celiac disease or a gluten sensitivity, this recipe ensures you don’t miss out. Follow along to create a delicious, gluten-free ponzu sauce. It’s simple, quick, and perfect for enhancing your favorite meals. Let’s get started on this flavorful journey!

Introduction To Gluten-free Ponzu Sauce

Are you looking for a delightful twist to your dishes? Try gluten-free ponzu sauce. This tangy and savory sauce enhances many recipes. Whether drizzling over salads or using it as a dip, it’s a must-have. Let’s dive into what makes this sauce special.

What Is Ponzu Sauce?

Ponzu sauce is a classic Japanese condiment. It blends soy sauce, citrus juice, mirin, and dashi. These ingredients create a unique flavor profile. Ponzu is both tangy and slightly sweet. Often used in Japanese cuisine, it pairs well with many dishes.

Why Go Gluten-free?

Many people choose a gluten-free diet for health reasons. Gluten can cause issues for those with celiac disease or gluten sensitivity. A gluten-free diet helps reduce symptoms and promotes overall well-being. Gluten-free ponzu sauce offers the same great taste without gluten.

Making your own gluten-free ponzu sauce is easy. You control the ingredients and ensure they are safe. Enjoy the rich flavors without worry. Plus, homemade sauces often taste fresher and more vibrant.

Gluten Free Ponzu Sauce Recipe: Delicious & Easy to Make

Credit: munchyesta.com

Essential Ingredients

Creating your own gluten-free ponzu sauce at home is both simple and rewarding. The key lies in using the essential ingredients that bring out the authentic flavors. Let’s break down these components.

Gluten-free Soy Sauce

The foundation of your ponzu sauce is gluten-free soy sauce. This ingredient adds the salty, umami taste that is crucial. Ensure the soy sauce is labeled gluten-free to avoid contamination. Brands like Tamari or San-J are excellent choices. Tamari is often naturally gluten-free and offers a rich flavor profile.

Citrus Options

Citrus is another key element. Traditional ponzu sauce uses yuzu juice, but it’s not always easy to find. You can substitute yuzu with more accessible options like lemon, lime, or a mix of both. These fruits add a tangy, refreshing zing that balances the soy sauce. Here’s a quick comparison:

Citrus Flavor
Yuzu Unique, aromatic, slightly sweet
Lemon Tart, bright
Lime Sharp, sour

Additional Flavor Enhancers

For a deeper flavor, include additional enhancers. Mirin or rice vinegar adds a touch of sweetness. Dried bonito flakes (katsuobushi) or kombu (dried kelp) provide a smoky, savory depth. You can also add a bit of fresh ginger or garlic for a spicy kick. Here’s a quick list:

  • Mirin
  • Rice vinegar
  • Dried bonito flakes
  • Kombu
  • Fresh ginger
  • Garlic

Combine these ingredients to create a balanced, flavorful gluten-free ponzu sauce. Experiment with proportions to suit your taste.

Health Benefits

Gluten free ponzu sauce offers a tasty and healthy alternative for those with gluten sensitivities. This zesty sauce can enhance meals while promoting better digestion and reducing inflammation.

Gluten-free ponzu sauce is not just delicious. It offers numerous health benefits. This versatile condiment enhances flavors and supports a healthy diet. Below, we explore some key benefits of this sauce.

Low-calorie Option

Gluten-free ponzu sauce is low in calories. It is ideal for those watching their calorie intake. You can enjoy it without guilt. This makes it a perfect addition to salads, marinades, and dipping sauces. It helps you maintain a balanced diet.

Rich In Antioxidants

Gluten-free ponzu sauce contains antioxidants. These compounds fight free radicals in the body. Free radicals can cause cell damage. Antioxidants protect your health and boost your immune system. This sauce often includes ingredients like citrus juice. Citrus fruits are known for their high antioxidant content. By using gluten-free ponzu sauce, you add a healthy dose of antioxidants to your meals. “`

Step-by-step Preparation

Making gluten-free ponzu sauce is simple. Follow these steps to create a delicious, tangy sauce. This guide will help you gather ingredients, mix the sauce, and adjust the taste. Let’s get started!

Gather Ingredients

First, gather all the ingredients. You will need:

  • 1/2 cup gluten-free soy sauce
  • 1/4 cup fresh lemon juice
  • 1/4 cup rice vinegar
  • 2 tablespoons mirin
  • 1 tablespoon sugar
  • 1 small piece of kombu (dried seaweed)
  • 1/4 cup bonito flakes (optional)

Make sure all ingredients are gluten-free. Check labels carefully.

Mixing The Sauce

Place all the ingredients in a mixing bowl. Stir well to combine. Ensure the sugar dissolves completely. If using kombu and bonito flakes, add them now. They enhance the flavor.

Allow the mixture to sit for at least 30 minutes. This helps the flavors meld together. Strain the sauce to remove the kombu and bonito flakes.

Taste And Adjust

Taste the sauce. Adjust the flavors to your liking. Add more lemon juice for tartness. Increase sugar for sweetness. Balance is key. The sauce should be tangy, salty, and slightly sweet.

Once satisfied with the taste, your gluten-free ponzu sauce is ready. Store it in the refrigerator. Use it as a dipping sauce, marinade, or dressing. Enjoy!

Serving Suggestions

Enjoy Gluten Free Ponzu Sauce with sushi, grilled fish, or as a salad dressing. It also pairs well with steamed vegetables. Enhance your dishes with this zesty, gluten-free option.

Gluten-free ponzu sauce offers a delightful tangy twist to various dishes. Its unique flavor profile enhances your meals. Here are some delicious ways to serve it.

Pairing With Sushi

Sushi and ponzu sauce are a match made in heaven. Drizzle ponzu over sashimi for an extra zing. Dip your sushi rolls in ponzu instead of traditional soy sauce. The citrusy notes elevate the fresh taste of the fish. It’s a refreshing change that will surprise your taste buds.

Using As A Marinade

Gluten-free ponzu sauce makes an excellent marinade. Marinate chicken, beef, or fish for at least 30 minutes. The sauce tenderizes the meat and infuses it with rich flavors. Grill or bake the marinated protein for a juicy, tasty dish. Your family will love the depth of flavor. “`
Gluten Free Ponzu Sauce Recipe: Delicious & Easy to Make

Credit: munchyesta.com

Storage Tips

Proper storage of your gluten-free ponzu sauce ensures it stays fresh and flavorful. By following these storage tips, you can enjoy its rich taste for longer. Let’s explore the best practices for storing your homemade ponzu sauce.

Refrigeration

Always refrigerate your gluten-free ponzu sauce after making it. The cold temperature helps maintain its freshness. Store the sauce in a clean, airtight container. This prevents any contamination and preserves its flavor. Place the container on a shelf, not the door, for a stable temperature.

Shelf Life

Homemade gluten-free ponzu sauce can last up to two weeks in the fridge. Always check for any signs of spoilage before using it. If the sauce smells off or has mold, discard it immediately. Keep track of the date you made the sauce. This helps you use it within the safe period.

Common Mistakes To Avoid

Creating a delicious gluten-free ponzu sauce can be tricky. Even experienced cooks can make mistakes. Here are some common pitfalls to avoid for a perfect sauce.

Using Regular Soy Sauce

Many overlook the importance of using gluten-free soy sauce. Regular soy sauce contains wheat, which is not suitable for a gluten-free diet. Always check the label to ensure your soy sauce is gluten-free. This is crucial for maintaining the integrity of your dish.

Incorrect Citrus Ratio

Another common mistake is getting the citrus ratio wrong. Ponzu sauce needs a balanced mix of citrus juices. Too much lemon can overpower the sauce. Too little can make it bland. A good ratio is:

Citrus Proportion
Lemon 1 part
Lime 1 part
Orange 2 parts

Use this ratio for a balanced flavor. Adjust to your taste, but keep proportions consistent.

Gluten Free Ponzu Sauce Recipe: Delicious & Easy to Make

Credit: munchyesta.com

Frequently Asked Questions

What Is Gluten Free Ponzu Sauce?

Gluten free ponzu sauce is a Japanese citrus-based sauce made without gluten. It combines soy sauce, citrus juice, and other ingredients.

How Do You Make Gluten Free Ponzu Sauce?

To make gluten free ponzu sauce, combine gluten free soy sauce, citrus juice, mirin, and rice vinegar. Mix well.

Can I Use Gluten Free Soy Sauce?

Yes, you can use gluten free soy sauce to make ponzu sauce. It ensures the sauce is gluten free.

What Dishes Can Use Gluten Free Ponzu Sauce?

Gluten free ponzu sauce is perfect for sushi, sashimi, salads, and marinades. It adds a tangy flavor.

Conclusion

Enjoy making your own gluten-free ponzu sauce at home. It’s easy and delicious. This recipe ensures everyone can enjoy it without worry. Perfect for salads, sushi, or marinades. The fresh flavors will enhance any dish. Plus, it only takes a few minutes to prepare.

Try it today and taste the difference. Your meals will never be the same. Happy cooking!

Black Bean Noodles Korean Recipe: Deliciously Authentic & Easy

Black bean noodles, known as Jjajangmyeon, are a beloved Korean dish. Rich, savory, and hearty, it’s a comfort food favorite.

Originating from Chinese cuisine, Jjajangmyeon has become a staple in Korean households. The black bean sauce, made from fermented black soybeans, creates a deep, unique flavor. Coupled with noodles and vegetables, it’s both satisfying and delicious. This dish is not only tasty but also simple to make at home.

Perfect for a quick lunch or a comforting dinner, black bean noodles offer a delightful culinary experience. Ready to dive into the world of Korean cuisine? This recipe will guide you to create your own delicious bowl of Jjajangmyeon. Let’s get started on this flavorful journey.

Black Bean Noodles Korean Recipe: Deliciously Authentic & Easy

Credit: mykoreankitchen.com

Introduction To Black Bean Noodles

Black Bean Noodles, or Jajangmyeon, is a popular Korean-Chinese dish. It features thick noodles coated in a savory, rich black bean sauce. This dish has become a staple in Korean cuisine due to its unique flavor and easy preparation.

History And Origins

Black Bean Noodles have a fascinating history. They originated in China and were introduced to Korea in the early 20th century. Chinese immigrants brought the recipe over, and it quickly became popular among locals.

In Korea, the dish evolved. Korean chefs added their own twist by incorporating local ingredients and flavors. Over time, Jajangmyeon became a beloved comfort food. It is now a significant part of Korean culinary heritage.

Cultural Significance

Black Bean Noodles hold a special place in Korean culture. They are often eaten during celebrations and special occasions. One notable event is “Black Day,” celebrated on April 14th. On this day, single people eat Jajangmyeon to console themselves.

The dish is also a popular choice for family gatherings and casual meals. Its hearty and satisfying nature makes it a favorite among people of all ages.

Black Bean Noodles are more than just a meal. They represent a blend of cultures and a shared history. Each bite tells a story of culinary innovation and cultural exchange.

Aspect Details
Origin China, introduced to Korea in early 20th century
Main Ingredients Thick noodles, black bean paste, pork or beef, vegetables
Special Occasions Black Day, family gatherings, casual meals

In summary, Black Bean Noodles are a delicious and meaningful dish. They bring together history, culture, and flavor in every bowl.

Essential Ingredients

Creating delicious Black Bean Noodles, or Jjajangmyeon, requires specific ingredients. Each component plays a crucial role in delivering its unique flavors. Let’s dive into the essential ingredients you need for this mouth-watering Korean recipe.

Black Bean Paste

Black bean paste is the star of this dish. It provides the rich, savory taste that makes Jjajangmyeon special. You can find it in most Asian grocery stores. Look for the Korean version called chunjang. This paste is salty and slightly bitter. Fry it in oil to enhance its flavor.

Vegetables And Proteins

Vegetables add color and texture. Common choices include onions, zucchini, and cabbage. Dice them into small pieces. They should be similar in size for even cooking.

Proteins are essential for a complete meal. Pork is a traditional choice. Cut it into bite-sized pieces. Chicken or tofu are good alternatives. Each protein brings its own flavor and texture.

Now you have the key ingredients for Black Bean Noodles. Gather them and get ready to cook an authentic Korean dish.

Kitchen Tools Needed

Cooking Black Bean Noodles is an exciting experience. Having the right kitchen tools makes it easier and more enjoyable. This section covers the essential utensils and special equipment needed for this delicious Korean recipe.

Necessary Utensils

  • Large Pot – Perfect for boiling noodles.
  • Strainer – Helps to drain the noodles quickly.
  • Mixing Bowl – For mixing the black bean sauce.
  • Wooden Spoon – Ideal for stirring the sauce.
  • Chopping Board – Necessary for preparing vegetables.
  • Chef’s Knife – Essential for chopping ingredients.

Special Equipment

  • Wok – Best for cooking the sauce evenly.
  • Spatula – Useful for mixing noodles with sauce.
  • Garlic Press – Makes mincing garlic quick and easy.
  • Measuring Cups – Ensures accurate ingredient measurements.

Using these tools will help you achieve the perfect Black Bean Noodles. With the right equipment, your cooking process will be smooth and efficient.

Step-by-step Cooking Instructions

Cooking Black Bean Noodles, also known as Jajangmyeon, can be a delightful experience. This dish combines the rich flavors of black bean paste with fresh vegetables and savory pork. Follow these step-by-step instructions to create a delicious meal that will impress your family and friends.

Preparing The Ingredients

First, gather all your ingredients. You will need pork, black bean paste, onions, potatoes, zucchini, and garlic. Chop the onions, potatoes, and zucchini into small cubes. Mince the garlic finely. Cut the pork into bite-sized pieces. Set everything aside.

Next, prepare the black bean paste. In a small bowl, mix the paste with a bit of sugar. This will balance the salty taste. Stir well until the sugar dissolves. Set the mixture aside for later use.

Cooking The Noodles

Boil a pot of water. Once it reaches a rolling boil, add the noodles. Cook them according to the package instructions. Usually, it takes about 5 to 7 minutes. Stir occasionally to prevent sticking.

While the noodles cook, heat a large pan over medium heat. Add a bit of oil. Sauté the minced garlic until fragrant. Add the pork pieces and cook until they are no longer pink.

Add the chopped onions, potatoes, and zucchini to the pan. Stir-fry the vegetables until they are tender. This will take about 5 minutes. Add the black bean paste mixture to the pan. Stir well to coat the meat and vegetables.

Drain the cooked noodles. Rinse them under cold water to stop the cooking process. Add the noodles to the pan with the black bean sauce. Toss everything together until the noodles are well coated with the sauce.

Serve the Black Bean Noodles hot. Garnish with sliced cucumber or a fried egg if you like. Enjoy your homemade Jajangmyeon!

Creating The Black Bean Sauce

The heart of Korean Black Bean Noodles lies in its rich, flavorful sauce. This sauce, known as Jajangmyeon, brings the dish to life with its deep umami taste. Making this sauce at home is easier than you might think. Follow the steps below for a delicious result.

Sauce Preparation

To begin, gather all your ingredients. You will need black bean paste, pork belly, onion, zucchini, potato, and garlic. Chop the vegetables into small, even pieces. This ensures they cook evenly and blend well with the sauce.

Next, heat a pan over medium heat. Add a tablespoon of oil. Once hot, add the chopped pork belly. Cook until it turns golden brown. Then, add the garlic and sauté for about 30 seconds. This step enhances the meat’s flavor.

Add the chopped vegetables to the pan. Stir them frequently for about 5 minutes. They should become slightly tender. Now, it’s time to add the black bean paste. Stir it into the mixture until everything is well coated. Cook for an additional 2 minutes.

Pour in one cup of water or chicken broth. This helps to thin out the sauce. Allow the mixture to simmer for about 10 minutes. Stir occasionally to prevent sticking. The sauce should thicken and become glossy.

Flavor Enhancements

For extra depth, consider adding a teaspoon of sugar. This balances the saltiness of the black bean paste. You can also add a splash of soy sauce for a richer taste. If you like a bit of heat, add some red chili flakes.

To add a touch of freshness, stir in some chopped green onions just before serving. This adds a nice crunch and a burst of color. Another great addition is a few drops of sesame oil. It gives a nutty aroma that complements the sauce beautifully.

For a complete dish, serve the sauce over cooked noodles. Garnish with cucumber strips and a boiled egg. Enjoy your homemade Black Bean Noodles!

Black Bean Noodles Korean Recipe: Deliciously Authentic & Easy

Credit: thefoodietakesflight.com

Assembling The Dish

Assembling the dish is a crucial step in making Black Bean Noodles. This process ensures all flavors meld together perfectly. Follow these steps to create a delicious meal.

Combining Noodles And Sauce

First, cook the noodles until they are tender. Drain and rinse them in cold water. This helps remove excess starch. Next, transfer the noodles to a large serving bowl. Pour the black bean sauce over the noodles. Use a pair of tongs to mix everything well. Make sure each noodle is coated with the sauce. This step is vital for a rich and even flavor.

Garnishing Tips

Garnishing adds a visual appeal and extra taste to your dish. Add julienned cucumber for a fresh crunch. Sprinkle some chopped green onions for a mild, tangy flavor. Sesame seeds also make a great garnish. They add a nutty taste and a bit of texture. You can even place a fried egg on top. It adds a rich, creamy element to the dish.

Serving Suggestions

Serving suggestions can enhance your Black Bean Noodles Korean recipe experience. Pairing the right sides and drinks will elevate your meal. Let’s explore some tasty options.

Side Dishes

Kimchi is a classic choice. Its spicy, tangy flavor complements the savory noodles. For a milder option, try a cucumber salad. The crisp texture and light dressing provide a refreshing contrast. Steamed vegetables like broccoli or spinach also work well. They add nutrients and a bit of crunch.

Beverage Pairings

Tea is a perfect match. Green tea offers a clean taste that balances the rich noodles. Barley tea, with its nutty flavor, is another great option. If you prefer something cold, try a light beer. Its slight bitterness pairs well with the savory sauce. For a non-alcoholic choice, go with sparkling water. The bubbles cleanse your palate between bites.

Tips For Perfect Black Bean Noodles

Cooking the perfect Black Bean Noodles can be a delightful experience. With the right tips and techniques, you can achieve restaurant-quality results at home. Below are some useful tips to ensure your Black Bean Noodles turn out just right every time.

Common Mistakes To Avoid

Avoid these common pitfalls to make sure your Black Bean Noodles are delicious:

  • Overcooking the Noodles: Noodles should be cooked al dente. They will cook more in the sauce.
  • Not Rinsing the Noodles: Rinse cooked noodles under cold water. This stops further cooking and removes excess starch.
  • Using Too Much Sauce: The sauce should coat the noodles. Don’t drown them.
  • Skipping the Vegetables: Vegetables add crunch and flavor. Include onions, zucchini, and cabbage.
  • Not Stirring Enough: Stir continuously when cooking the sauce. This prevents burning and ensures even cooking.

Advanced Techniques

Ready to take your Black Bean Noodles to the next level? Try these advanced techniques:

  1. Homemade Black Bean Paste: Make your own paste. This can greatly enhance the flavor. Blend fermented black beans with garlic, ginger, and soy sauce.
  2. Marinate the Meat: Marinate the meat with soy sauce, sugar, and pepper. This adds depth to the dish.
  3. Use High Heat: Cook the sauce on high heat. This creates a richer, more caramelized flavor.
  4. Adding Oyster Sauce: Add a spoon of oyster sauce. This gives a subtle umami boost.
  5. Finishing with Sesame Oil: Drizzle sesame oil at the end. It adds a fragrant finish to the dish.

By following these tips, you can make perfect Black Bean Noodles every time. Whether avoiding common mistakes or using advanced techniques, these suggestions will help you create a delightful and authentic meal.

Variations Of The Recipe

Black Bean Noodles, or Jajangmyeon, is a beloved Korean dish. It features a rich, savory black bean sauce. This versatile recipe has many variations. Here, we explore a few popular options.

Vegetarian Options

Black Bean Noodles can easily be made vegetarian. Replace the meat with tofu or mushrooms. Both options soak up the rich sauce well. For added texture, use a mix of both.

Vegetable broth can replace any meat-based stock. This keeps the flavors deep and satisfying. Add a variety of vegetables like zucchini, carrots, and potatoes. These add color and extra nutrients to your meal.

Regional Twists

Different regions in Korea have their own spins on Black Bean Noodles. In the coastal areas, seafood is a common addition. Shrimp, squid, and mussels add a unique flavor. They pair well with the black bean sauce.

In some parts, the dish is a bit sweeter. This is achieved by adding a bit more sugar to the sauce. A small tweak, but it changes the flavor profile noticeably.

Some regions prefer their noodles with a bit of a kick. They add a touch of gochujang, Korean red chili paste. This gives the dish a spicy edge, perfect for those who like it hot.

Black Bean Noodles Korean Recipe: Deliciously Authentic & Easy

Credit: www.seriouseats.com

Frequently Asked Questions

What Are Black Bean Noodles?

Black bean noodles are a popular Korean dish. They are made with fermented black bean paste. The noodles are typically served with vegetables and sometimes meat.

How To Make Korean Black Bean Noodles?

To make black bean noodles, cook the noodles first. Then, prepare the black bean sauce with vegetables. Mix the sauce with the noodles and serve.

Are Black Bean Noodles Healthy?

Black bean noodles can be healthy. They are rich in protein and fiber. However, the sauce can be high in sodium, so enjoy in moderation.

What Do Black Bean Noodles Taste Like?

Black bean noodles have a unique, savory flavor. The sauce is slightly sweet and salty. The texture is thick and rich.

Conclusion

Enjoy making and eating your black bean noodles. It’s a delicious and simple dish. Impress friends and family with this Korean recipe. Quick to prepare. Packed with flavor. You can easily make it at home. Perfect for busy weeknights. Healthy and satisfying.

Give it a try. You’ll love the taste and ease of this meal. Happy cooking!